Well I've been searching online for some time now  and came across a 600 Gal. DIY instructions (actually a lil less but 600 sounds better ) This is not my actual tank. I just thought i should share cause his instructions are pretty good, however I would use thicker plywood. Let me know what you guys think cuase i am really interested in building this.
Building your own tank
What's the point? Does it pay off? Generally we can say that it doesn't pay off for small tanks, typically under 1000 litres (264G). That's because these are mass produced, sold in a competitive market and you can also buy them used. So the price is generally low, and special offers make it even lower. So here it pays to just buy the tank at the best possible price. However, if you are in a situation where you can get cheap parts, say glass or acrylic, it could pay of to build even these tanks on your own.
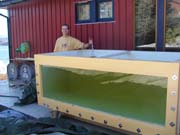
 This is one proud guy with his new tank!
Big tanks
This is a different story. There can be really big money to save here. I paid less for my 2200 litres (581G) tank than I would have to pay for a 900 (238G) litres tank in the shop. Where I live you don't get a quantity discount on litres of water. In fact the cost per litre increases with tank size. This is because big tanks are often custom designs where you hire handcrafters to build, modify or install the tank for you. That just makes the price explode. The market is also totally different. Generally the people who buy large tanks are in a very good situation economically. Price is not a problem. In fact many of them like the fact that it is very expensive, because it makes their systems exclusive. If you build on your own you do get a volume discount. You don't have to hire expensive labour and you can use better and much cheaper materials.
Water is good for the fish
The animals always have a better chance to be happy in a big tank. "Big tank, small fish" has always been my motto. I keep wild caught fish that are not bred or hand picked by professionals. I always look at my tanks to relax, and I just can't relax if the fish are stressed.
Cons
There are some arguments against building large tanks.
People who invest in extremely expensive reef systems argue that the tank itself is just a small part of the cost. That is true, but so is every component in the system. You have to start saving somewhere. These people are rich anyway, so they don't care about DIYing.
Cost of lights and filtration
Then there is the argument that the lighting and filtration requirements are proportional to the water volume. Therefore, when reaching a certain level in size the costs of lighting and filtration become so great that they overshadow the tank cost and make the whole project impossible. This is not true. These costs depend on the type, amount and placement of plants, algae or animals. In other words: Everything, but the water volume. So you can have a huge tank, that looks fantastic, with very little light and filtration. It's really just a matter of taste. For example, if you have a reef tank, there isn't a law that says the whole tank must be filled with light demanding corals. You can place those corals on a shallow shelf just under the light and other thing in the deeper areas with less light. Thus you get lots of space for the animals that need it and a more realistic system too.
Humidity
The humidity in the house is another issue. I recently heard about a man, Mr. 4000, with a 15140 litres (guess!) tank. He had to shut down the whole thing because the moisture was destroying his house. Really scary, but when you think about it, this is just a solvable technical problem. Really big tanks must be sealed off from the house and correct ventilation provided. If you have the skill to build the tank you have the skill to do this too.
The heating/chilling of the water is a question of insulation. Done correctly it won't cost too much in terms of power and it won't affect the temperature in the house.
Fundamentals of construction
A tank has 6 sides, but typically only one or two need to be transparent. The price of glass and acrylic increases rapidly with tank size until it explodes at a certain level where you can't get standard sizes anymore. In some regions, like in my country, the prices of glass and acrylic are so insane that it is best to use as little of them as possible in any case. So there is the argument for getting some cheap material. Besides, glass is a risky and hopeless material in the first place. You definitely don't want to use that in the bottom of an aquarium. Plywood is cheap, lightweight, elastic, more so than glass, and strong enough. The problem of course is that it can't touch water. That's where the epoxy comes in.
Epoxy
Epoxy is an extremely strong plastic. It is a two-components hard plastic, like polyester, but it is generally better. It is stronger and more elastic, but not harder. Epoxy is very popular as a glue, filler and coater for both wood and plastic boats. Unfortunately it's expensive, but can be bought in relatively large quantities at a good quantity discount. The normal types of marine epoxy don't contain solvent and don't shrink during hardening. So they are easier to work with than polyester and are non toxic when hardened. The hardened product is completely water proof, unlike polyester. Most of all, when epoxy is used with wood it is sucked into the wood and bonds with it in a fantastic way so that the wood fibres function as a reinforcement of the plastic. Therefore epoxy is one of the best wood glues out there and has partly replaced metal in wooden boats.
I did a mistake when designing my tank. Originally I intended to go with the expensive West System marine epoxy. But I decided it was too expensive and took the risk with some epoxy primer from Hempel instead. That primer turned out to have solvent in it and was not as cheap as it originally seemed. I couldn't use it for gluing either. There are cheaper marine epoxies out there also that are probably just as good as West System. So lesson learned there. Next time I will use one of these with a solvent free topcoat for colouring and UV protection.
Fibreglass
Some people want to use fibreglass in the epoxy. The idea is that epoxy is not so strong alone, but needs reinforcement. It is true that epoxy alone, and wood, are not nearly as strong as reinforced epoxy. Still, I believe they are more than strong enough.
Update
The epoxy coating is set well into the surface of the plywood giving the epoxy a slight wood fibre reinforcement. Also, epoxy without fibres is used as floor coatings in warehouses etc. It's a strong surface coating. Reinforced epoxy can be made so strong that you can drop a big rock from 2 metres height straight onto the bottom of the tank without making a dent. In fact, Kevlar fibres are for sale in boat shops so with some extra effort I think you can actually make the tank bullet proof! So, if you feel safer with fibreglass and the extra work and money don't frighten you, it certainly doesn't hurt. It will make the whole thing more fool proof. If you make a mistake in another area the fibreglass might save you from having a tank that splits apart. Fibreglass in the epoxy effectively creates a new tank inside the tank. This can be a nice solution to the problem of sealing off the seams between the plywood sheets. Just remember that the most difficult problem with creating a tank, stiffness, is not solved with the fibreglass. That is why it's so hard to create the tank out of pure fibreglass and epoxy composite in the first place. The thin walls bend. You need some sort of thickness to avoid the bending. That's where wood comes in.
Wood
The first thing I thought when I heard about plywood aquariums was: "Wood aquarium no way!" But that was a long time ago. Because when you think about what you need for constructing an aquarium, it becomes obvious that wood is a really great material. You need something that is watertight. Ok, wood is not. Water destroys wood. But water destroys steel too, and even concrete and polyester are not that safe. We need a coating between the wood and the water and we have that in the epoxy.
In addition to water tightness we need stiffness. When creating a stiff structure, that is a structure that doesn't bulge and bend, thickness is essential. This is where wood shines because it is available cheap in great thickness. This is why you don't see many aquariums made fully out of steel. The steel frames are great, but thin steel plates would bend. Therefore one would need thick plates and these would be very heavy and expensive. Also, if the wood plates aren't strong enough they can easily be reinforced by beams, horizontal or vertical.
Beams for strength
Now we are getting into real woodworking here. These are used whenever there is risk of the plywood bending. How to calculate the thickness of the beams, and the number of beams, to achieve the optimal use of wood is well documented in the school of construction engineering. Unfortunately I am not a construction engineer and I don't know much about this type of calculations. On the Norwegian version of this page there is a formula that I used to check that my design was strong enough. Later, however, people in the construction trade have told me that the formula is slightly wrong and not very useful anyway. So it is not included here. I am sorry to say that I can't give you any formulas to work with.
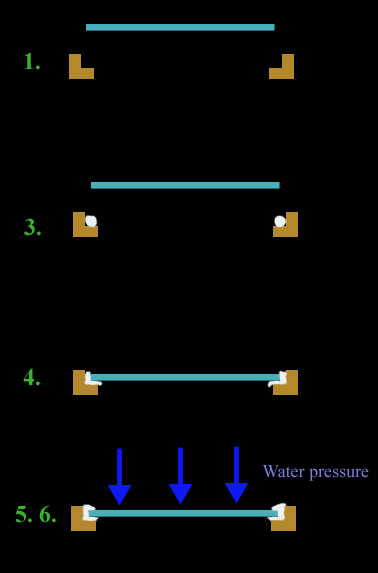
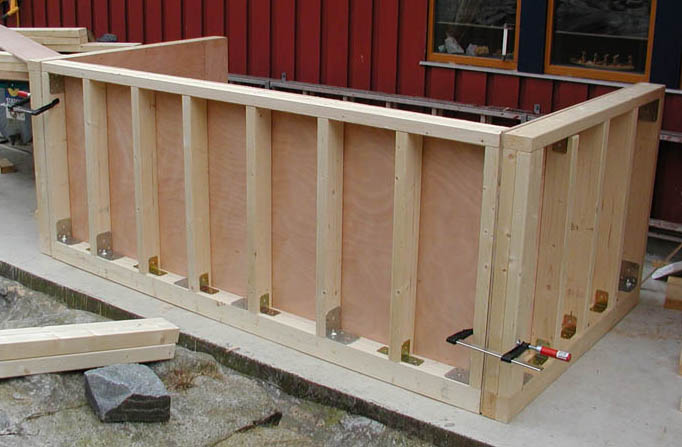 The picture shows the construction principle. This is the back wall and the two sidewalls. The plywood sheets are relatively thin, but the strong beams prevent them from bending as a result of the water pressure.
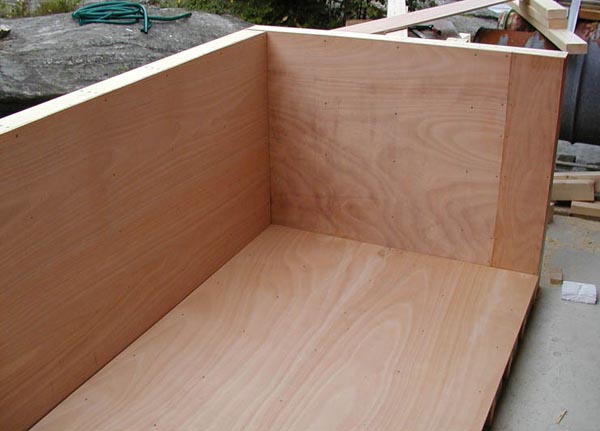 The inside of the same setup. Note that the bottom plate is placed between the wall plates.
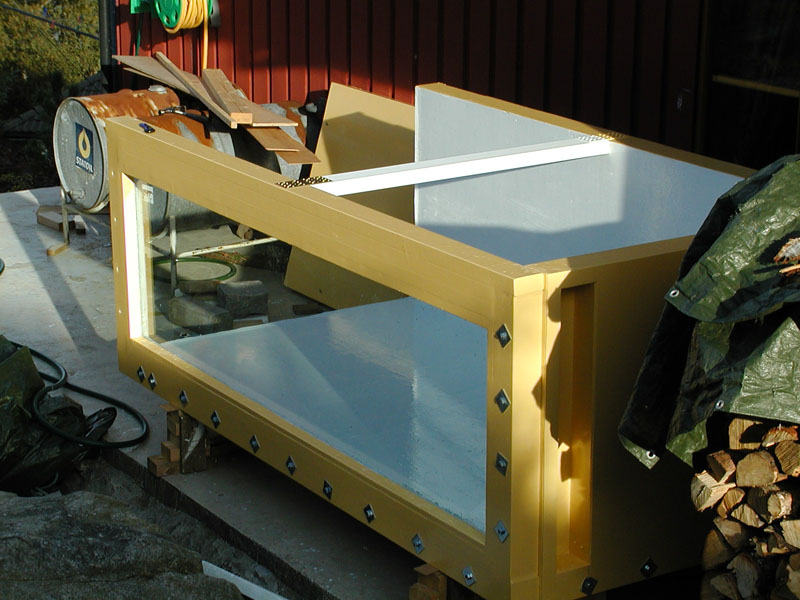
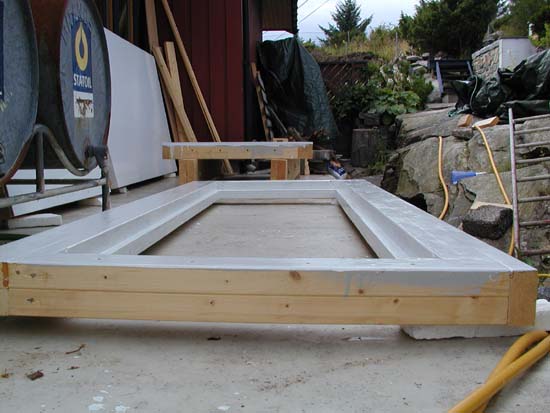
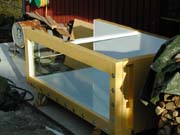
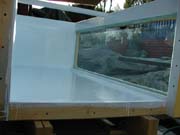
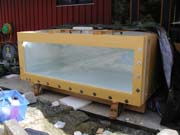
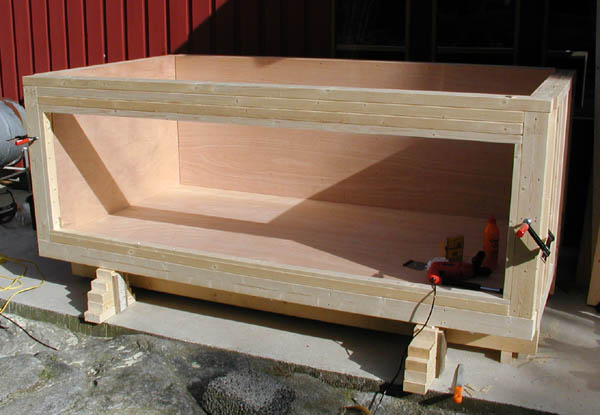 Another test setup. The tank is placed on the stand. The front plate is on. It is essentially just a frame for the glass.
Sealing gaps: Plugging or gluing
There are going to be gaps between the wood plates. The important thing is that we know this and have a plan to deal with them. I must stress this. Simply painting over them is not going to give a high quality result. It is dangerous even if the gaps are very small. As illustrated by the figures there are three ways to seal them:
I chose to go with method number 2 because I had to. It wouldn't be possible to take a glued tank apart for transport and storing. It worked really great. I will not have a problem with sealing like this in future projects.
Silicone
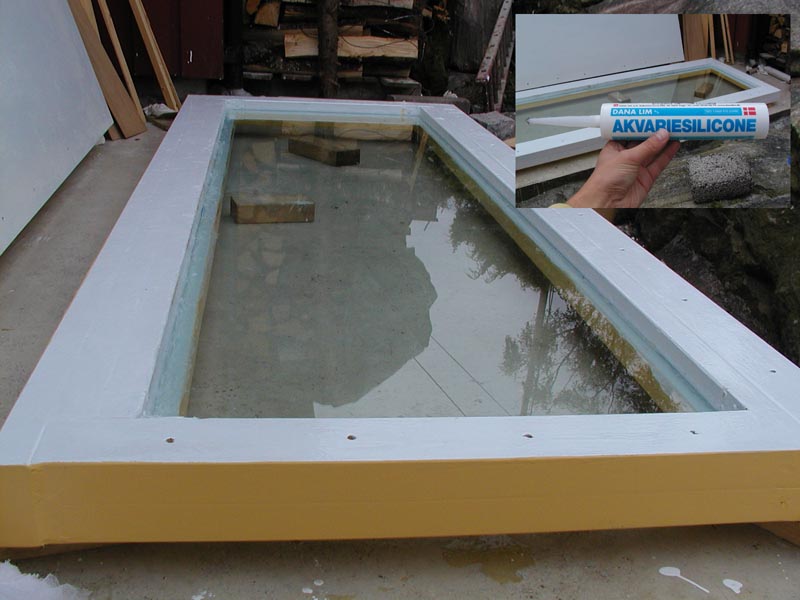
Before I started this project I really didn't know what a great material this is. It is non toxic (aquarium variant), very strong and very elastic. I wondered how far the water pressure would push the silicone into the gaps between the plates. The answer was that it didn't push it at all. The lining was more than strong enough to withstand the pressure.
Glass
There are several types of glass. I won't try to describe the different types here. I used standard clear float glass which is the most common type. Many people ask how thick glass they need. This website has an excellent explanation of this and a spreadsheet that can be downloaded:
http://www.fnzas.org.nz/glassthickness.0.html
My tank
Some facts first:
Inner measurements: 2.44m x 1.22m x 0.73m (0.73 m water height) (96.1in x 48in x 27.7in (27.7in water height)) giving approximately 2200 litres (581G) of water. My original measure of 2300 litres (608G) was a bit wrong.
Outer measurements: 2.67m x 1.45m x 1.0m. (105.1in x 57.1in x 39.4in)
Glass plate: 2.43m x 0.705m x 12mm. (95.7in x 27.8in x 1/2in)
In the design stage I decided that my tank would use relatively thin plywood plates (12mm ½ in) and much reinforcement by beams. This was because wood was cheap and plywood expensive. But now I really think that was a mistake. I should have gone with thicker plates and less beams. That would mean less work and added safety against point damage to the plates and small weaknesses in the plywood. 12mm (1/2 in) is a bit too thin.
Divide and conquer
A nice strategy to use when constructing a tank like this is to build it as a separated set of plates. Each plate consists of a sheet of plywood glued and screwed to a rigid wood frame. After the plates are complete they are bolted together.
Materials
Here are the materials I used. Prices are not included because I live in Norway which is a small high cost country with an oil inflated economy so they wouldn't mean much to people from other countries anyway.
Material Quantity West System Epoxy 1.2kg 1 Polyurethane paint Hempel (litres) 1.5 (0.4G) Threaded steel rod 10mm (3/8in)(metres) 6 (20ft) Fitting screws 500 Square washers 50 Fittings 105x10x90mm (4.13x0.39x3.54in) 40 Wood screws 500 Paint equipment 1 Nuts 90 Glass plate 2430x705x12mm (95.7 x 27.8 x 1/2in) 1 12mm (1/2in) meranti plywood 2440x1220mm (96x48in) 3 4mm (1/6in ?) meranti plywood 2440x1220mm (96x48in) 3 48x198mm (2x8in) wood (meters) 11 (36ft) 48x98mm (2x4in) wood (meters) 70 (230ft) Hempel Light primer (litres) 5.25 (1.39G) Paint rollers 6 Paint thinner 1 Silicone tubes 7 Interior house paint 1 Primer for interior house paint 1 Work drawings
Here are the exact drawings for the 5 plates.
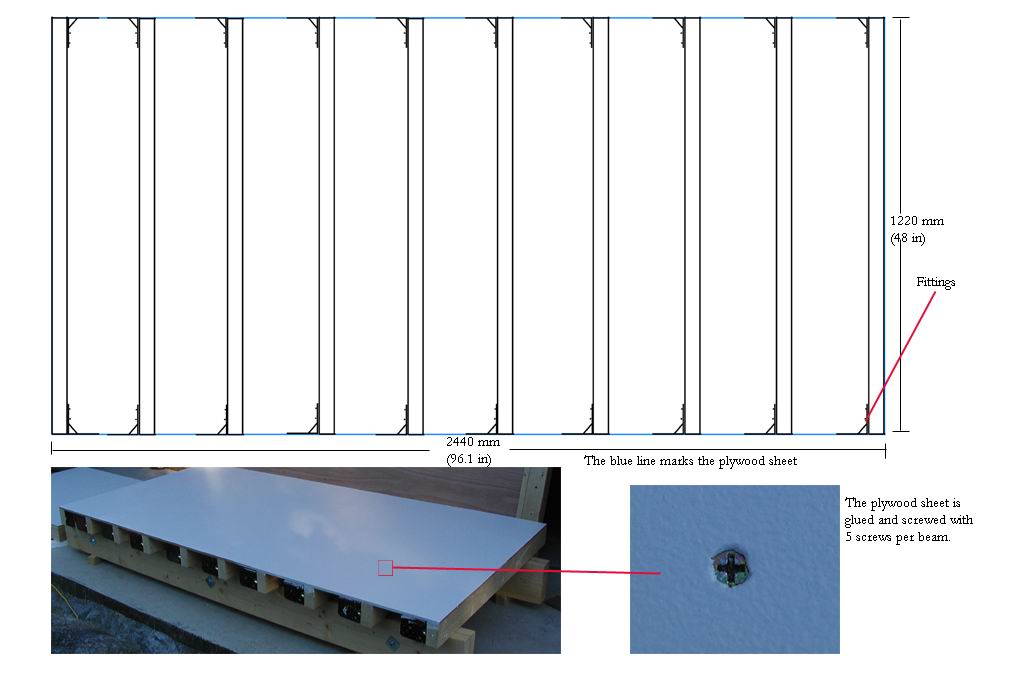
Bottom
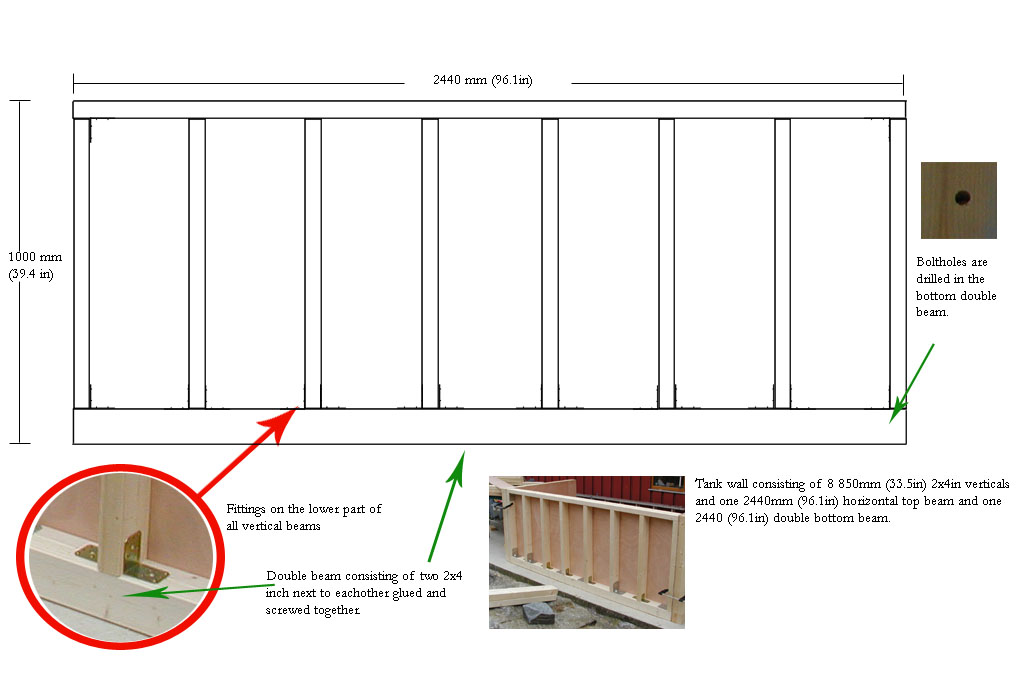
 Back wall
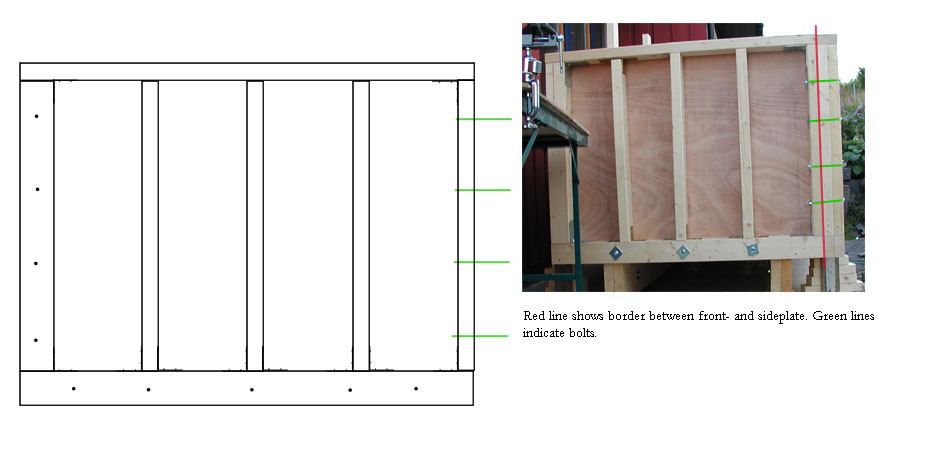
 Side wall
 Front
Front
 The construction process
I made the stand first. It was quite simple, consisting of 2 big beams the length of the tank and 4 pieces of wood to hold them off the ground.
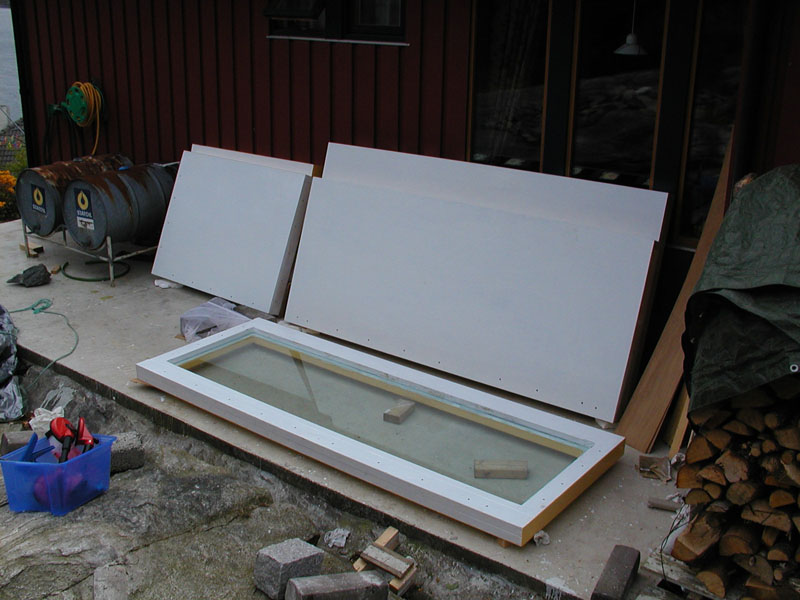
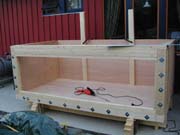
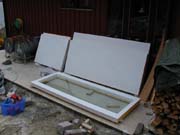
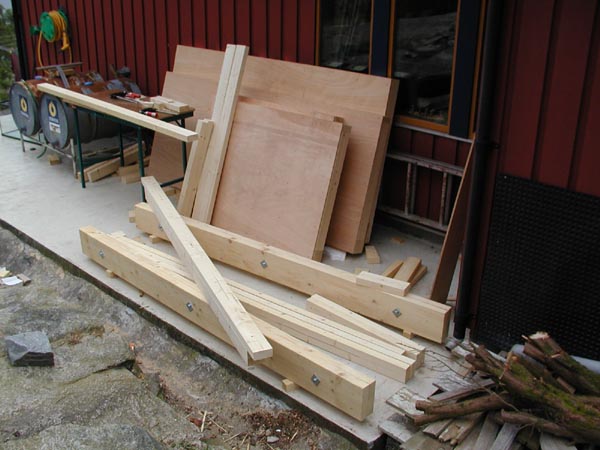 At the front in this picture are the two large beams for the stand and some parts for the front plate. The side wall, back wall and bottom are in the back. This shows how convenient it is to store and transport the tank when it is in disassembled state. Only two people are needed for transportation, though three people is best with the front plate. Only one person is needed to lift the tank onto the stand and asseble it.
Then I started constructing the wall and bottom plates. The plywood sheets were cut to right sizes with a circular saw. The wood for the frames was cut on a mounted circular saw. I used strong wood screws and plenty of steel fittings with the frames. The plywood sheets were screwed and glued to the frames.
The bottom plate did not have a frame, only cross going beams. I regretted this later. It worked, but made it more difficult to handle.
The front plate did not have any plywood. It was only a frame for the glass anyway so I made it completely out of wood.
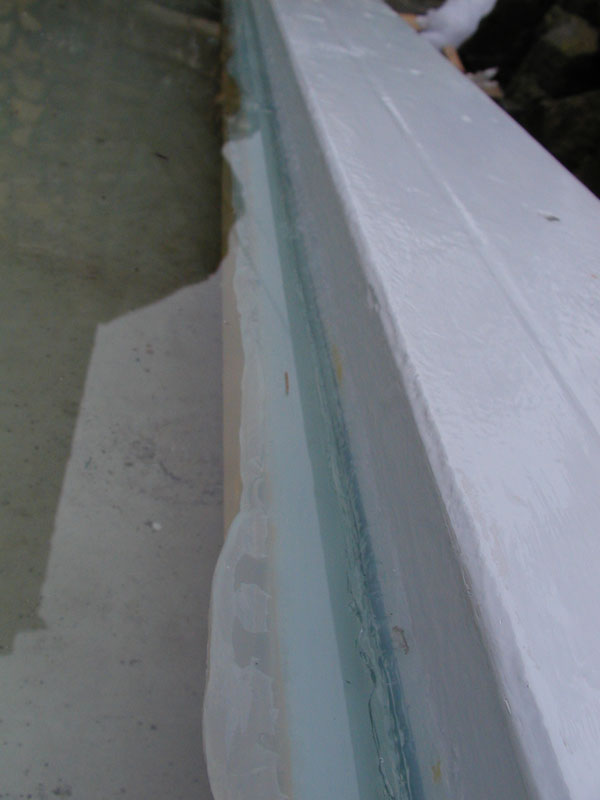
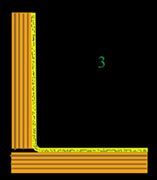
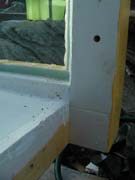
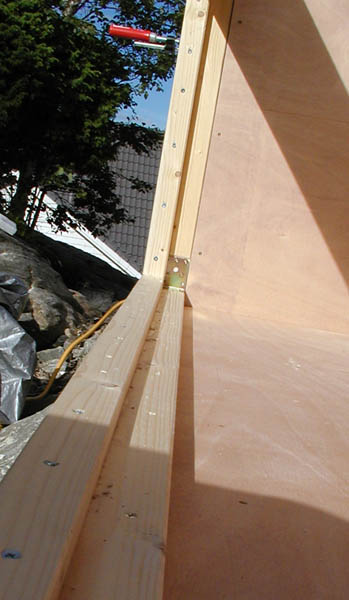 Closeup of the L-frame for the glass. Notice the denity of screws here. The small amount of West System solvent free epoxy that I bought was used for gluing this frame, and heavily surface coat it. Such all wood frames have a tendency to "live". That is bend, stretch, and shrink due to moisture changes in the environment. It is always important to be aware of this and take the necessary steps to avoid leaks as a result.
Then I put the plates together with clamps and drilled holes for the bolts. I didn't buy finished bolts because that was too expensive. Instead they were cut from threaded steel rods. When all the bolts were in place I tested the solidity, and it gave a very good impression. Later I have been told by people in the construction industry that the tank is strong enough to hold poured concrete. Not counting the glass of course.
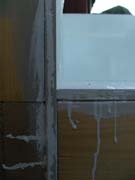
Coating the inside
This was straight forward work. The epoxy primer I used was at least user friendly if nothing else. It had a long pot life and was easily applied with paint rollers and brushes. I regret using a white top coat. White makes a bad background in an aquarium. It must be repainted in a darker colour later. The topcoat was two components polyurethane paint for boats.
Rust free screws
Some people find it important to use expensive rust free screws and bolts in projects like this. I don't think that makes it any safer. You need to apply security measures where you need them. Take an example: What if a ship engineer decided to spend some extra money to make sure the chandelier in the ball room of a cruise ship was saltwater safe. I mean sure you are out on the ocean with saltwater everywhere so it could happen that the chandelier is exposed to it. But when you think about it: By the time the sea reaches the ceiling of the ball room people have gotten other things to do than dance anyway. It's the same with a plywood tank. If the epoxy layer is broken and water starts sifting into the plywood then the show is over. The tank must be emptied and fixed. Things will start swelling and dripping long before the screws break from rust.
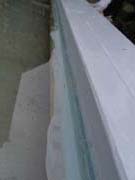
Putting the glass in place
Here is an illustration of a nice way to put a glass plate in and aquarium. Use a frame. The frame has an L-shaped cross section with the back of the L facing out of the aquarium.
Final assembly
After all the 5 plates were done I bolted the whole thing together again. Then the sealing of the gaps went down as described above. I let it cure for a week before filling up. The tank held water on first try!
Outer coating
On the outside of the plywood plates I put thin sheets of plywood. Inside the plates I put glass wool for insulation, since this is going to be a cold water marine aquarium. Then I painted the outside w ith regular interior house paint. The colour was a bit creepy so I will probably change that on final assembly. I will also do some more decoration of the tank itself, so that it becomes a part of the room it's placed in. There will probably not be a hood, but a small separate room for the tank and all that follows it, and the glass will face through a wall.
Click on picture to enlarge.

and came across a 600 Gal. DIY instructions (actually a lil less but 600 sounds better ) This is not my actual tank. I just thought i should share cause his instructions are pretty good, however I would use thicker plywood. Let me know what you guys think cuase i am really interested in building this.Building your own tank
What's the point? Does it pay off? Generally we can say that it doesn't pay off for small tanks, typically under 1000 litres (264G). That's because these are mass produced, sold in a competitive market and you can also buy them used. So the price is generally low, and special offers make it even lower. So here it pays to just buy the tank at the best possible price. However, if you are in a situation where you can get cheap parts, say glass or acrylic, it could pay of to build even these tanks on your own.
Big tanks
This is a different story. There can be really big money to save here. I paid less for my 2200 litres (581G) tank than I would have to pay for a 900 (238G) litres tank in the shop. Where I live you don't get a quantity discount on litres of water. In fact the cost per litre increases with tank size. This is because big tanks are often custom designs where you hire handcrafters to build, modify or install the tank for you. That just makes the price explode. The market is also totally different. Generally the people who buy large tanks are in a very good situation economically. Price is not a problem. In fact many of them like the fact that it is very expensive, because it makes their systems exclusive. If you build on your own you do get a volume discount. You don't have to hire expensive labour and you can use better and much cheaper materials.
Water is good for the fish
The animals always have a better chance to be happy in a big tank. "Big tank, small fish" has always been my motto. I keep wild caught fish that are not bred or hand picked by professionals. I always look at my tanks to relax, and I just can't relax if the fish are stressed.
Cons
There are some arguments against building large tanks.
People who invest in extremely expensive reef systems argue that the tank itself is just a small part of the cost. That is true, but so is every component in the system. You have to start saving somewhere. These people are rich anyway, so they don't care about DIYing.
Cost of lights and filtration
Then there is the argument that the lighting and filtration requirements are proportional to the water volume. Therefore, when reaching a certain level in size the costs of lighting and filtration become so great that they overshadow the tank cost and make the whole project impossible. This is not true. These costs depend on the type, amount and placement of plants, algae or animals. In other words: Everything, but the water volume. So you can have a huge tank, that looks fantastic, with very little light and filtration. It's really just a matter of taste. For example, if you have a reef tank, there isn't a law that says the whole tank must be filled with light demanding corals. You can place those corals on a shallow shelf just under the light and other thing in the deeper areas with less light. Thus you get lots of space for the animals that need it and a more realistic system too.
Humidity
The humidity in the house is another issue. I recently heard about a man, Mr. 4000, with a 15140 litres (guess!) tank. He had to shut down the whole thing because the moisture was destroying his house. Really scary, but when you think about it, this is just a solvable technical problem. Really big tanks must be sealed off from the house and correct ventilation provided. If you have the skill to build the tank you have the skill to do this too.
The heating/chilling of the water is a question of insulation. Done correctly it won't cost too much in terms of power and it won't affect the temperature in the house.
Fundamentals of construction
A tank has 6 sides, but typically only one or two need to be transparent. The price of glass and acrylic increases rapidly with tank size until it explodes at a certain level where you can't get standard sizes anymore. In some regions, like in my country, the prices of glass and acrylic are so insane that it is best to use as little of them as possible in any case. So there is the argument for getting some cheap material. Besides, glass is a risky and hopeless material in the first place. You definitely don't want to use that in the bottom of an aquarium. Plywood is cheap, lightweight, elastic, more so than glass, and strong enough. The problem of course is that it can't touch water. That's where the epoxy comes in.
Epoxy
Epoxy is an extremely strong plastic. It is a two-components hard plastic, like polyester, but it is generally better. It is stronger and more elastic, but not harder. Epoxy is very popular as a glue, filler and coater for both wood and plastic boats. Unfortunately it's expensive, but can be bought in relatively large quantities at a good quantity discount. The normal types of marine epoxy don't contain solvent and don't shrink during hardening. So they are easier to work with than polyester and are non toxic when hardened. The hardened product is completely water proof, unlike polyester. Most of all, when epoxy is used with wood it is sucked into the wood and bonds with it in a fantastic way so that the wood fibres function as a reinforcement of the plastic. Therefore epoxy is one of the best wood glues out there and has partly replaced metal in wooden boats.
I did a mistake when designing my tank. Originally I intended to go with the expensive West System marine epoxy. But I decided it was too expensive and took the risk with some epoxy primer from Hempel instead. That primer turned out to have solvent in it and was not as cheap as it originally seemed. I couldn't use it for gluing either. There are cheaper marine epoxies out there also that are probably just as good as West System. So lesson learned there. Next time I will use one of these with a solvent free topcoat for colouring and UV protection.
Fibreglass
Some people want to use fibreglass in the epoxy. The idea is that epoxy is not so strong alone, but needs reinforcement. It is true that epoxy alone, and wood, are not nearly as strong as reinforced epoxy. Still, I believe they are more than strong enough.
Update
I was probably wrong here! I recommend using fiberglass now. See this acticle
The epoxy coating is set well into the surface of the plywood giving the epoxy a slight wood fibre reinforcement. Also, epoxy without fibres is used as floor coatings in warehouses etc. It's a strong surface coating. Reinforced epoxy can be made so strong that you can drop a big rock from 2 metres height straight onto the bottom of the tank without making a dent. In fact, Kevlar fibres are for sale in boat shops so with some extra effort I think you can actually make the tank bullet proof! So, if you feel safer with fibreglass and the extra work and money don't frighten you, it certainly doesn't hurt. It will make the whole thing more fool proof. If you make a mistake in another area the fibreglass might save you from having a tank that splits apart. Fibreglass in the epoxy effectively creates a new tank inside the tank. This can be a nice solution to the problem of sealing off the seams between the plywood sheets. Just remember that the most difficult problem with creating a tank, stiffness, is not solved with the fibreglass. That is why it's so hard to create the tank out of pure fibreglass and epoxy composite in the first place. The thin walls bend. You need some sort of thickness to avoid the bending. That's where wood comes in.
Wood
The first thing I thought when I heard about plywood aquariums was: "Wood aquarium no way!" But that was a long time ago. Because when you think about what you need for constructing an aquarium, it becomes obvious that wood is a really great material. You need something that is watertight. Ok, wood is not. Water destroys wood. But water destroys steel too, and even concrete and polyester are not that safe. We need a coating between the wood and the water and we have that in the epoxy.
In addition to water tightness we need stiffness. When creating a stiff structure, that is a structure that doesn't bulge and bend, thickness is essential. This is where wood shines because it is available cheap in great thickness. This is why you don't see many aquariums made fully out of steel. The steel frames are great, but thin steel plates would bend. Therefore one would need thick plates and these would be very heavy and expensive. Also, if the wood plates aren't strong enough they can easily be reinforced by beams, horizontal or vertical.
Beams for strength
Now we are getting into real woodworking here. These are used whenever there is risk of the plywood bending. How to calculate the thickness of the beams, and the number of beams, to achieve the optimal use of wood is well documented in the school of construction engineering. Unfortunately I am not a construction engineer and I don't know much about this type of calculations. On the Norwegian version of this page there is a formula that I used to check that my design was strong enough. Later, however, people in the construction trade have told me that the formula is slightly wrong and not very useful anyway. So it is not included here. I am sorry to say that I can't give you any formulas to work with.
Sealing gaps: Plugging or gluing
There are going to be gaps between the wood plates. The important thing is that we know this and have a plan to deal with them. I must stress this. Simply painting over them is not going to give a high quality result. It is dangerous even if the gaps are very small. As illustrated by the figures there are three ways to seal them:
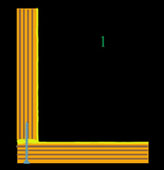
- If the seams are going to be painted over they must first be glued and completely filled with a material that is harder or equally hard to the paint. Glue the plates together with very strong glue that can fill gaps. The principle is that the glue bonds to the wood and fills the small gaps in the seam completely. Epoxy is ideal for this. Screws should also be used to strengthen the seam. Notice that it is very important that the seam is made extremely strong. Because the glue is normally hard and if the wood swells and shrinks because of moisture the glue could loosen. Thus the importance of strong glue and reinforcement by screws.
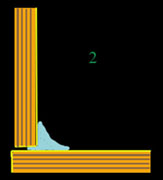
- Plug the gap. This is done with a strong elastic sealant like a high quality aquarium silicone. The plug is applied after the plates are completely surface treated. The silicone is laid out as a "sausage" like string on the inside of the tank and gently squeezed into the gap. The silicone becomes very strong and elastic when hardened. Water pressure barely affects it, but to the degree it does, just presses it better into the gap. The silicone allows for relatively large gaps between plates. Plates moving, shrinking and swelling is not a problem. But the silicone seam must not be viewed as a support of the structure. It is only there to seal, not to hold.
- Create a "tank inside the tank". As I mentioned in the fibreglass section. You can cover the whole inside of the tank with epoxy/fibreglass composite.
I chose to go with method number 2 because I had to. It wouldn't be possible to take a glued tank apart for transport and storing. It worked really great. I will not have a problem with sealing like this in future projects.
Silicone
Before I started this project I really didn't know what a great material this is. It is non toxic (aquarium variant), very strong and very elastic. I wondered how far the water pressure would push the silicone into the gaps between the plates. The answer was that it didn't push it at all. The lining was more than strong enough to withstand the pressure.
Glass
There are several types of glass. I won't try to describe the different types here. I used standard clear float glass which is the most common type. Many people ask how thick glass they need. This website has an excellent explanation of this and a spreadsheet that can be downloaded:
http://www.fnzas.org.nz/glassthickness.0.html
My tank
Some facts first:
Inner measurements: 2.44m x 1.22m x 0.73m (0.73 m water height) (96.1in x 48in x 27.7in (27.7in water height)) giving approximately 2200 litres (581G) of water. My original measure of 2300 litres (608G) was a bit wrong.
Outer measurements: 2.67m x 1.45m x 1.0m. (105.1in x 57.1in x 39.4in)
Glass plate: 2.43m x 0.705m x 12mm. (95.7in x 27.8in x 1/2in)
In the design stage I decided that my tank would use relatively thin plywood plates (12mm ½ in) and much reinforcement by beams. This was because wood was cheap and plywood expensive. But now I really think that was a mistake. I should have gone with thicker plates and less beams. That would mean less work and added safety against point damage to the plates and small weaknesses in the plywood. 12mm (1/2 in) is a bit too thin.
Divide and conquer
A nice strategy to use when constructing a tank like this is to build it as a separated set of plates. Each plate consists of a sheet of plywood glued and screwed to a rigid wood frame. After the plates are complete they are bolted together.
Materials
Here are the materials I used. Prices are not included because I live in Norway which is a small high cost country with an oil inflated economy so they wouldn't mean much to people from other countries anyway.
Material Quantity West System Epoxy 1.2kg 1 Polyurethane paint Hempel (litres) 1.5 (0.4G) Threaded steel rod 10mm (3/8in)(metres) 6 (20ft) Fitting screws 500 Square washers 50 Fittings 105x10x90mm (4.13x0.39x3.54in) 40 Wood screws 500 Paint equipment 1 Nuts 90 Glass plate 2430x705x12mm (95.7 x 27.8 x 1/2in) 1 12mm (1/2in) meranti plywood 2440x1220mm (96x48in) 3 4mm (1/6in ?) meranti plywood 2440x1220mm (96x48in) 3 48x198mm (2x8in) wood (meters) 11 (36ft) 48x98mm (2x4in) wood (meters) 70 (230ft) Hempel Light primer (litres) 5.25 (1.39G) Paint rollers 6 Paint thinner 1 Silicone tubes 7 Interior house paint 1 Primer for interior house paint 1 Work drawings
Here are the exact drawings for the 5 plates.
Bottom
I made the stand first. It was quite simple, consisting of 2 big beams the length of the tank and 4 pieces of wood to hold them off the ground.
Then I started constructing the wall and bottom plates. The plywood sheets were cut to right sizes with a circular saw. The wood for the frames was cut on a mounted circular saw. I used strong wood screws and plenty of steel fittings with the frames. The plywood sheets were screwed and glued to the frames.
The bottom plate did not have a frame, only cross going beams. I regretted this later. It worked, but made it more difficult to handle.
The front plate did not have any plywood. It was only a frame for the glass anyway so I made it completely out of wood.
Then I put the plates together with clamps and drilled holes for the bolts. I didn't buy finished bolts because that was too expensive. Instead they were cut from threaded steel rods. When all the bolts were in place I tested the solidity, and it gave a very good impression. Later I have been told by people in the construction industry that the tank is strong enough to hold poured concrete. Not counting the glass of course.
Coating the inside
This was straight forward work. The epoxy primer I used was at least user friendly if nothing else. It had a long pot life and was easily applied with paint rollers and brushes. I regret using a white top coat. White makes a bad background in an aquarium. It must be repainted in a darker colour later. The topcoat was two components polyurethane paint for boats.
Rust free screws
Some people find it important to use expensive rust free screws and bolts in projects like this. I don't think that makes it any safer. You need to apply security measures where you need them. Take an example: What if a ship engineer decided to spend some extra money to make sure the chandelier in the ball room of a cruise ship was saltwater safe. I mean sure you are out on the ocean with saltwater everywhere so it could happen that the chandelier is exposed to it. But when you think about it: By the time the sea reaches the ceiling of the ball room people have gotten other things to do than dance anyway. It's the same with a plywood tank. If the epoxy layer is broken and water starts sifting into the plywood then the show is over. The tank must be emptied and fixed. Things will start swelling and dripping long before the screws break from rust.
Putting the glass in place
Here is an illustration of a nice way to put a glass plate in and aquarium. Use a frame. The frame has an L-shaped cross section with the back of the L facing out of the aquarium.
- Lay down the frame with the outside down. It can be done with the frame standing too, but that is a little more difficult.
- Sand the epoxy and clean everything well with alcohol.
- Apply a thick long "sausage" of silicone around the frame. Don't be cheap on the silicone.
- Put the glass plate on top of the sausage. The silicone is stiff enough to hold it up. Push down gently until all air pockets are gone and the seam is complete. When the tank is set up, the silicone doesn't glue the plate in place, the water pressure holds it.
- For safety, apply a string of silicone on the inside too.
- Clean away excess silicone.
Final assembly
After all the 5 plates were done I bolted the whole thing together again. Then the sealing of the gaps went down as described above. I let it cure for a week before filling up. The tank held water on first try!
Outer coating
On the outside of the plywood plates I put thin sheets of plywood. Inside the plates I put glass wool for insulation, since this is going to be a cold water marine aquarium. Then I painted the outside w ith regular interior house paint. The colour was a bit creepy so I will probably change that on final assembly. I will also do some more decoration of the tank itself, so that it becomes a part of the room it's placed in. There will probably not be a hood, but a small separate room for the tank and all that follows it, and the glass will face through a wall.
Click on picture to enlarge.