
I originally had this posted over on AC, but I figured I'd post it up here now that I have the whole thing sorted out. I started conceptualizing this project in Jan 2007, and finally got it (mostly) finished in about March 2008 or so. There are still some things I want to improve or change, but the majority of it is finished. Enjoy!
Ok, so, in conjuntion with my giant sump thread, this is the plan for the basement. I have a layout of how I think the tanks best fit on the wall. There will be two 150s, a 55, a 300gal turtle pool, a 75, a 10 and a 30. The two upper tiers will all be on the sump, the lower level will all be independently filtered. Anyway, here's the plan so far...

The wall is 14' wide and a little over 7' tall. I know the upper 150 looks like its butted up against the ceiling, but I'll have about 8" over it to reach in. The main horizontal supports will be doubled up 2x6, with vertical 4x4s. The face is going to be a little strange, but all tanks will be supported all the way around, and will have legs underthe back corners, with intermediate legs where appropriate.
Oh yeah, forgot to explain..the faces of the tanks will all be flush on the wall, and drywalled over all the stands and supports so its just a wall with a bunch of tanks in it. Its going to be a false wall 4' out from the real wall, with all tank access done from behind.
Ok, updates. First off, I talked to my cousin, who is an archtect, who made me up some fancy schmancy drawings. He's convinced the weight isn't going to be a problem, which is comforting. The layout still might change a bit, but the design will remain the same.

Obviously the front-to-back will need to be adjusted accordingly but you get the idea.

Next - sub-project part 1 - moving the door for access from behind. The existing doorway is on the right side of the pic. It needs to be all the way back in the corner. As a side note - that corner was until recently teh residence of my workbench, the contents of which are now scattered in piles all over the basement floor, which is making this project even more exciting.

From the tank side. The edge of the doorway right now is about where thefish wall is going to meet the room wall.

Oh you want to put a door here? Of course there's a wire in the way. I ended up putting in a pass-through box and deleting the outlet, as it sits pretty much right where the walls are going to join. As another adventure, I found I have mice in my walls. Fun fun.

Sheetrock down and door mounted. Wow am I glad I just hung the sheetrock and skipped the tape/mud...that would have made substantially more mess. More to come...

Sub project part 2...cleaning up the old 150, so i can put the fish from the other 150 into it, and move it out of the way. I need to move it before I can move the turtle tank over there anyway.
I've had this tank for about a year. I got it for free with a couple crappy hoods that don't fit. The glass was a mess and there was more broken plastic in the frames than good.
I had thrown together some wood frames, I kept a hatching turtle in it over the winter. It only had about 6" of water in it so I wasn't too concerned. This is what I started with.

First, I scraped out allll the old silicone, cleaned the inside really well and resealed the entire tank.


Next step was to come up with some sort of temporary bracing. Its only going to have water in it like this for a few months. Before it moves to its final home, I'm going to weld up some angle aluminum full frames, top and bottom, with center braces. For now, its cable and turnbuckles to hold pressure on the corners, and a riveted aluminum brace for a center support.


I test filled it on Sunday and its leak free so far. I'm planning on switching the fish over this weekend, moving the other 150 and getting the turtle tank in the corner where it belongs.
Just so you can see where its going, and the mess I'll be cleaning up...I have too many tanks. Blasphemy!! The plywood tank is going on the floor, where the deck and kiddie pool currently are.

Well the first big part is done. I've relocated the fish in the 150 to the other 150, and gotten the turtle tank in place. Next is wiring and painting.


You can see the build thread for the plywood tank here.
Well I finally got some time and money to devote to this today. Went out and got all the stuff for the electrical and room lighting.
Wall painted, lights mounted on ceiling

Lights - 2x dual 8' T12 strip lights

Running the wiring for the switch

Wiring for the 3 GFCI outlets on the ceiling

Outlets and lights done

Switch done

Lights off

Lights on

And, gotta give credit where credit is due - daddy's little helper

The plan going forward was originally to run the plumbing over before building the stands. However, i think I'm going to go ahead and start framing the stands out first because thats going to more or less determine how I route the plumbing, and I don't want to run myself into a corner by getting too far ahead. And that way, I can start moving tanks and leave them on their current filtration while building the sump system and dealing with the plumbing.
Alright, spent most of today/tonight getting the framing done, after a late-night trip to Home Depot last night for the lumber. The only thing I need to add is one more vertical piece that goes from the top level up to the ceiling, just for lateral support. I just need to find a stud to latch onto up there and I haven't done that yet. On to the pics.
First, I finally banged out some drawings in AutoCAD to get a materials list, and finalize the spacing. Its going to be tight, but hey I'm young, right? They're a little blurry...


My work area and the lumber....that chopsaw ROCKS.

I built it in modules that could basically be freestanding with a little more lateral support.
First part

Second
Third

Fourth

And a behind shot, to get an idea of how much room I'll have behind. Not much, basically enough to walk.

The stands are wedged in between the two walls pretty darn tight, and I used liquid nails between the frames and the walls where they met. By building it this way, all weight is directly channeled to the ground through the supports, none of them will be supported by shear strength of screws/bolts. I used Deckmate deck screws to hold everything together. I still want to paint all the frames with the same white mildew-resistant paint I used on the walls, and then I can think about starting to transfer tanks around.
Well I finihsed painting today and started putting the tanks in place. The empty ones, anyway. I have to get a few friends together tomorrow to help me move one of the 150s as well, that thing is heavy.
View behind
Everything painted

55 at top left, 75 at middle right

For the brackish tank, instead of using the pvc and plexi ramp I made, I'm siliconing a few chunks of driftwood into the corner for the mudskipper. I think it will look a lot better this way.
Well, got the first tank transferred over. The 55 is now up and running on the top shelf. IT was a royal pain, took me about 4 hours to get it done. Mostly because it had a ton of plants in it, and I was tired of everything constantly being overrun with guppy grass and duckweed, and some random hair algae clumps. So, I systematically pulled every plant out and carefully removed all the duckweed, pieces of guppy grass and algae that I could. I think I successfully got rid of all the duckweed and I'm hoping all the guppy grass as well. The hair algae might come back, there was some on the diftwood and I didn't feel like boiling or bleaching it cause I wanted to get done.
I also took out a large number of plants, since that tank was holding the plants for both that and the 150 asian tank, which hasn't been set up yet. The asian plants are in a bucket right now, I might have to get a 10gal or something just as a holding area until the other tank gets set up.
Just for reference, this is what the 55 looked like before the move...and this pic was taken before the guppy grass was added, so it got way more overgrown than this

Full tank shot now:

Full wall shot so far

The one angel I have right now

School of black neons

It feels good to have at least one tank running. Its still run on the canister its been using, eventually when I get the sump set up this will be one of the three tanks that are run on that system. The brackish tank is next in line to be transferred from the 40B into the 75.
Got another tank moved yesterday. The 40 gal brackish is now a 75gal, and I'm liking it a lot better. I got rid of the RFUG, and for substrate I'm using mostly sand with some CC mixed in. The tank is looking a little barren right now, but I'm going for a tidal/estuarine look. I am going to try and some some round fenceposts or something to simulate some pilings or a dock end to provide some more cover and structure in the tank, I think it will end up pretty nice.
The Emperor 400 is ince but its such a pain to get primed, since the water level is so low. Eventually I think I'll end up switching to a canister like an XP3, and move the emperor onto my 30gal. Anyway, picture updates.
Just for reference, this is what the tank looked like before, when it was the 40gal.


Currently - full tank/wall shots


The brackish tank and the turtle tank below it. Finally got the empty 150 up above that. Also, my 10gal sw QT tank on the end there.

And finally a few full wall shots


So, the next step is going to be moving the fish in the 150 in the middle of the room, into the 150 in the wall. Then, the empty one can move into its new home, the last remaining space. You can sort of see the side of the 40gal tank that will serve as the sump, right to the right of the 30gal. I'm hoping its big enough. I think I'll be able to keep the water level relatively low with an auto topoff system so I don't have to worry about the pumps running dry. I have all the plumbing for the system, so thats the next thing to tackle.
Alright, new pics. Got the fish moved into the second 150. I also changed the gravel over, I like the way it looks a lot better now. The pics are pretty couldy, but the tank is pretty much cleared up at this point. I also moved the gold nugget pleco from the 150 into the 55 hoping that a) it will be more comfortable, and b) I'll see it more often.
This is the drain setup I put together to catch all the overflow from the 3 tanks, which then drains into the w/d.

And installed:


150 filled


I did run into one problem - There's not enough room over the tank to fit the HOB overflow box on. I was unwilling to accept this and cracked it trying to squeeze it on...oops. Luckily I held onto the crappy PVC overflows I built, so I can at least keep the tank running. I ordered a new one today, as well as one for the 55 so I can get that running on the sump soon as well. I'm going to have to cut a hole in the ceiling sheetrock behind the tank to get it on there...ah well. So yeah, space is tight.
Ok, a few updated pics. Not too much progress, just general organization. Got the last tank in the wall just to get it out of the middle of the room.


Alright, nothing major going on, but got some pictures of the wood frames I built for the 150gal. Once I get these on the tank I can start hanging sheetrock.
I kind of screwed up so the top and bottom don't match exactly, but you won't be able to see them anyway so I'm not worried about it. They are 1x2" poplar, with recessed flat corner brackets in them. The top and bottom both have two cross braces, the top ones are doweled in and the bottom ones are held with more flat brackets.
Inside of the bottom frame - corner brace recessed.

Both frames almost done, the bottom needs the cross braces

Top frame - flat corber bracket and doweled center brace

Top done

Building the braces


Both frames with a crappy coat of paint to protect from splashes

So, I'm going to line the top and bottom with a thick bead of silicone and pop them onto the tank, then I can go get sheetrock and start the final step.
In other news, I really liked that method of bracing. I have a 55gal with broken frames as well, so I'm going to try it again with 1x2" pine and see how it goes.
ok ok I finally got the pictures off my camera...ended up bringing my laptop home from work to do it. So without further ado...
Frames attached to the 150, in place

First piece of sheetrock up

Walls have been painted too. No more purple!

I built Hofer gurgle-busters for my overflows - helped the noise level dramatically.

All the sheetrock hung

All the windows are covered with plastic to keep dust out from behind the wall. The turtle tank is taped off from behind because the glass is inset further than the rest. Gives a nice teaser as to what it will look like.

right-hand side of the room

this is me thinking to myself "yeah screw this..." I had half a bucket of drywall compound in my basement for a few years, and it had separated pretty badly. I was trying to mix it up to use it, but it ended up getting trashed and I just bought some new stuff.
Liz painting the walls

First coat of mud

wood frames installed

the frames for the turtle tank are a bit deeper

first coat of mud sanded

On the upside, everyone has decided I suck at tape and seam so badly they won't let me do it any more, so Liz's dad has been helping out. Fine with me, he'll do a better job and, hey, I don't have to do it.
The mud should be getting finished up tomorrow, final skimcoat/sanding, so I'm hoping by Sunday I can look at getting it painted. Then, the only thing left will be to build and install the false wall to fill that doorway on the left, and repaint the ceiling and that room will be pretty much done. As fas as the fish stuff goes, next big thing will be running water lines behind the wall to hook up an auto-drip system. Goodbye, syphoning.
Alright, FINALLY I got to a point where I was willing to take pictures. There's a few more things I need to touch up here and there, but hte majority is done. Iis kind of like aquascaping a tank...is it ever really finished? Nah... Anyway, onto the moment you've all been waiting for.
with the flash

without the flash


Each tank (these are a little blurry...too lazy to get the tripod.


Behind the scenes...


So, there she is. Aesthetically its pretty much done other than filling in and painting some nail holes in the molding. Next big part will be running a water line back there for the constant drip/water change system. That will have to wait for some fundage, however.
So here are a few pics of the final tank, we have a few gouramis,khuili loaches and some glass cats in there so far.


Ok, so, in conjuntion with my giant sump thread, this is the plan for the basement. I have a layout of how I think the tanks best fit on the wall. There will be two 150s, a 55, a 300gal turtle pool, a 75, a 10 and a 30. The two upper tiers will all be on the sump, the lower level will all be independently filtered. Anyway, here's the plan so far...
The wall is 14' wide and a little over 7' tall. I know the upper 150 looks like its butted up against the ceiling, but I'll have about 8" over it to reach in. The main horizontal supports will be doubled up 2x6, with vertical 4x4s. The face is going to be a little strange, but all tanks will be supported all the way around, and will have legs underthe back corners, with intermediate legs where appropriate.
Oh yeah, forgot to explain..the faces of the tanks will all be flush on the wall, and drywalled over all the stands and supports so its just a wall with a bunch of tanks in it. Its going to be a false wall 4' out from the real wall, with all tank access done from behind.
Ok, updates. First off, I talked to my cousin, who is an archtect, who made me up some fancy schmancy drawings. He's convinced the weight isn't going to be a problem, which is comforting. The layout still might change a bit, but the design will remain the same.
Obviously the front-to-back will need to be adjusted accordingly but you get the idea.
Next - sub-project part 1 - moving the door for access from behind. The existing doorway is on the right side of the pic. It needs to be all the way back in the corner. As a side note - that corner was until recently teh residence of my workbench, the contents of which are now scattered in piles all over the basement floor, which is making this project even more exciting.
From the tank side. The edge of the doorway right now is about where thefish wall is going to meet the room wall.
Oh you want to put a door here? Of course there's a wire in the way. I ended up putting in a pass-through box and deleting the outlet, as it sits pretty much right where the walls are going to join. As another adventure, I found I have mice in my walls. Fun fun.
Sheetrock down and door mounted. Wow am I glad I just hung the sheetrock and skipped the tape/mud...that would have made substantially more mess. More to come...
Sub project part 2...cleaning up the old 150, so i can put the fish from the other 150 into it, and move it out of the way. I need to move it before I can move the turtle tank over there anyway.
I've had this tank for about a year. I got it for free with a couple crappy hoods that don't fit. The glass was a mess and there was more broken plastic in the frames than good.
I had thrown together some wood frames, I kept a hatching turtle in it over the winter. It only had about 6" of water in it so I wasn't too concerned. This is what I started with.
First, I scraped out allll the old silicone, cleaned the inside really well and resealed the entire tank.
Next step was to come up with some sort of temporary bracing. Its only going to have water in it like this for a few months. Before it moves to its final home, I'm going to weld up some angle aluminum full frames, top and bottom, with center braces. For now, its cable and turnbuckles to hold pressure on the corners, and a riveted aluminum brace for a center support.
I test filled it on Sunday and its leak free so far. I'm planning on switching the fish over this weekend, moving the other 150 and getting the turtle tank in the corner where it belongs.
Just so you can see where its going, and the mess I'll be cleaning up...I have too many tanks. Blasphemy!! The plywood tank is going on the floor, where the deck and kiddie pool currently are.
Well the first big part is done. I've relocated the fish in the 150 to the other 150, and gotten the turtle tank in place. Next is wiring and painting.
You can see the build thread for the plywood tank here.
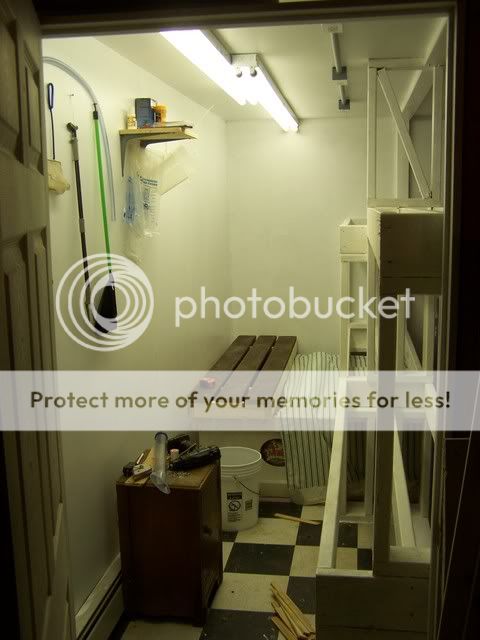
Well I finally got some time and money to devote to this today. Went out and got all the stuff for the electrical and room lighting.
Wall painted, lights mounted on ceiling
Lights - 2x dual 8' T12 strip lights
Running the wiring for the switch
Wiring for the 3 GFCI outlets on the ceiling
Outlets and lights done
Switch done
Lights off
Lights on
And, gotta give credit where credit is due - daddy's little helper
The plan going forward was originally to run the plumbing over before building the stands. However, i think I'm going to go ahead and start framing the stands out first because thats going to more or less determine how I route the plumbing, and I don't want to run myself into a corner by getting too far ahead. And that way, I can start moving tanks and leave them on their current filtration while building the sump system and dealing with the plumbing.
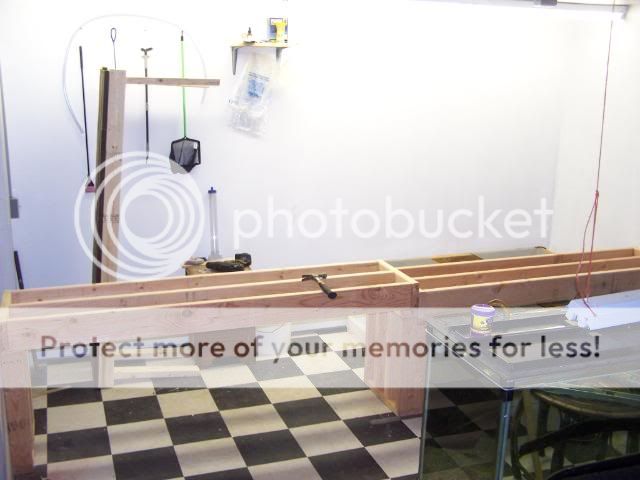
Alright, spent most of today/tonight getting the framing done, after a late-night trip to Home Depot last night for the lumber. The only thing I need to add is one more vertical piece that goes from the top level up to the ceiling, just for lateral support. I just need to find a stud to latch onto up there and I haven't done that yet. On to the pics.
First, I finally banged out some drawings in AutoCAD to get a materials list, and finalize the spacing. Its going to be tight, but hey I'm young, right? They're a little blurry...
My work area and the lumber....that chopsaw ROCKS.
I built it in modules that could basically be freestanding with a little more lateral support.
First part
Second
Third
Fourth
And a behind shot, to get an idea of how much room I'll have behind. Not much, basically enough to walk.
The stands are wedged in between the two walls pretty darn tight, and I used liquid nails between the frames and the walls where they met. By building it this way, all weight is directly channeled to the ground through the supports, none of them will be supported by shear strength of screws/bolts. I used Deckmate deck screws to hold everything together. I still want to paint all the frames with the same white mildew-resistant paint I used on the walls, and then I can think about starting to transfer tanks around.
Well I finihsed painting today and started putting the tanks in place. The empty ones, anyway. I have to get a few friends together tomorrow to help me move one of the 150s as well, that thing is heavy.
View behind
Everything painted
55 at top left, 75 at middle right
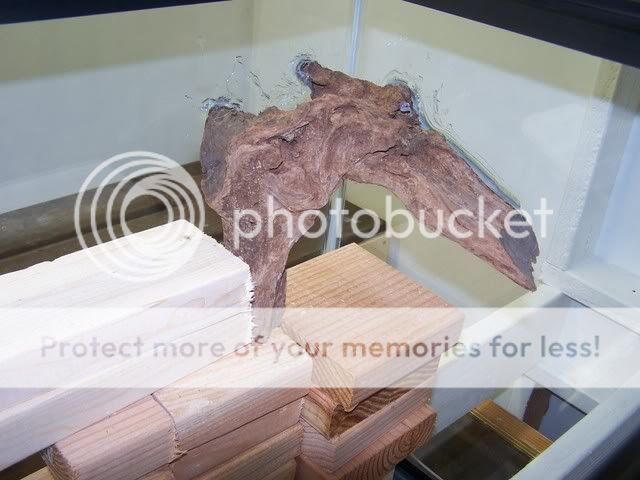
For the brackish tank, instead of using the pvc and plexi ramp I made, I'm siliconing a few chunks of driftwood into the corner for the mudskipper. I think it will look a lot better this way.
Well, got the first tank transferred over. The 55 is now up and running on the top shelf. IT was a royal pain, took me about 4 hours to get it done. Mostly because it had a ton of plants in it, and I was tired of everything constantly being overrun with guppy grass and duckweed, and some random hair algae clumps. So, I systematically pulled every plant out and carefully removed all the duckweed, pieces of guppy grass and algae that I could. I think I successfully got rid of all the duckweed and I'm hoping all the guppy grass as well. The hair algae might come back, there was some on the diftwood and I didn't feel like boiling or bleaching it cause I wanted to get done.
I also took out a large number of plants, since that tank was holding the plants for both that and the 150 asian tank, which hasn't been set up yet. The asian plants are in a bucket right now, I might have to get a 10gal or something just as a holding area until the other tank gets set up.
Just for reference, this is what the 55 looked like before the move...and this pic was taken before the guppy grass was added, so it got way more overgrown than this
Full tank shot now:
Full wall shot so far
The one angel I have right now
School of black neons
It feels good to have at least one tank running. Its still run on the canister its been using, eventually when I get the sump set up this will be one of the three tanks that are run on that system. The brackish tank is next in line to be transferred from the 40B into the 75.
Got another tank moved yesterday. The 40 gal brackish is now a 75gal, and I'm liking it a lot better. I got rid of the RFUG, and for substrate I'm using mostly sand with some CC mixed in. The tank is looking a little barren right now, but I'm going for a tidal/estuarine look. I am going to try and some some round fenceposts or something to simulate some pilings or a dock end to provide some more cover and structure in the tank, I think it will end up pretty nice.
The Emperor 400 is ince but its such a pain to get primed, since the water level is so low. Eventually I think I'll end up switching to a canister like an XP3, and move the emperor onto my 30gal. Anyway, picture updates.
Just for reference, this is what the tank looked like before, when it was the 40gal.
Currently - full tank/wall shots
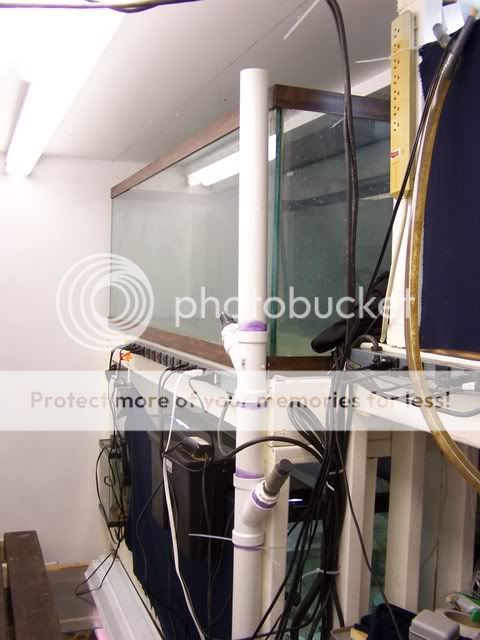
The brackish tank and the turtle tank below it. Finally got the empty 150 up above that. Also, my 10gal sw QT tank on the end there.
And finally a few full wall shots
So, the next step is going to be moving the fish in the 150 in the middle of the room, into the 150 in the wall. Then, the empty one can move into its new home, the last remaining space. You can sort of see the side of the 40gal tank that will serve as the sump, right to the right of the 30gal. I'm hoping its big enough. I think I'll be able to keep the water level relatively low with an auto topoff system so I don't have to worry about the pumps running dry. I have all the plumbing for the system, so thats the next thing to tackle.
Alright, new pics. Got the fish moved into the second 150. I also changed the gravel over, I like the way it looks a lot better now. The pics are pretty couldy, but the tank is pretty much cleared up at this point. I also moved the gold nugget pleco from the 150 into the 55 hoping that a) it will be more comfortable, and b) I'll see it more often.
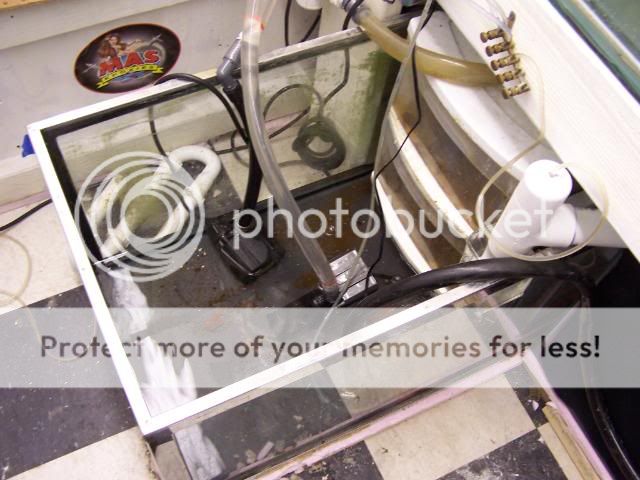
This is the drain setup I put together to catch all the overflow from the 3 tanks, which then drains into the w/d.
And installed:
150 filled
I did run into one problem - There's not enough room over the tank to fit the HOB overflow box on. I was unwilling to accept this and cracked it trying to squeeze it on...oops. Luckily I held onto the crappy PVC overflows I built, so I can at least keep the tank running. I ordered a new one today, as well as one for the 55 so I can get that running on the sump soon as well. I'm going to have to cut a hole in the ceiling sheetrock behind the tank to get it on there...ah well. So yeah, space is tight.
Ok, a few updated pics. Not too much progress, just general organization. Got the last tank in the wall just to get it out of the middle of the room.
Alright, nothing major going on, but got some pictures of the wood frames I built for the 150gal. Once I get these on the tank I can start hanging sheetrock.
I kind of screwed up so the top and bottom don't match exactly, but you won't be able to see them anyway so I'm not worried about it. They are 1x2" poplar, with recessed flat corner brackets in them. The top and bottom both have two cross braces, the top ones are doweled in and the bottom ones are held with more flat brackets.
Inside of the bottom frame - corner brace recessed.
Both frames almost done, the bottom needs the cross braces
Top frame - flat corber bracket and doweled center brace
Top done
Building the braces
Both frames with a crappy coat of paint to protect from splashes
So, I'm going to line the top and bottom with a thick bead of silicone and pop them onto the tank, then I can go get sheetrock and start the final step.
In other news, I really liked that method of bracing. I have a 55gal with broken frames as well, so I'm going to try it again with 1x2" pine and see how it goes.
ok ok I finally got the pictures off my camera...ended up bringing my laptop home from work to do it. So without further ado...
Frames attached to the 150, in place
First piece of sheetrock up
Walls have been painted too. No more purple!
I built Hofer gurgle-busters for my overflows - helped the noise level dramatically.
All the sheetrock hung
All the windows are covered with plastic to keep dust out from behind the wall. The turtle tank is taped off from behind because the glass is inset further than the rest. Gives a nice teaser as to what it will look like.
right-hand side of the room
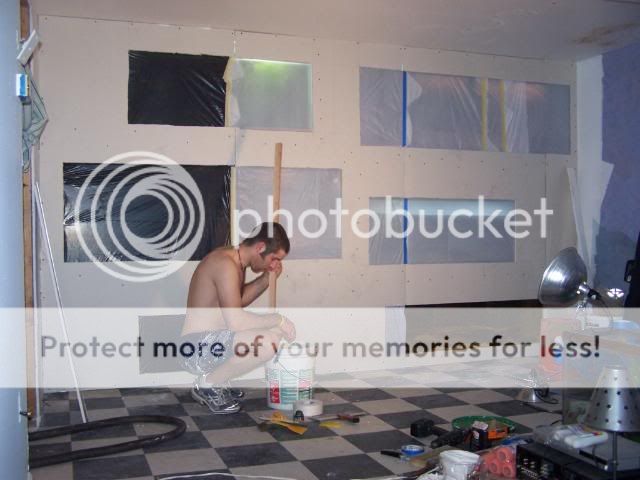
this is me thinking to myself "yeah screw this..." I had half a bucket of drywall compound in my basement for a few years, and it had separated pretty badly. I was trying to mix it up to use it, but it ended up getting trashed and I just bought some new stuff.
Liz painting the walls
First coat of mud
wood frames installed
the frames for the turtle tank are a bit deeper
first coat of mud sanded
On the upside, everyone has decided I suck at tape and seam so badly they won't let me do it any more, so Liz's dad has been helping out. Fine with me, he'll do a better job and, hey, I don't have to do it.
The mud should be getting finished up tomorrow, final skimcoat/sanding, so I'm hoping by Sunday I can look at getting it painted. Then, the only thing left will be to build and install the false wall to fill that doorway on the left, and repaint the ceiling and that room will be pretty much done. As fas as the fish stuff goes, next big thing will be running water lines behind the wall to hook up an auto-drip system. Goodbye, syphoning.
Alright, FINALLY I got to a point where I was willing to take pictures. There's a few more things I need to touch up here and there, but hte majority is done. Iis kind of like aquascaping a tank...is it ever really finished? Nah... Anyway, onto the moment you've all been waiting for.
with the flash
without the flash
Each tank (these are a little blurry...too lazy to get the tripod.
Behind the scenes...
So, there she is. Aesthetically its pretty much done other than filling in and painting some nail holes in the molding. Next big part will be running a water line back there for the constant drip/water change system. That will have to wait for some fundage, however.
So here are a few pics of the final tank, we have a few gouramis,khuili loaches and some glass cats in there so far.


