Mega Powerful Nitrate and Phosphate Remover - DIY!
Are you tired of green on your rocks? Do you have to clean your glass more than once a week? Well then I'm sure you've been told (or you've figured out) that your Nitrate and/or Phosphate are too high. Sure enough, if these are too high, the green starts growing. Phosphate is the important one: If you can detect any phosphate at all with a hobby test kit (like Salifert), then it's high enough to cause algae to grow. So, what can you do?
Build an algae filter screen, that's what you can do. An algae filter screen, also known as a turf algae filter, a turf scrubber, or an algae scrubber, basically filters the water clean of nitrate and phosphate so that the green on your rocks and glass goes away. It does this by "moving" the growth of the algae from the tank to a "screen" outside of the tank. The idea is that you create a better growing environment on the screen than occurs in the tank, so that the algae grows on the screen instead. It works great!
Here's what you can expect: If you build your algae filter properly, your nitrate and phosphate will be incredibly low, sometimes unmeasureable by hobby test kits, within four weeks. I use Salifert test kits, and the readings I get are "clear" (zero) for both the Nitrate and the Phosphate tests. This is what you want. If you have been trying to get this yourself, then an algae filter is for you.
Here is my Algae Filter in a 5-gallon bucket; it's the only filter I have (other than the live rock) on my 100 gallon reef:

Here is the filter in operation with the lights on:

Here is my tank:

Hi-Res: http://www.radio-media.com/fish/WholeTank.jpg
Video: http://www.radio-media.com/fish/WholeTank08-11-08.mpg
And here are the only things you need to build a bucket version of this filter:

My nitrate and phosphate are zero (clear on Salifert test kits), and the only thing in my sump is water. I removed the skimmer, carbon, phosban, polyfilter(s), and filtersock; I don't use ozone, vodka, zeo or anything else. I'm feeding massive amounts too; enough that if I had my previous filtering setup, I'd have to clean the glass twice a day, and everything in the tank would be covered in green or brown algae. Amazing.
The only thing you need to decide on is how big your algae filter screen needs to be, and if you want it to be in your tank's hood, or in a bucket, or in your sump. The basic rule is one square inch of screen for each gallon of tank water, if the screen it lit on both sides; the screen size should be twice this if the screen is lit up on just one side. A 12 X 12 inch screen, lit both sides, = 144 square inches = 144 gal tank; a 7 X 7 inch screen lit both sides = 49 gal tank; a 6 X 6 lit both sides = 36 gal tank. Algae filters get really small as you can see. A 12 gal nano tank needs just 3 X 4 inches! This small thing can replace the skimmer, refugium, phosphate removers, nitrate removers, carbon, filtersocks, and waterchanges, IF THE PURPOSE of these devices is to reduce nitrate and phosphate. If these devices have any other purpose, then they can't be replaced. If your tank is bigger than a 75, then just start with a 5 gallon bucket size and see how it goes. You can always add a second one, or build a bigger one later.
My example bucket version takes about 4 hours to build. Water goes in the pvc pipe at the top, flows down over the screen, then drains out the bottom. That's it! Oh, and it has clip-on lights. I can feed the tank a lot of food, and anything not eaten by the corals or fish eventually ends up as algae on the screen.
Here are some examples of DIY algae filter screens already built, from a simple nano one:


to larger ones:


Here are some advantages of an algae filter:
o Allows you to feed very high amounts without causing nuisance algae growth in the tank.
o Can replace waterchanges, IF THE PURPOSE of the waterchange is to reduce nitrate or
phosphate or algae growth. Otherwise, it does not replace the water change.
o Grows swarms of copepods.
o Increases pH.
o Increases oxygen.
o Will NOT spread algae into the tank. It removes algae FROM the tank.
o There is no odor from the algae (only a slight ocean smell when cleaning it).
o Is very quiet when flowing, similar to a tabletop decorative waterfall.
o Introduces no microbubbles when adjusted.
o Removes ammonia too.
o You can even make a portable bucket! Just unplug the lights, lift up the pump
out of the tank water, and go put it in your next tank (or your friend's tank).
Don't let the screen dry out though.
o Works in saltwater or freshwater.
How to build it:
First, get your screen. Any stiff material that has holes in it, like knitting backing, plastic canvas, rug canvas, gutter guard, or tank-divider will do. Try going to hardware stores, craft stores, garden stores, sewing stores, or just get one of these online (in order of preference):
http://www.craftsetc.com/store/item.aspx?ItemId=43844
http://www.herrschners.com/products/product.aspx?sku=137850
http://www.aquaticeco.com/subcategories/2/Tank-Dividers/tank divider/0
Don't use window screen though. The main problem with this kind of "soft" screen will be getting it to hold its shape; it will bend and fold too much. Stiff screen is easier to make stay put, and easier to clean.
If you have a nano with a filter hatch on top of the hood, then it's super easy: Just cut a piece of screen to replace the sponge filter, and put it where the sponge filter went. Leave the hatch open, an set a strong light on it, facing down directly on the screen. This is a good bulb to get; it will be bright enough to power the screen, and to light up your nano too:
http://www.buylighting.com/23-Watt-R40-Compact-Fluorescent-Flood-5100K-p/tcp1r4023-51k.htm
If your nano does not have a filter hatch on top of the hood, or if you have a regular tank, then here are the larger versions:


The first and main thing to consider is the flow to the screen. You need about 35 gph (gallons per hour) for every inch of width of the screen. Thus, a 2" wide screen would need 70 gph, and so on. Here is a chart:
Screen Width-----Gallons Per Hour (GPH)
1" 35
2" 70
3" 105
4" 140
5" 175
6" 210
7" 245
8" 280
9" 315
10" 350
11" 385
12" 420
13" 455
14" 490
15" 525
16" 560
17" 595
18" 630
19" 665
20" 700
Note that it does not matter how tall your screen is, just how wide it is. Let's start with an overflow feed: In this case the amount of flow is pre-determined by how much is overflowing; the maximum flow you'll get to the screen will be what's going through your overflow now. This is easy to figure out by counting how many seconds it takes your overflow to fill a one-gallon jug:
60 seconds = 60 gph
30 seconds = 120 gph
15 seconds = 240 gph
10 seconds = 360 gph
8 seconds = 450 gph
5 seconds = 720 gph
Take this gph number that you end up with, and divide by 35, to get the number of inches wide the screen should be. For example, if your overflow was 240 gph, then divide this by 35 to get 6.8 (or just say 7) inches. So your screen should be 7 inches wide. How tall should it be? As tall as can fit into the area you have, and, as tall as your light bulbs will cover. But how tall it is not as important as how wide it is.
Pump feeds: Since with a pump you have control over the flow, start with the size screen you can fit into your space. If the screen will go into your sump, then measure how wide that screen will be. If the screen will go into a bucket, then measure how wide that screen will be. Take the width you get, and multiply by 35 to get the gph you need. For example if you can fit a 10 inch wide screen into your sump or bucket, then multiply 10 by 35 to get 350 gph. Thus your pumps needs to deliver 350 gph to the screen.
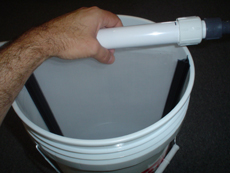
You can construct your setup using any method you like. The only difficult part is the "waterfall pipe", which must have a slot cut lengthwise into it where the screen goes into it. Don't cut the slot too wide; just start with 1/8", and you can increase it later if you need to, based on the flow you get. I used a Dremel moto-tool with a "cut off wheel":

Now install the pipe onto the screen/bucket by tilting the pipe and starting at one side, then lowering the pipe over the rest. You may have to wiggle the screen in some places to get it to fit in:
Lighting: This is the most important aspect of the whole thing. You must, must, have strong lighting. I'll list again the bulb I listed above:
http://www.buylighting.com/23-Watt-R40-Compact-Fluorescent-Flood-5100K-p/tcp1r4023-51k.htm
... This the minimum you should have on BOTH sides of your screen. You can get even higher power CFL bulbs, or use multiple bulbs per side, for screens larger than 12 X 12 inches, or for tanks with higher waste loads. The higher the power of the lighting on the screen, the more nitrate and phosphate will be pulled out of the tank, and faster too.
Operation:
Regardless of which version you build, the startup process is the same. First, clean the screen with running tap water (no soap) while scrubbing it with something abrasive. Then dry it off and sand it with sandpaper on both sides. Then get some algae (any type) from your system and rub it HARD into the screen on both sides, as deep and as hard as you can. Then run tap water over the screen to remove the loose algae pieces; you won't see the spores that stick... they are too small, but they are there. Don't forget this algae rubbing part... it will speed up the start of your screen by a few days. Install the screen and turn on the water.
You can leave the light on for 24 hours for the first week if you want to speed up the process; otherwise just put it on a timer for 18 hours ON, and 6 hours OFF. You will see absolutely nothing grow for the first two days. On day 3 you'll start seeing some growth, and by day 5 most of the screen should have a light brown coating. If this level of growth does not happen on your screen, your lighting is probably not strong enough, or it's not close enough to the screen. Increase the bulb power, or move it closer.
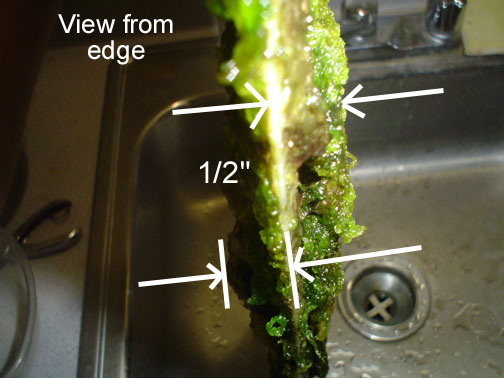
When the screen looks something like this:

...then you want to give it it's first cleaning, on ONE SIDE only. Take the screen to the sink, run tap water on it, and just push the algae off with your fingers (not fingernails):

Wait a week, and clean the other side, gently. Wait another week and clean the first side again, etc. After a while you'll have to press harder to get the tougher algae off, and after a few months you'll probably need to scrape it with something, and it may eventually get so strong that you'll need a razor blade to scrape it off. But for now, be gentle; you always want some algae to remain on the screen when you are done. NEVER clean it off completely.
Don't forget to test your Nitrate and Phosphate before you start your filter, and each day after. I use Salifert:
http://www.marinedepot.com/ps_AquariumPage~PageAlias~test_kits_salifert.html
Post your pics of how you build it, the growth day by day, and your nitrate and phosphate readings, so we can all see how you are doing!
Are you tired of green on your rocks? Do you have to clean your glass more than once a week? Well then I'm sure you've been told (or you've figured out) that your Nitrate and/or Phosphate are too high. Sure enough, if these are too high, the green starts growing. Phosphate is the important one: If you can detect any phosphate at all with a hobby test kit (like Salifert), then it's high enough to cause algae to grow. So, what can you do?
Build an algae filter screen, that's what you can do. An algae filter screen, also known as a turf algae filter, a turf scrubber, or an algae scrubber, basically filters the water clean of nitrate and phosphate so that the green on your rocks and glass goes away. It does this by "moving" the growth of the algae from the tank to a "screen" outside of the tank. The idea is that you create a better growing environment on the screen than occurs in the tank, so that the algae grows on the screen instead. It works great!
Here's what you can expect: If you build your algae filter properly, your nitrate and phosphate will be incredibly low, sometimes unmeasureable by hobby test kits, within four weeks. I use Salifert test kits, and the readings I get are "clear" (zero) for both the Nitrate and the Phosphate tests. This is what you want. If you have been trying to get this yourself, then an algae filter is for you.
Here is my Algae Filter in a 5-gallon bucket; it's the only filter I have (other than the live rock) on my 100 gallon reef:
Here is the filter in operation with the lights on:
Here is my tank:
Hi-Res: http://www.radio-media.com/fish/WholeTank.jpg
Video: http://www.radio-media.com/fish/WholeTank08-11-08.mpg
And here are the only things you need to build a bucket version of this filter:
My nitrate and phosphate are zero (clear on Salifert test kits), and the only thing in my sump is water. I removed the skimmer, carbon, phosban, polyfilter(s), and filtersock; I don't use ozone, vodka, zeo or anything else. I'm feeding massive amounts too; enough that if I had my previous filtering setup, I'd have to clean the glass twice a day, and everything in the tank would be covered in green or brown algae. Amazing.
The only thing you need to decide on is how big your algae filter screen needs to be, and if you want it to be in your tank's hood, or in a bucket, or in your sump. The basic rule is one square inch of screen for each gallon of tank water, if the screen it lit on both sides; the screen size should be twice this if the screen is lit up on just one side. A 12 X 12 inch screen, lit both sides, = 144 square inches = 144 gal tank; a 7 X 7 inch screen lit both sides = 49 gal tank; a 6 X 6 lit both sides = 36 gal tank. Algae filters get really small as you can see. A 12 gal nano tank needs just 3 X 4 inches! This small thing can replace the skimmer, refugium, phosphate removers, nitrate removers, carbon, filtersocks, and waterchanges, IF THE PURPOSE of these devices is to reduce nitrate and phosphate. If these devices have any other purpose, then they can't be replaced. If your tank is bigger than a 75, then just start with a 5 gallon bucket size and see how it goes. You can always add a second one, or build a bigger one later.
My example bucket version takes about 4 hours to build. Water goes in the pvc pipe at the top, flows down over the screen, then drains out the bottom. That's it! Oh, and it has clip-on lights. I can feed the tank a lot of food, and anything not eaten by the corals or fish eventually ends up as algae on the screen.
Here are some examples of DIY algae filter screens already built, from a simple nano one:
to larger ones:
Here are some advantages of an algae filter:
o Allows you to feed very high amounts without causing nuisance algae growth in the tank.
o Can replace waterchanges, IF THE PURPOSE of the waterchange is to reduce nitrate or
phosphate or algae growth. Otherwise, it does not replace the water change.
o Grows swarms of copepods.
o Increases pH.
o Increases oxygen.
o Will NOT spread algae into the tank. It removes algae FROM the tank.
o There is no odor from the algae (only a slight ocean smell when cleaning it).
o Is very quiet when flowing, similar to a tabletop decorative waterfall.
o Introduces no microbubbles when adjusted.
o Removes ammonia too.
o You can even make a portable bucket! Just unplug the lights, lift up the pump
out of the tank water, and go put it in your next tank (or your friend's tank).
Don't let the screen dry out though.
o Works in saltwater or freshwater.
How to build it:
First, get your screen. Any stiff material that has holes in it, like knitting backing, plastic canvas, rug canvas, gutter guard, or tank-divider will do. Try going to hardware stores, craft stores, garden stores, sewing stores, or just get one of these online (in order of preference):
http://www.craftsetc.com/store/item.aspx?ItemId=43844
http://www.herrschners.com/products/product.aspx?sku=137850
http://www.aquaticeco.com/subcategories/2/Tank-Dividers/tank divider/0
Don't use window screen though. The main problem with this kind of "soft" screen will be getting it to hold its shape; it will bend and fold too much. Stiff screen is easier to make stay put, and easier to clean.
If you have a nano with a filter hatch on top of the hood, then it's super easy: Just cut a piece of screen to replace the sponge filter, and put it where the sponge filter went. Leave the hatch open, an set a strong light on it, facing down directly on the screen. This is a good bulb to get; it will be bright enough to power the screen, and to light up your nano too:
http://www.buylighting.com/23-Watt-R40-Compact-Fluorescent-Flood-5100K-p/tcp1r4023-51k.htm
If your nano does not have a filter hatch on top of the hood, or if you have a regular tank, then here are the larger versions:
The first and main thing to consider is the flow to the screen. You need about 35 gph (gallons per hour) for every inch of width of the screen. Thus, a 2" wide screen would need 70 gph, and so on. Here is a chart:
Screen Width-----Gallons Per Hour (GPH)
1" 35
2" 70
3" 105
4" 140
5" 175
6" 210
7" 245
8" 280
9" 315
10" 350
11" 385
12" 420
13" 455
14" 490
15" 525
16" 560
17" 595
18" 630
19" 665
20" 700
Note that it does not matter how tall your screen is, just how wide it is. Let's start with an overflow feed: In this case the amount of flow is pre-determined by how much is overflowing; the maximum flow you'll get to the screen will be what's going through your overflow now. This is easy to figure out by counting how many seconds it takes your overflow to fill a one-gallon jug:
60 seconds = 60 gph
30 seconds = 120 gph
15 seconds = 240 gph
10 seconds = 360 gph
8 seconds = 450 gph
5 seconds = 720 gph
Take this gph number that you end up with, and divide by 35, to get the number of inches wide the screen should be. For example, if your overflow was 240 gph, then divide this by 35 to get 6.8 (or just say 7) inches. So your screen should be 7 inches wide. How tall should it be? As tall as can fit into the area you have, and, as tall as your light bulbs will cover. But how tall it is not as important as how wide it is.
Pump feeds: Since with a pump you have control over the flow, start with the size screen you can fit into your space. If the screen will go into your sump, then measure how wide that screen will be. If the screen will go into a bucket, then measure how wide that screen will be. Take the width you get, and multiply by 35 to get the gph you need. For example if you can fit a 10 inch wide screen into your sump or bucket, then multiply 10 by 35 to get 350 gph. Thus your pumps needs to deliver 350 gph to the screen.
You can construct your setup using any method you like. The only difficult part is the "waterfall pipe", which must have a slot cut lengthwise into it where the screen goes into it. Don't cut the slot too wide; just start with 1/8", and you can increase it later if you need to, based on the flow you get. I used a Dremel moto-tool with a "cut off wheel":
Now install the pipe onto the screen/bucket by tilting the pipe and starting at one side, then lowering the pipe over the rest. You may have to wiggle the screen in some places to get it to fit in:
Lighting: This is the most important aspect of the whole thing. You must, must, have strong lighting. I'll list again the bulb I listed above:
http://www.buylighting.com/23-Watt-R40-Compact-Fluorescent-Flood-5100K-p/tcp1r4023-51k.htm
... This the minimum you should have on BOTH sides of your screen. You can get even higher power CFL bulbs, or use multiple bulbs per side, for screens larger than 12 X 12 inches, or for tanks with higher waste loads. The higher the power of the lighting on the screen, the more nitrate and phosphate will be pulled out of the tank, and faster too.
Operation:
Regardless of which version you build, the startup process is the same. First, clean the screen with running tap water (no soap) while scrubbing it with something abrasive. Then dry it off and sand it with sandpaper on both sides. Then get some algae (any type) from your system and rub it HARD into the screen on both sides, as deep and as hard as you can. Then run tap water over the screen to remove the loose algae pieces; you won't see the spores that stick... they are too small, but they are there. Don't forget this algae rubbing part... it will speed up the start of your screen by a few days. Install the screen and turn on the water.
You can leave the light on for 24 hours for the first week if you want to speed up the process; otherwise just put it on a timer for 18 hours ON, and 6 hours OFF. You will see absolutely nothing grow for the first two days. On day 3 you'll start seeing some growth, and by day 5 most of the screen should have a light brown coating. If this level of growth does not happen on your screen, your lighting is probably not strong enough, or it's not close enough to the screen. Increase the bulb power, or move it closer.
When the screen looks something like this:
...then you want to give it it's first cleaning, on ONE SIDE only. Take the screen to the sink, run tap water on it, and just push the algae off with your fingers (not fingernails):
Wait a week, and clean the other side, gently. Wait another week and clean the first side again, etc. After a while you'll have to press harder to get the tougher algae off, and after a few months you'll probably need to scrape it with something, and it may eventually get so strong that you'll need a razor blade to scrape it off. But for now, be gentle; you always want some algae to remain on the screen when you are done. NEVER clean it off completely.
Don't forget to test your Nitrate and Phosphate before you start your filter, and each day after. I use Salifert:
http://www.marinedepot.com/ps_AquariumPage~PageAlias~test_kits_salifert.html
Post your pics of how you build it, the growth day by day, and your nitrate and phosphate readings, so we can all see how you are doing!