
I have posted about this in a couple of other forums but I was asked if I would do a post on the build of it.
First step is to ask many, many, many questions before you get started. The members here were very helpful. Here is the thread where I received so much helpful advice.
Next is to get supplies. For this sump I purchased a new all-glass (aqueon) 75 gallon aquarium. If I could have found a used one I would have been all over it.
Here is a list of the supplies. All prices are estimates.
75 gallon aquarium - $190
black paint - $10
silicone - $5
glass panels from local glass store - (17", 15", and 4" tall) - $30
Egg Crate from lowes $30
4" PVC from lowes - $8
1" PVC from lowes - $3
280 scrubbies from member zennzzo - $70
Five gallons bioballs from bigalsonline - $30
2" bulkhead and hole saw from gl*******s - $25
plastic pegboard from shop2000 - $25
Total cost - $426
I know there are cheaper ways to build this, this is just the way I feel comfortable with.
Here is the plan I was using when I started construction.

First I drilled the hole for the bulkhead. It took about 20 minutes but was pretty easy to do.


Once I started doing my plumbing I realized that I should have done it a little lower but it's a little too late for that. I can live with where it is.

Next I painted the back of the tank black and then I started putting the glass panels in. I should have gotten them cut at 17 1/4" instead of 17 3/8" wide. They have just a slight angle to them but it isn't too bad. Not bad enough for me to start over.
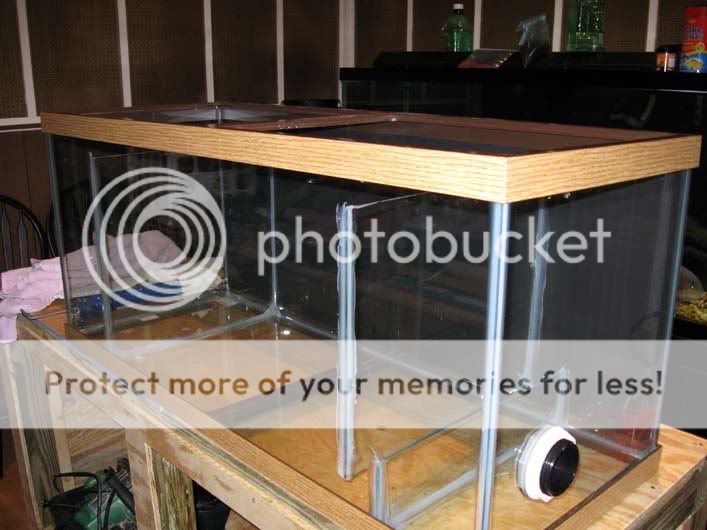
After I got them installed I did not like the height of the first baffle (17"). It was going to make it way too difficult to install the filtersocks above it. I decided to remove it the next day and ordered a 15" piece of glass instead. It is going to work much better!
Once the glass was installed I had to figure out how to do the filter sock holders. I decided to use 4" PVC and elevate the bottom using egg crate. I also used eggcrate to hold it in place. I still need to drill some holes in the sides of the pvc but other than that I believe it is going to work pretty well.


Next step was making the area for the biomedia. I constructed the bottom and the stands for it out of egg crate. I then used pieces of pvc on top of the egg crate to hold up the drip tray. I made the drip tray out of plastic pegboard. Once all is said and done I will be using polyfill mat on top of the drip tray.

The final step was to put the scrubbies and the bioballs in and doing all of the plumbing.


I still plan on putting some more bioballs in but all in all I think it turned out pretty well. Anyway, what do you think?
First step is to ask many, many, many questions before you get started. The members here were very helpful. Here is the thread where I received so much helpful advice.
Next is to get supplies. For this sump I purchased a new all-glass (aqueon) 75 gallon aquarium. If I could have found a used one I would have been all over it.
Here is a list of the supplies. All prices are estimates.
75 gallon aquarium - $190
black paint - $10
silicone - $5
glass panels from local glass store - (17", 15", and 4" tall) - $30
Egg Crate from lowes $30
4" PVC from lowes - $8
1" PVC from lowes - $3
280 scrubbies from member zennzzo - $70
Five gallons bioballs from bigalsonline - $30
2" bulkhead and hole saw from gl*******s - $25
plastic pegboard from shop2000 - $25
Total cost - $426
I know there are cheaper ways to build this, this is just the way I feel comfortable with.
Here is the plan I was using when I started construction.
First I drilled the hole for the bulkhead. It took about 20 minutes but was pretty easy to do.
Once I started doing my plumbing I realized that I should have done it a little lower but it's a little too late for that. I can live with where it is.
Next I painted the back of the tank black and then I started putting the glass panels in. I should have gotten them cut at 17 1/4" instead of 17 3/8" wide. They have just a slight angle to them but it isn't too bad. Not bad enough for me to start over.
After I got them installed I did not like the height of the first baffle (17"). It was going to make it way too difficult to install the filtersocks above it. I decided to remove it the next day and ordered a 15" piece of glass instead. It is going to work much better!
Once the glass was installed I had to figure out how to do the filter sock holders. I decided to use 4" PVC and elevate the bottom using egg crate. I also used eggcrate to hold it in place. I still need to drill some holes in the sides of the pvc but other than that I believe it is going to work pretty well.
Next step was making the area for the biomedia. I constructed the bottom and the stands for it out of egg crate. I then used pieces of pvc on top of the egg crate to hold up the drip tray. I made the drip tray out of plastic pegboard. Once all is said and done I will be using polyfill mat on top of the drip tray.
The final step was to put the scrubbies and the bioballs in and doing all of the plumbing.
I still plan on putting some more bioballs in but all in all I think it turned out pretty well. Anyway, what do you think?
