
text and photos Copyright 2006 John Marcus
Permission to use on www.monsterfishkeepers.com
5000 gallon gigas tank
Below is an overview of the 5000 gallon giga tank just completed.
Final design :
5000 gallon display tank ( 72 height x 12 x 10 )
Filtration:
9 bag filters in a 3x3 array running 50 gpm each
( 300, 100 and 10 micron in each set)
300 gallon sump. 36x48x48
200 gallons of bio filtration and degassing (4x55 gallon drums)
Four 6000 watt heaters with two independent controllers 1 for 6kw the other for 18kw
Total pumps 255 gpm ( 5 x 53gpm march 3/4 hp )
Aquafine CSL 24R UV sterilizer ( 12 lamps)
1600 watts metal halide lighting ( 4x400watts)
8 48 t5 fluorescent tubes.
6600 pounds gravel, 1500 pounds lace rock etc
40,000 pounds of water
just add fish .

Tank construction.
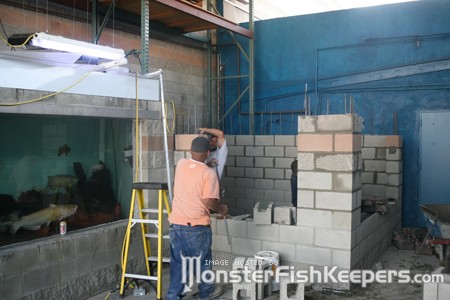
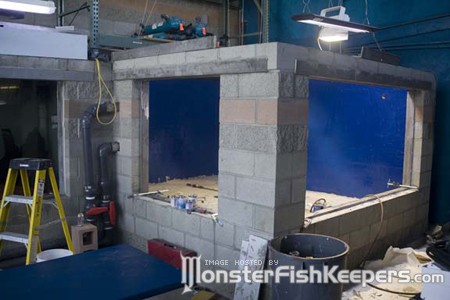
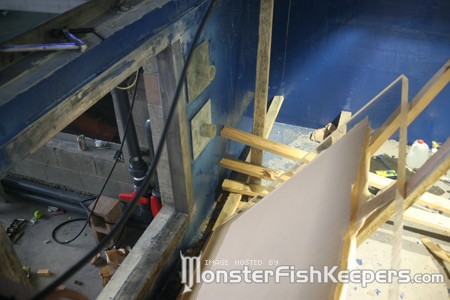
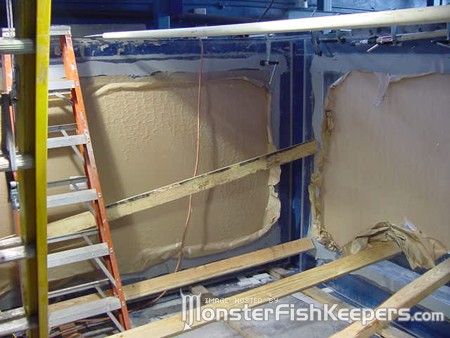
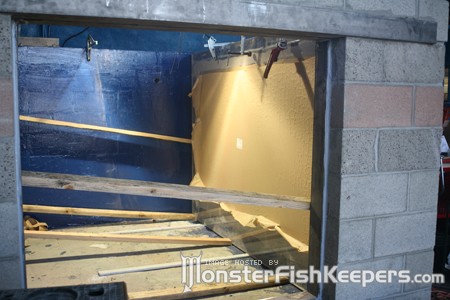
Tank size was maximized for the available space. Concrete block construction was chosen and the design was finalized. A block box with two viewing windows. The tank was layed out on the concrete slab. Holes were drill in the slab and rebar was epoxied in place. Walls were built with lots of rebar with special attention to the corners. The custom built 316 stainless steel window headers were placed and the block work completed. The blocks are 8x8x16 and the 316 stainless is 4x4x1/2 angles. The block was filled with high strength grout and curing began.
Several holes were put thru the block walls. Two for 3 inch pipe (3.5 inches) for intake to the pumps. Two 2 inch for water recirculation returns and one 2 inch for overflow ( to control water height). The feed through pipes were fiberglass which allowed them to be epoxied in place once the block was waterproofed.

The grout cured, washed with acid and waterproofed with pond shield two part epoxy. Next the rest of the SS angle was epoxied in to form the sealing surface for the silicone seal to the plastic.
WINDOW INSTALL
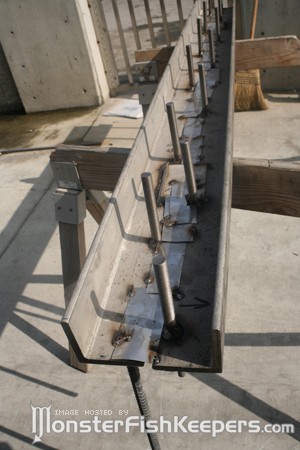
I used 4x4x1/2 inch stainless steel angle ( type 316 for saltwater ) to make a frame for the opening with one of the 4 inch flats to set the window against.
The stainless steel frame was epoxied in place after the cement block was waterproofed with a epoxy sealer called pond armor. http://www.pondarmor.com/

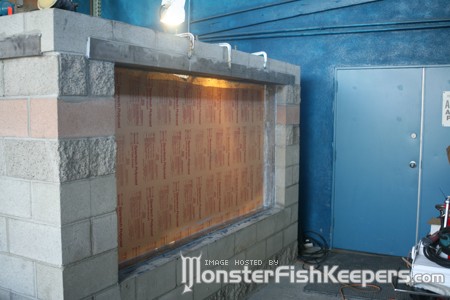
The main window is cell cast acrylic 2 thick x 120 x 60 inches. It weighs about 750 pounds and was handled with a forklift.
I used no bolts etc to hold it in place the weight of the plastic rests on the bottom of the tank on a few small plastic blocks to allow for movement. The pressure of the water will hold the plastic firmly against the sealing surface.
The plastic was placed against the stainless steel frame inside the tank and the opening was marked on the paper protecting the plastic. The plastic sheet in lager than the opening by at least 8 inches in each direction, leaving a minimum of a 4 inch overlap on all sides.

Next the plastic was moved away from the opening. The paper border which covers the sealing area was carefully removed on both sides of the plastic.
The sealing side of the plastic was sanded with 220 grit to roughen the surface for better adhesion.
I also ground clean the sealing surface of the stainless.
Next both surfaces were primed with dow corning 1205 prime coat and allowed to dry.
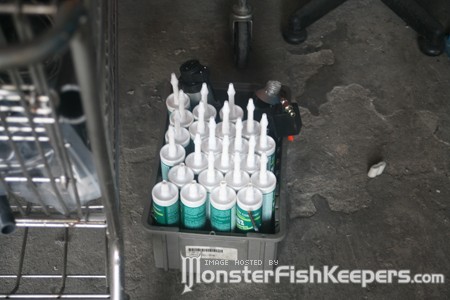
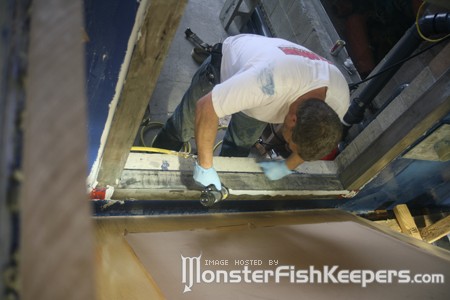
I used dow corning 832 multi surface adhesive sealant. I used a very heavy bead ( approx 1x ½ inch) applied all the way around the stainless steel sealing surface. I used and air powered caulking gun ..it would be very hard to apply this much sealant by hand and take way too long.
This is a fast paced event and I had two helpers opening the tubes of 832 ( aprrox 15-20 ) etc. Apply the top last as it can run a little and drip on you. Once the 832 is in place the plastic was slide in final position on the plastic supports. I used large c clamps on the top edge and 2x4 wood elsewhere to put GENTLE pressure on it do not bend or strain the plastic. The reason for removing the paper from the back side of the plastic is it now allows you to see the 832 flow out into an even seal and not use TOO MUCH clamping force.
Now clean up the excess .
Leave it alone to cure for several weeks. It cures at about 1/8 inch per day so this takes awhile.
PLEASE NOTE THE DOW CORNING DOES NOT RECOMMEND ANY OF THIER PRODUCTS FOR CONTINOUS UNDERWATER USE !!!
THIS WORKED FOR ME BUT TRY IT A YOUR OWN RISK !!!
PLUMBING
While the silicone began to cure and the cement continued to cure I did the plumbing and electrical work.
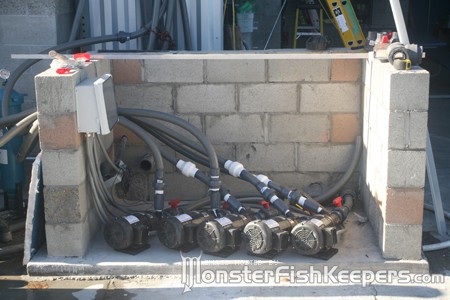
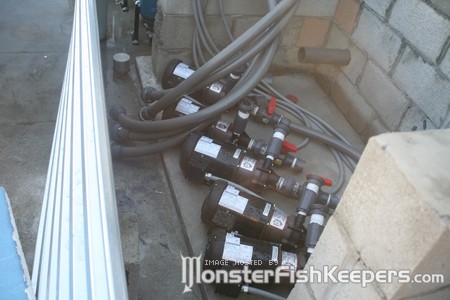
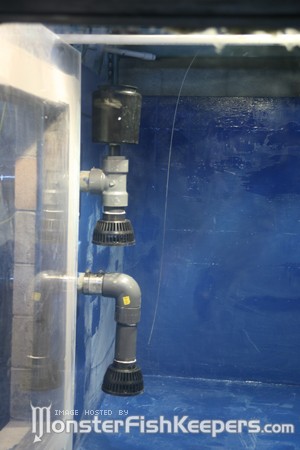
The fiberglass pipes were epoxied in place thru the tank walls. They were reinforced with 0.5 inch fiberglass sheet for strength and water proofing. Intake screens and a skimmer were mounted and two 3 inch pipes were run to the pump house. March mag drive pumps were selected for a number of reasons and we ended up with 5 series 7 pumps .75 horsepower 220v 3 phase.
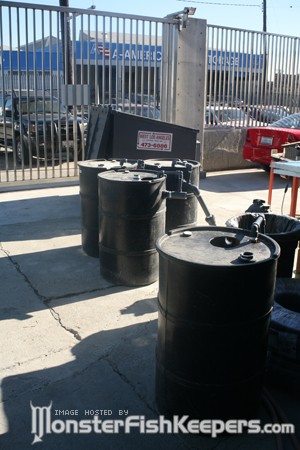
Four 55 gallon plastic drums were converted to bio filters with the addition of bioballs and self starting siphons with air brakes ( see photos) which makes the water level rise and fall giving the little bugs the maximum amount of oxygen .which is usually the limiting factor in bio filters. These were place above the sump.

The 300 gallon sump was placed above the main tank with 3 three inch overflows to return filtered water to the tank. Four 6000 watt heaters were installed. One on one thermostat set one degree lower than the other three so it will do the bulk of the heating.

Two carbon canisters also empty into the sump as well as the UV sterilized water ( runs as needed ).

Three pumps are used for filtration. Each running thru a bank of three bag filters ( 200, 100 and 10 microns each). This water is returned to the four bio filters and two carbon canisters. This then is gravity feed to the sump and heated and the falls into the main tank.
Two pumps are used for creating flow in the tank and return directly to the two 2 inch pipes thru the block walls.
ELECTRICAL
The two main electrical issues were the heaters and pumps.
The four 6000 watt submersible heaters were wired as follows.
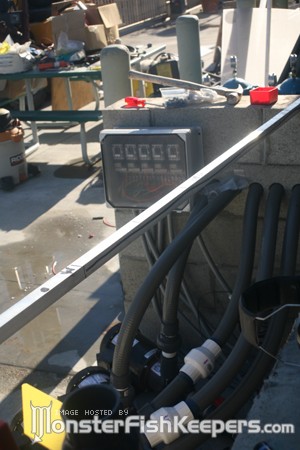
One heater was wired to a 220v 30amp single phase breaker. It is controlled by a chromalox digital controller running a 40 amp power relay and set at 81 F. This heater does most of the cycling on/off.
The other three heaters were wired together in a triangle and feed from a 50 amp 220 volt three phase breaker. Again with a chromalox controller set at 80 F and a 90 amp three phase power relay.
Pilot lights were included and the whole mess placed in a waterproof enclosure.
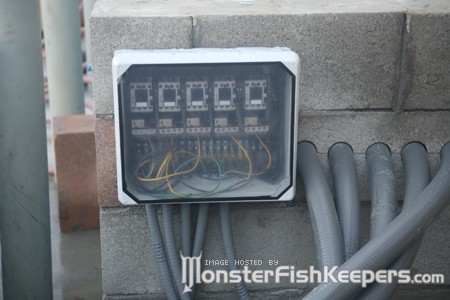
The five pumps each have a 220v 3 phase motor contactor with overload protection. A small toggle switch allows each pump to be controlled separately for maintenance or filter changes. All the contactors are mounted in a waterproof enclosure at the pump house.
I plan to add some alarms etc in the future.

Lighting four 400 watt metal halide lights and 8 48 t5 bulbs were suspended on ss cable over the tank.
BACK TO THE TANK
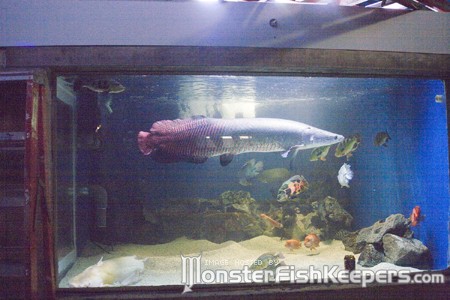
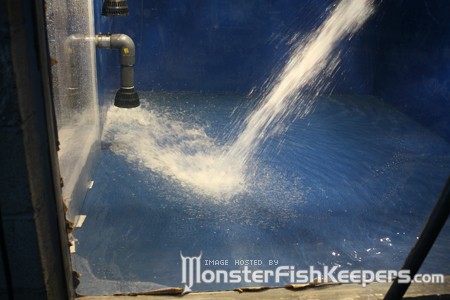
Now that the cement has cured 28 days and the silicone has set for 14 days water was added ( see photos) .and the pumps started. No tank leaks and several piping leaks were repaired.
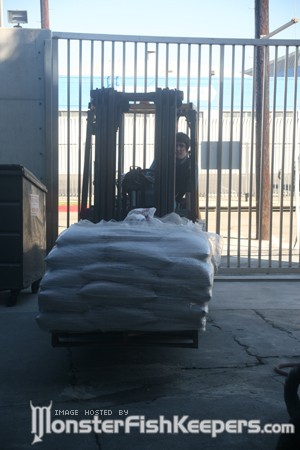
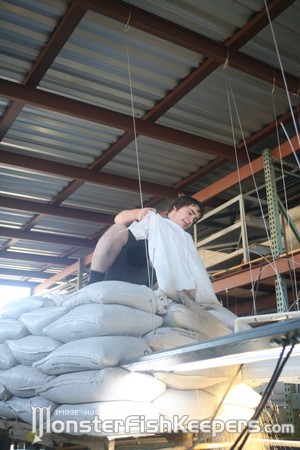
6600 pounds of white 1/8 inch baja gravel were lifted in two lifts with the forklift, bags emptied and gravel added.
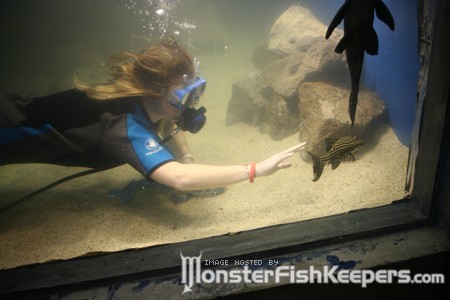
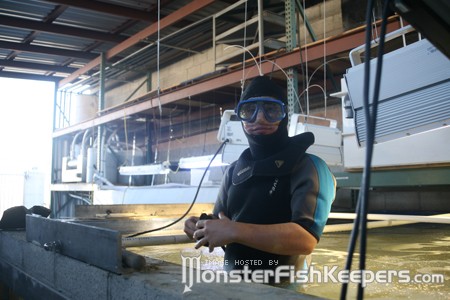
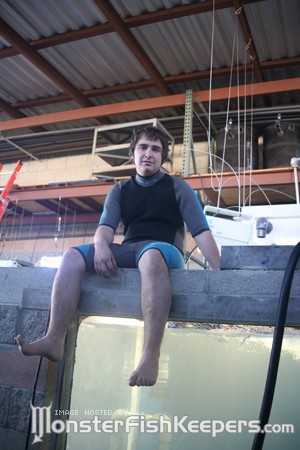
About 1000 pounds of lace rock and a very large driftwood tree stump were added. The arrangement done by my son and friend Erica with a hookah setup for breathing under water.
The heaters were turned on and the water treated with prime.
Once everything stabilized the fish ( expect the giga and jardini) were transferred to the new tank ..start up cycling was avoided by connecting the existing 2400 gallon system to the new 5000 gallon system to provide bio filtration until the new bio filters are active ( 60 days ??). At this point the old bio filters will be taken off line one at a time and the water checked to make sure the new filters are fully developed.
The tanks is covered with a twin sheet polycarbonate that is very light weight and a good insulator.
Moving the 5 foot gigas is the subject of the next article.
Questions are always welcome.
Tank cam can be found through www.ptcmetrology.com ( near bottom of page)
Permission to use on www.monsterfishkeepers.com
5000 gallon gigas tank
Below is an overview of the 5000 gallon giga tank just completed.
Final design :
5000 gallon display tank ( 72 height x 12 x 10 )
Filtration:
9 bag filters in a 3x3 array running 50 gpm each
( 300, 100 and 10 micron in each set)
300 gallon sump. 36x48x48
200 gallons of bio filtration and degassing (4x55 gallon drums)
Four 6000 watt heaters with two independent controllers 1 for 6kw the other for 18kw
Total pumps 255 gpm ( 5 x 53gpm march 3/4 hp )
Aquafine CSL 24R UV sterilizer ( 12 lamps)
1600 watts metal halide lighting ( 4x400watts)
8 48 t5 fluorescent tubes.
6600 pounds gravel, 1500 pounds lace rock etc
40,000 pounds of water
just add fish .
Tank construction.
Tank size was maximized for the available space. Concrete block construction was chosen and the design was finalized. A block box with two viewing windows. The tank was layed out on the concrete slab. Holes were drill in the slab and rebar was epoxied in place. Walls were built with lots of rebar with special attention to the corners. The custom built 316 stainless steel window headers were placed and the block work completed. The blocks are 8x8x16 and the 316 stainless is 4x4x1/2 angles. The block was filled with high strength grout and curing began.
Several holes were put thru the block walls. Two for 3 inch pipe (3.5 inches) for intake to the pumps. Two 2 inch for water recirculation returns and one 2 inch for overflow ( to control water height). The feed through pipes were fiberglass which allowed them to be epoxied in place once the block was waterproofed.
The grout cured, washed with acid and waterproofed with pond shield two part epoxy. Next the rest of the SS angle was epoxied in to form the sealing surface for the silicone seal to the plastic.
WINDOW INSTALL
I used 4x4x1/2 inch stainless steel angle ( type 316 for saltwater ) to make a frame for the opening with one of the 4 inch flats to set the window against.
The stainless steel frame was epoxied in place after the cement block was waterproofed with a epoxy sealer called pond armor. http://www.pondarmor.com/
The main window is cell cast acrylic 2 thick x 120 x 60 inches. It weighs about 750 pounds and was handled with a forklift.
I used no bolts etc to hold it in place the weight of the plastic rests on the bottom of the tank on a few small plastic blocks to allow for movement. The pressure of the water will hold the plastic firmly against the sealing surface.
The plastic was placed against the stainless steel frame inside the tank and the opening was marked on the paper protecting the plastic. The plastic sheet in lager than the opening by at least 8 inches in each direction, leaving a minimum of a 4 inch overlap on all sides.
Next the plastic was moved away from the opening. The paper border which covers the sealing area was carefully removed on both sides of the plastic.
The sealing side of the plastic was sanded with 220 grit to roughen the surface for better adhesion.
I also ground clean the sealing surface of the stainless.
Next both surfaces were primed with dow corning 1205 prime coat and allowed to dry.
I used dow corning 832 multi surface adhesive sealant. I used a very heavy bead ( approx 1x ½ inch) applied all the way around the stainless steel sealing surface. I used and air powered caulking gun ..it would be very hard to apply this much sealant by hand and take way too long.
This is a fast paced event and I had two helpers opening the tubes of 832 ( aprrox 15-20 ) etc. Apply the top last as it can run a little and drip on you. Once the 832 is in place the plastic was slide in final position on the plastic supports. I used large c clamps on the top edge and 2x4 wood elsewhere to put GENTLE pressure on it do not bend or strain the plastic. The reason for removing the paper from the back side of the plastic is it now allows you to see the 832 flow out into an even seal and not use TOO MUCH clamping force.
Now clean up the excess .
Leave it alone to cure for several weeks. It cures at about 1/8 inch per day so this takes awhile.
PLEASE NOTE THE DOW CORNING DOES NOT RECOMMEND ANY OF THIER PRODUCTS FOR CONTINOUS UNDERWATER USE !!!
THIS WORKED FOR ME BUT TRY IT A YOUR OWN RISK !!!
PLUMBING
While the silicone began to cure and the cement continued to cure I did the plumbing and electrical work.
The fiberglass pipes were epoxied in place thru the tank walls. They were reinforced with 0.5 inch fiberglass sheet for strength and water proofing. Intake screens and a skimmer were mounted and two 3 inch pipes were run to the pump house. March mag drive pumps were selected for a number of reasons and we ended up with 5 series 7 pumps .75 horsepower 220v 3 phase.
Four 55 gallon plastic drums were converted to bio filters with the addition of bioballs and self starting siphons with air brakes ( see photos) which makes the water level rise and fall giving the little bugs the maximum amount of oxygen .which is usually the limiting factor in bio filters. These were place above the sump.
The 300 gallon sump was placed above the main tank with 3 three inch overflows to return filtered water to the tank. Four 6000 watt heaters were installed. One on one thermostat set one degree lower than the other three so it will do the bulk of the heating.
Two carbon canisters also empty into the sump as well as the UV sterilized water ( runs as needed ).
Three pumps are used for filtration. Each running thru a bank of three bag filters ( 200, 100 and 10 microns each). This water is returned to the four bio filters and two carbon canisters. This then is gravity feed to the sump and heated and the falls into the main tank.
Two pumps are used for creating flow in the tank and return directly to the two 2 inch pipes thru the block walls.
ELECTRICAL
The two main electrical issues were the heaters and pumps.
The four 6000 watt submersible heaters were wired as follows.
One heater was wired to a 220v 30amp single phase breaker. It is controlled by a chromalox digital controller running a 40 amp power relay and set at 81 F. This heater does most of the cycling on/off.
The other three heaters were wired together in a triangle and feed from a 50 amp 220 volt three phase breaker. Again with a chromalox controller set at 80 F and a 90 amp three phase power relay.
Pilot lights were included and the whole mess placed in a waterproof enclosure.
The five pumps each have a 220v 3 phase motor contactor with overload protection. A small toggle switch allows each pump to be controlled separately for maintenance or filter changes. All the contactors are mounted in a waterproof enclosure at the pump house.
I plan to add some alarms etc in the future.
Lighting four 400 watt metal halide lights and 8 48 t5 bulbs were suspended on ss cable over the tank.
BACK TO THE TANK
Now that the cement has cured 28 days and the silicone has set for 14 days water was added ( see photos) .and the pumps started. No tank leaks and several piping leaks were repaired.
6600 pounds of white 1/8 inch baja gravel were lifted in two lifts with the forklift, bags emptied and gravel added.
About 1000 pounds of lace rock and a very large driftwood tree stump were added. The arrangement done by my son and friend Erica with a hookah setup for breathing under water.
The heaters were turned on and the water treated with prime.
Once everything stabilized the fish ( expect the giga and jardini) were transferred to the new tank ..start up cycling was avoided by connecting the existing 2400 gallon system to the new 5000 gallon system to provide bio filtration until the new bio filters are active ( 60 days ??). At this point the old bio filters will be taken off line one at a time and the water checked to make sure the new filters are fully developed.
The tanks is covered with a twin sheet polycarbonate that is very light weight and a good insulator.
Moving the 5 foot gigas is the subject of the next article.
Questions are always welcome.
Tank cam can be found through www.ptcmetrology.com ( near bottom of page)


 i cant wait to see that tank

 Very cool thanks for sharing the pictures with us