
Three years ago, my wife fell in live this little pufferfish at the fish store. "Pleeeeeeease?...... Pleeeeease???". I have been keeping fish for my entire life but mostly planted tanks, Tanganyikan Cichlids, nothing like this. But, if you are married, you know how this story will end. Fast-forward to now and we just completed a major remodel to out house, the centerpiece of the living area being a new 300G aquarium for our puffer and his buddies. I'd like to chronicle how it all came together in this thread...
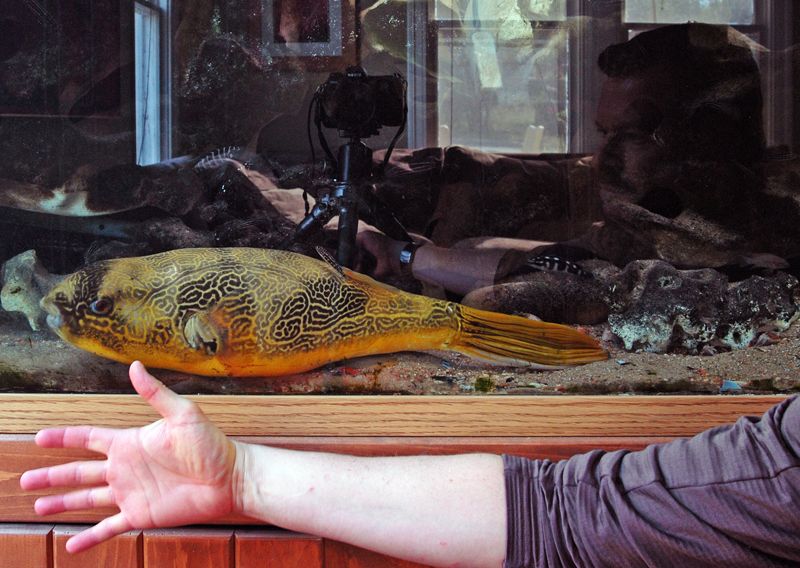
In January, we vacated the house and our puffer, the 110G he had grown up in. Here is the last photo of him in that tank...
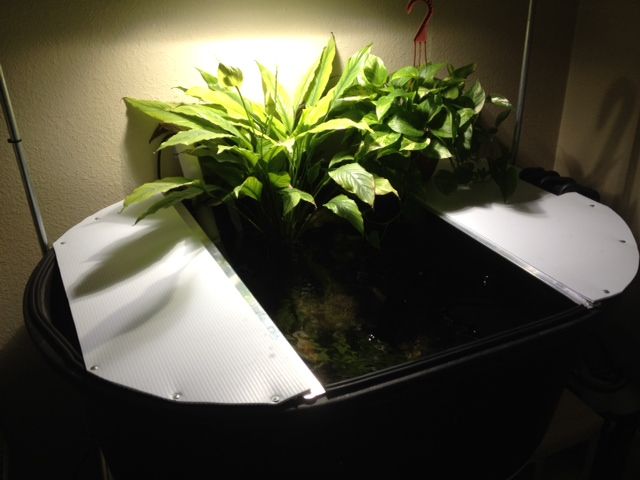
We would live in an apartment for the following six months, while the remodel was being done, and our puffer would stay in a 105G stock tub for that period...


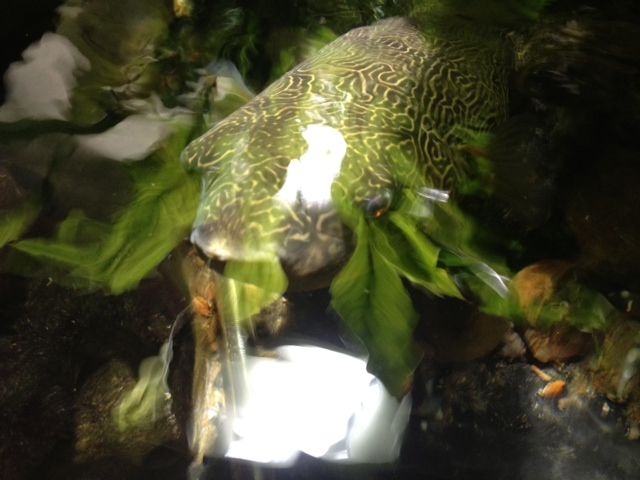
I truly felt bad keeping him in this "prison" for six months. Yes, he had several of his cichlid buddies in there with him but he had grown up in a glass tank with a view of the living room, us, the street out front and as those of us with Mbu know, they are very personable and inquisitive fish and really seem to thrive in the interaction...
I knew he hated it in there but there was really no other option, so as they say, "It is what it is".
Back at the house, things were being made ready for the 300G. Due to the extreme weight of a tank this size, we poured a concrete slab directly under the area where the tank would sit, and then blocked up the floor joists from below. This way, the entire weight of the tank is handled by this slab rather than by the joists, themselves...


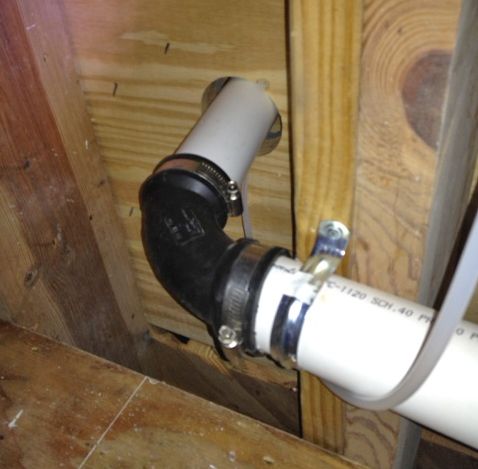
The PVC pipe you see there is part of the drain system I fabricated, so that the tank will never flood or overflow onto the floor. It will also serve as a receptacle for the Python, during siphoning and gravel vacuuming...

The effluent will be routed outside and used to water the garden, so we are reusing all the fish tank water...

Tee fitting and line for the automatic top-off system...

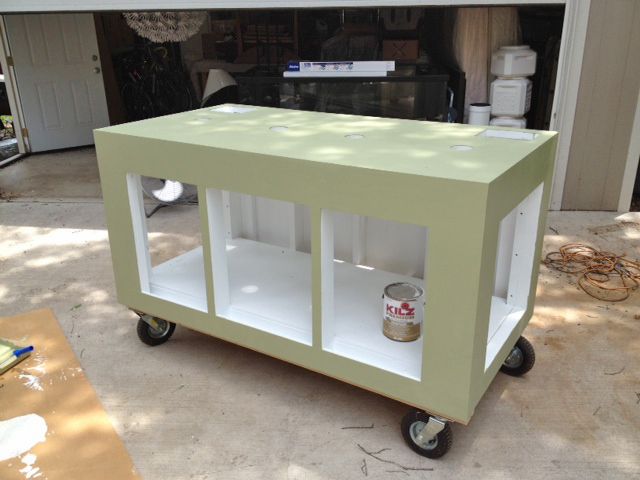
The stand carcase was assembled by a friend/furniture-maker and I will take over the final finishing as well as fitting for the wet-dry plumbing and the electrical components. The doors are made of reclaimed Longleaf Pine and are designed to lift away from the carcase...

The stand, finished and ready to go inside. The top surface and interior floor are all coated with epoxy for water protection...
The filtration will be primarily handled by two wet dry sumps. One is an acrylic unit I picked up on Craigslist and the other is a 40G breeder flat from Petsmart. Here, I am drilling bulkhead holes in the glass tank....

Leak-testing the two sumps...


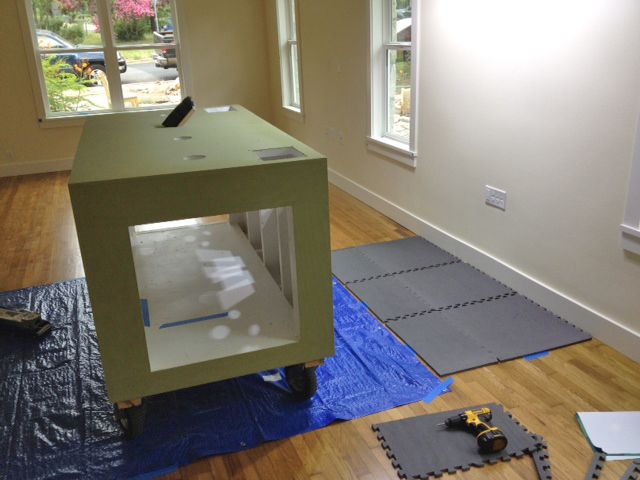
Stand being moved inside...


Lighting for the stand interior...


Overhead lighting is four Giesemann Nova II lamps, which I refinished to a hammered metallic silver color...


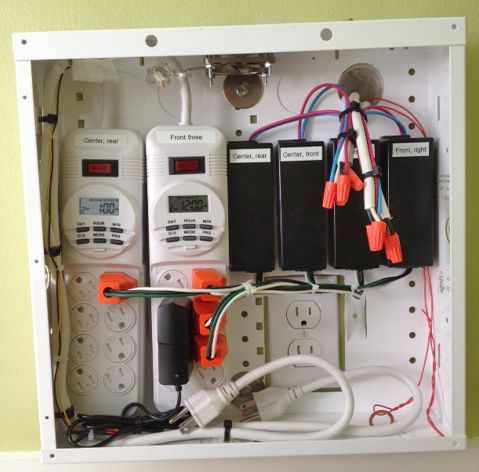
To keep the ceiling as clean as possible, I fabricated a remote enclosure for the MH transformers and timers that is mounted in the closet directly above the tank, on the second story...


The lamps were originally 150w each but that would be too much for our applications, so I instead installed 70w electronic ballasts which I found at an industrial supply overstock place on Ebay and then Osram "Excellence" 5,500K lamps, which are awesome in person and only $18 ea on Ebay.
Next, the tank is ready to come inside...

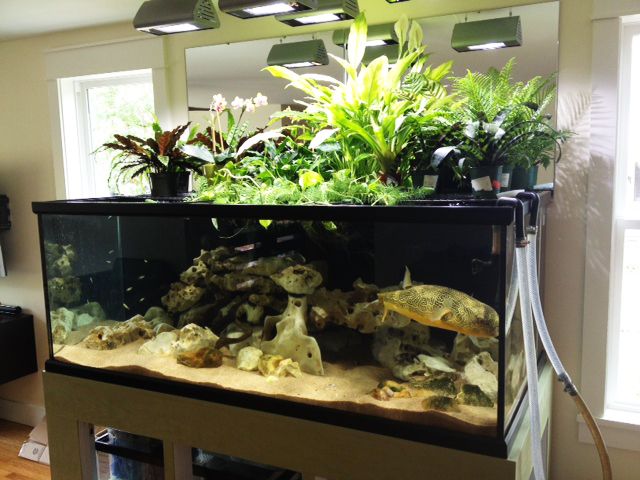
I think one of the reasons why our fish do so well is that I always grow plants hydroponically in the water, such as Pothos and Peace Lily. They do an excellent job of nitrate control and also, area for beneficial bacteria to grow, on their submerged roots. My plan was to have baskets of Peace Lily in the back, then cuttings of Pothos and other species in front, then a potted plants, raised above the water line, on each side.
I cut a piece of aluminum stock to act as a brace and attached it with stainless fasteners, then put a section of black plastic eggcrate in front. The sides are sections of vinyl-coated shelving from Lowe's, which I cut down to fit the tank frame...

Back of the tank painted flat black...

Time to move the tank inside...


Noe that the tank is in place and filtration and lighting are worked out, it is time for decoration. The theme of this tank is tat of a cenote, which is limestone cavern from the Yucutan peninsula of Mexico. My wife and I love snorkeling in cenotes and one of the things that fascinates me is the how the vegetation comes right up to the water's edge and then it is all limestone caves under the surface. That is the look we were shooting for.
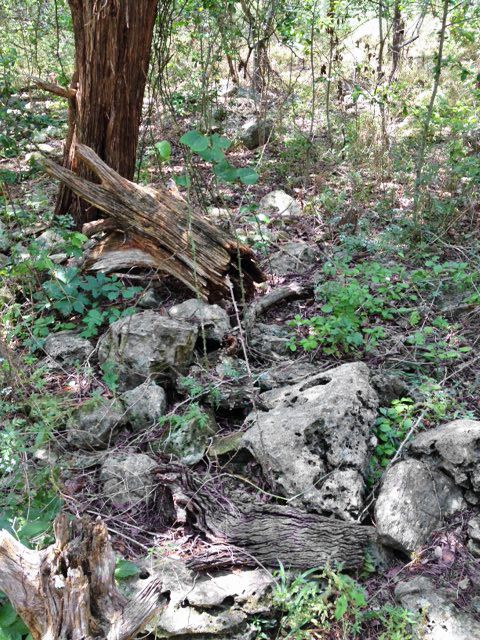
Here in the Texas Hill Country, we are fortunate to have limestone all over the place and lots of it. A friend let me onto his property to collect some...


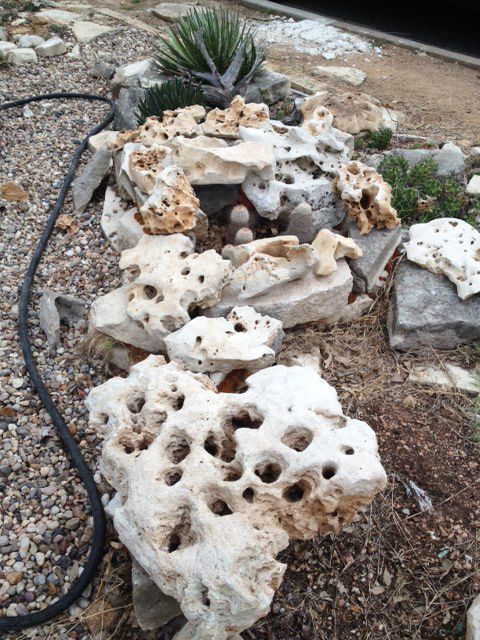
These rocks are unusable as they are, since there is so much organic material on them. The first step is to bleach them and remove as much organic material as possible. Here, you can see that I have two tubs set up. The rocks are first bleached, then rinsed twice with fresh water and then allowed to dry for several days before being ready for hardscaping.


You can see that I am draining the bleach water into our sewer-out line, not down the street, since the street goes directly to the local aquifer and I would never want to harm that. Here are the rocks, drying in the sun...

Now, it is time to hardscape the tank. I used the gray "waterfall foam" to secure the rocks together, since the Mbu is big and we do not want him knocking anything over in the tank...

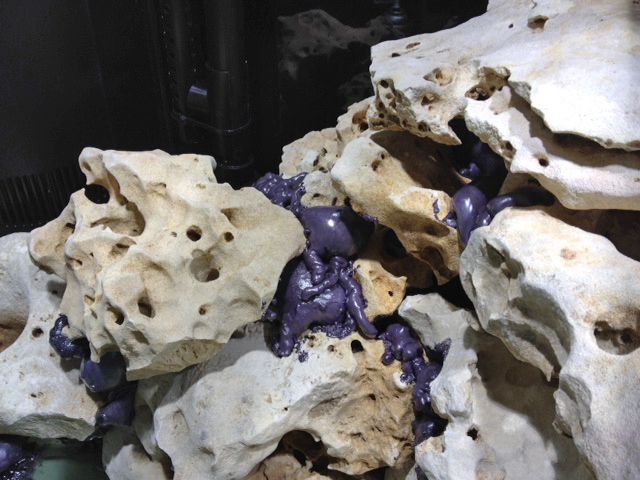

After the foam had hardened overnight, I used a small caluking tool to "dredge" out as much as I could, so you really see very little of it when the tank is filled. For the substrate, we used pool filter sand from Home Depot...

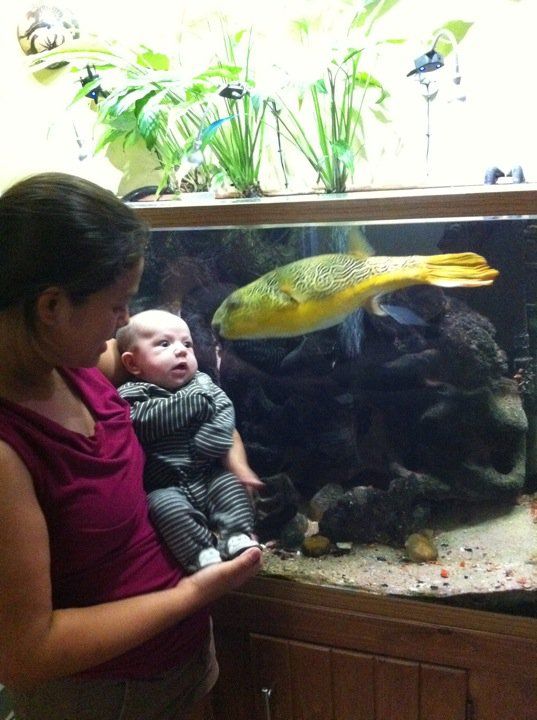
So, our puffer has had two weeks now in the new tank and genuinely looks like he is ecstatic to be out of the jail cell and back home. Back to his enthusiastic self and the picture of personality. Thank for letting me share and we hops you enjoy this thread as much as we enjoyed doing it all...


In January, we vacated the house and our puffer, the 110G he had grown up in. Here is the last photo of him in that tank...
We would live in an apartment for the following six months, while the remodel was being done, and our puffer would stay in a 105G stock tub for that period...
I truly felt bad keeping him in this "prison" for six months. Yes, he had several of his cichlid buddies in there with him but he had grown up in a glass tank with a view of the living room, us, the street out front and as those of us with Mbu know, they are very personable and inquisitive fish and really seem to thrive in the interaction...
I knew he hated it in there but there was really no other option, so as they say, "It is what it is".
Back at the house, things were being made ready for the 300G. Due to the extreme weight of a tank this size, we poured a concrete slab directly under the area where the tank would sit, and then blocked up the floor joists from below. This way, the entire weight of the tank is handled by this slab rather than by the joists, themselves...
The PVC pipe you see there is part of the drain system I fabricated, so that the tank will never flood or overflow onto the floor. It will also serve as a receptacle for the Python, during siphoning and gravel vacuuming...
The effluent will be routed outside and used to water the garden, so we are reusing all the fish tank water...
Tee fitting and line for the automatic top-off system...
The stand carcase was assembled by a friend/furniture-maker and I will take over the final finishing as well as fitting for the wet-dry plumbing and the electrical components. The doors are made of reclaimed Longleaf Pine and are designed to lift away from the carcase...
The stand, finished and ready to go inside. The top surface and interior floor are all coated with epoxy for water protection...
The filtration will be primarily handled by two wet dry sumps. One is an acrylic unit I picked up on Craigslist and the other is a 40G breeder flat from Petsmart. Here, I am drilling bulkhead holes in the glass tank....
Leak-testing the two sumps...
Stand being moved inside...
Lighting for the stand interior...
Overhead lighting is four Giesemann Nova II lamps, which I refinished to a hammered metallic silver color...
To keep the ceiling as clean as possible, I fabricated a remote enclosure for the MH transformers and timers that is mounted in the closet directly above the tank, on the second story...
The lamps were originally 150w each but that would be too much for our applications, so I instead installed 70w electronic ballasts which I found at an industrial supply overstock place on Ebay and then Osram "Excellence" 5,500K lamps, which are awesome in person and only $18 ea on Ebay.
Next, the tank is ready to come inside...
I think one of the reasons why our fish do so well is that I always grow plants hydroponically in the water, such as Pothos and Peace Lily. They do an excellent job of nitrate control and also, area for beneficial bacteria to grow, on their submerged roots. My plan was to have baskets of Peace Lily in the back, then cuttings of Pothos and other species in front, then a potted plants, raised above the water line, on each side.
I cut a piece of aluminum stock to act as a brace and attached it with stainless fasteners, then put a section of black plastic eggcrate in front. The sides are sections of vinyl-coated shelving from Lowe's, which I cut down to fit the tank frame...
Back of the tank painted flat black...
Time to move the tank inside...
Noe that the tank is in place and filtration and lighting are worked out, it is time for decoration. The theme of this tank is tat of a cenote, which is limestone cavern from the Yucutan peninsula of Mexico. My wife and I love snorkeling in cenotes and one of the things that fascinates me is the how the vegetation comes right up to the water's edge and then it is all limestone caves under the surface. That is the look we were shooting for.
Here in the Texas Hill Country, we are fortunate to have limestone all over the place and lots of it. A friend let me onto his property to collect some...
These rocks are unusable as they are, since there is so much organic material on them. The first step is to bleach them and remove as much organic material as possible. Here, you can see that I have two tubs set up. The rocks are first bleached, then rinsed twice with fresh water and then allowed to dry for several days before being ready for hardscaping.
You can see that I am draining the bleach water into our sewer-out line, not down the street, since the street goes directly to the local aquifer and I would never want to harm that. Here are the rocks, drying in the sun...
Now, it is time to hardscape the tank. I used the gray "waterfall foam" to secure the rocks together, since the Mbu is big and we do not want him knocking anything over in the tank...
After the foam had hardened overnight, I used a small caluking tool to "dredge" out as much as I could, so you really see very little of it when the tank is filled. For the substrate, we used pool filter sand from Home Depot...
So, our puffer has had two weeks now in the new tank and genuinely looks like he is ecstatic to be out of the jail cell and back home. Back to his enthusiastic self and the picture of personality. Thank for letting me share and we hops you enjoy this thread as much as we enjoyed doing it all...


")
