DIY 180 gallon sump critique

vincel892

Exodon
MFK Member
May 20, 2019
91
96
26
32
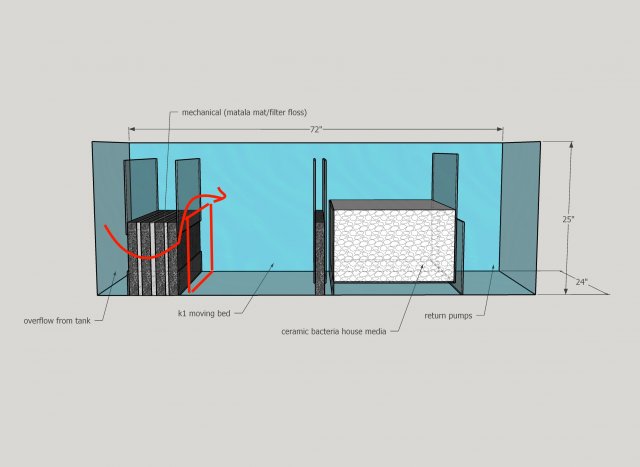
Would love some feedback on my 180 gallon sump design for my 720 plywood build (see full build thread in DIY section if interested! :) )
Decided to try a horizontal mechanical filtration using matala/jap mat with filter floss sandwiched between. This will be followed by a k1 moving bed using matala mat as the barriers on each side. Last will be more bio filtration with ceramic bacteria house media.
My only concern is the k1 section not having enough water volume. May need to modify direction of flow/baffle placement.
Any thoughts/comments?
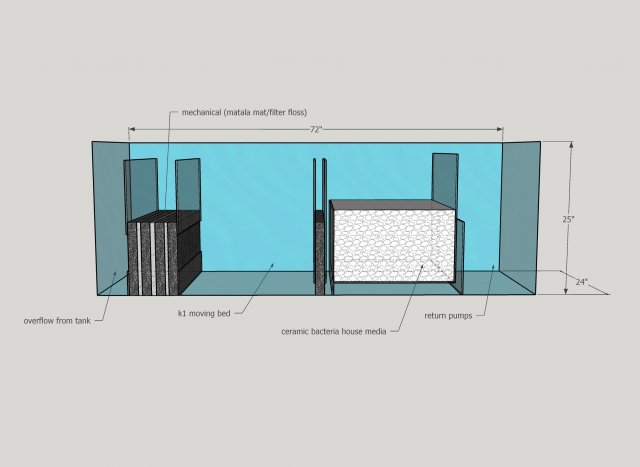
sump design.jpg
 

esoxlucius

Balaclava Bot Butcher
MFK Member
Dec 30, 2015
3,692
13,745
194
UK
When I set up my first sump, a basic three chamber one, I had sheets of various sponges in my first section, as you are planning, nothing wrong with that. But I soon found out there was a flaw which became a right pita.

When I took my sponges out on maintainance day a lot of the crud they were housing would come loose as I removed them and just hang round in the water column. No big deal, I thought, until the clean sponges were put back in place and the return pump was turned back on. It took me a while to realise but all that loose crud that had settled at the bottom of the sump while I did the rest of my maintainance would then get sucked into my bio section. Over the space of a few months my bio section was thick with gunk which could only be hindering it's performance.

So I changed things round a little. The way I did it was only meant to be temporary but that temporary fix is still going strong today, it's simple but brilliant.

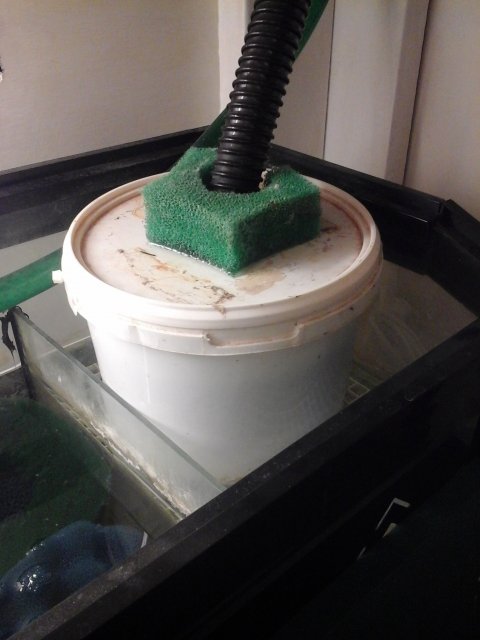
I took all the sponges out, cut them down to the appropriate diameter and layered them in a bucket, see picture below. There's three grades of sponges and two layers of filter floss in that bucket. All I do on water change day now is lift the bucket out, take it to the kitchen sink and rinse all the sponges and replace the filter floss with new.

The beauty is that all the crud is in the bucket and when I take it out all the crud remains in there, no crud drips or comes apart from anything. My bio section keeps very very clean this way.

You will probably find that your moving bed section will get full of disturbed crud from those sponges when you remove them for cleaning.

Just my experience, something you may want to think about, hth.

20191211_160115.jpg
 

TheWolfman

Goliath Tigerfish
MFK Member
Sep 5, 2010
1,423
2,348
179
37
Long island, NY
the size of your return chamber looks too small. Will this be the only filtration on the tank of are you doing a closed loop? What’s the target turnover for this sump. All this needs to be considered before you start placing baffles.
 

vincel892

Exodon
MFK Member
May 20, 2019
91
96
26
32
the size of your return chamber looks too small. Will this be the only filtration on the tank of are you doing a closed loop? What’s the target turnover for this sump. All this needs to be considered before you start placing baffles.
Currently the return chamber is only 5" long. My target turnover would be around 4000-5000 gph. This will be my only filtration. What changes would you suggest.
 

TheWolfman

Goliath Tigerfish
MFK Member
Sep 5, 2010
1,423
2,348
179
37
Long island, NY
At 5000 gph you will run the return dry. I’d remove the return baffles and keep the bio rings and the return pumps together. I’m running about 3000 to 4000 through my sump and only have baffles on the mechanical side. Everything else is considered my return chamber. Your planning on putting even more water through your sump so you will need to have a larger return side.
 
  • Like
Reactions: vincel892

vincel892

Exodon
MFK Member
May 20, 2019
91
96
26
32
At 5000 gph you will run the return dry. I’d remove the return baffles and keep the bio rings and the return pumps together. I’m running about 3000 to 4000 through my sump and only have baffles on the mechanical side. Everything else is considered my return chamber. Your planning on putting even more water through your sump so you will need to have a larger return side.
I see what your saying. Will consider that on my revision.
The reason I want the separation is to force water down through the media.
What if I just remove the last baffle on the right. Water will still flow down through the ceramic media but wont have to travel up before reaching the return pumps.
 
Last edited:
  • Like
Reactions: TheWolfman

TheWolfman

Goliath Tigerfish
MFK Member
Sep 5, 2010
1,423
2,348
179
37
Long island, NY
I see what your saying. Will consider that on my revision.
The reason I want the separation is to force water down through the media.
What if I just remove the last baffle on the right. Water will still flow down through the ceramic media but wont have to travel up before reaching the return pumps.
That would be the way I would do it. Keep in mind that as long as the media is submerged in the return it will have water flowing through it. If you make it so the water can’t get around the media you could end up running into cavitation issues when the media gets dirty and clogged up. At 5000 gph it can happen fast.
 

Lusus_Naturae

Fire Eel
MFK Member
Oct 7, 2010
1,172
15
68
OK, USA
My personal change would be to do a panel after the filter pads to raise the water and get a rotation current for the K2 bed. I have a similar design running in my tank, including the smaller return area for the pump. In mine, if the downflow is blocked, the pump can push everything up and still not flood my floor - by millimeters, but still. I don't run pads in the front either, I run my strictly off a large filter sock hung up, I like your pads, but I would consider running a sock too so the bigger stuff is caught easier. A stainless sock is also easy to clean as well, so a quick wash and it's back in business in minutes. Since mine is run only with a sock, I run a much larger sock made for fine filtering. I change it twice a week because of that, but I wash mine and replace them once a year or if needed.

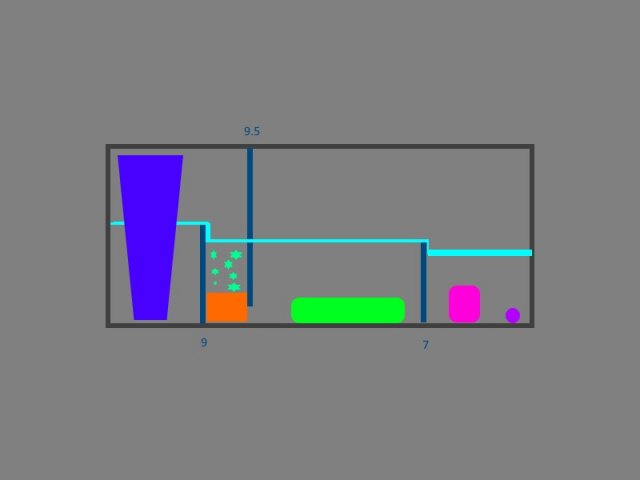
Here's a photo of the change I'd make for your design, and I'm adding how I built mine as well to give you some ideas. We have similar ideas here, my K2 bed is running 1 liter of K2 and it's high motion and flow. Mine doesn't pour water over the top of the ceramic bed, mine flow through foam at the bottom of my K2 bed and across my ceramic block. I also made the panel separating the K2 go to the very top of the tank where the K2 can't escape to other areas if I turn the pump off and the tank drains down to max fill.

sump design.jpg
 

Lusus_Naturae

Fire Eel
MFK Member
Oct 7, 2010
1,172
15
68
OK, USA
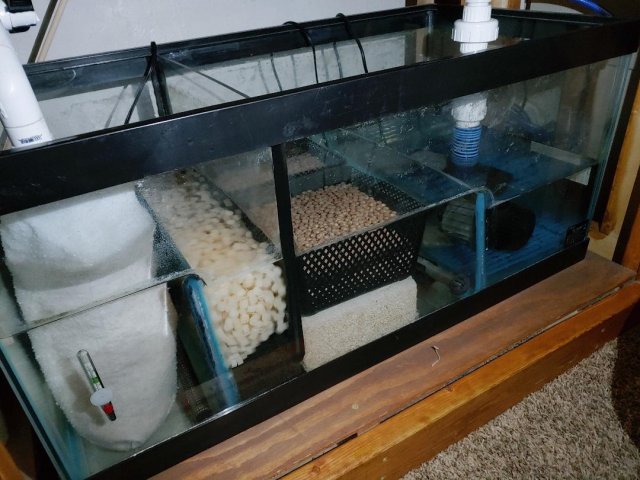
Well, I lost my sump photos. Only found one diagram, it's old and simple, ignore the numbers, they were changed a little in the end. Just took a few fresh sump photos to post. The purple in the last box with the pump is the heater, I moved that back to the center section to ensure it will always be covered by water. I run a backup heater in the sock box too.

sump.jpg

sump 12.22.19.jpeg
 

Lusus_Naturae

Fire Eel
MFK Member
Oct 7, 2010
1,172
15
68
OK, USA
This is a 75 g sump btw, running a 150g tank. Been running three years now. The ceramic blocks are 8x8x4 Marinepure by Cermedia. The baskets on top are from Lowe's pond supplies, I cut the lip off to make them fit. They are holding 3 boxes (I think) of ceramic bio balls (can't remember the brand name). The maintenance I have is changing the sock out twice a week (overstocked) and water changes, vac out the stuff on the bottom of the media section with the water change (usually some ceramic particles and fine debris). Twice a year I squeeze out the foam under the K2 really good. K2 - not K1 - https://www.ebay.com/itm/NEW-DESIGN...hash=item3ab9409321:m:m6VWxJya3Gx6NkfqdMb1yRw
 
zoomed.com
hikariusa.com
aqaimports.com
Store