Well let me just first say this is a basic auto top off and what I provide here can be modified or improved for your own use. The list below is the parts list. I have it in excel, but I couldn't upload it.
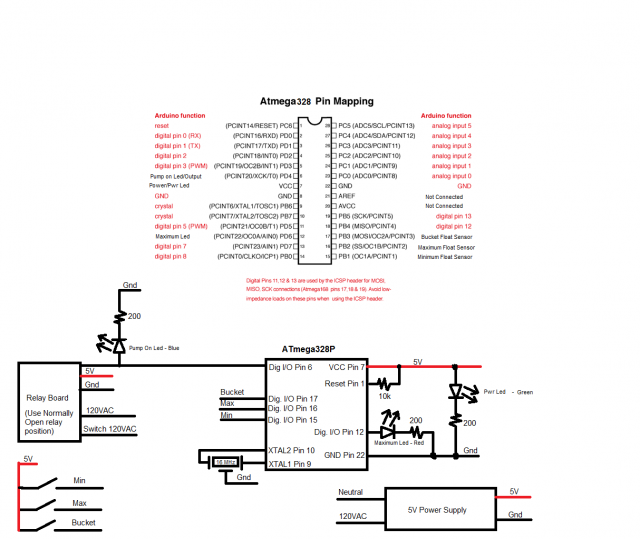
Down below is a basic schematic. I think the parts are self explanatory. If you need help identify where to use them, please let me know and I'll clear it up for you.
A Few things to note:
- The power supply must be disassembled to get at the printed circuit board inside.
- Where you mount things like the leds, plugs, etc... on the outside of the box are not important and are up to your preferences.
- This project does require you to have basic electronics knowledge / Tools
- To upload firmware to the microcontroller, you will need to download and install the Arduino code composer (its free)
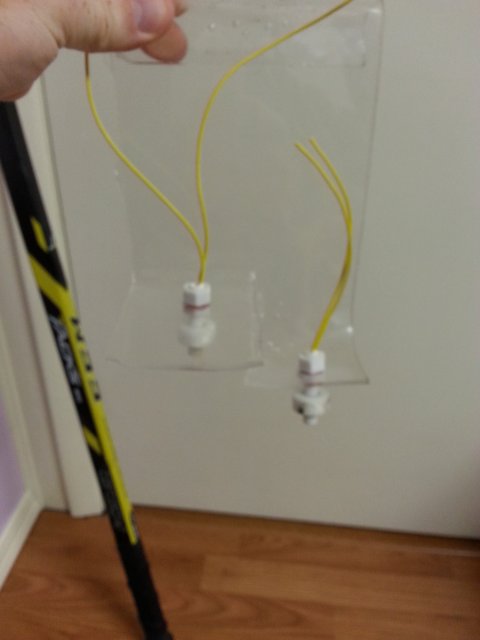
- You will have to form the plexi to fit your sump or tank. Here is an example from my original sump.

Source Code:
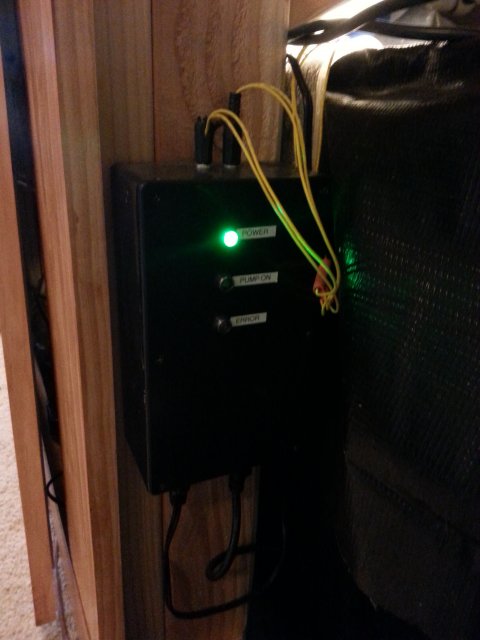
Finished Product

Hammond 1591ESBK ABS Project Box Black
$ 7.45, Qty1, From Amazon
Interpower 8301213 IEC 60320 C14 Screw Mount Power Inlet
$ 2.71, Qty1, From Amazon
10 Pcs US 3 Pins Power Socket Plug Black AC 125V 15A
$ 6.35, Qty1, From Amazon
AC 100-240V to DC 5V 2A Power Supply Charger Converter Adapter 3.5mm US Plug
$ 3.98, Qty1, From Amazon
5 Pcs Dual Row 5 Position Screw Terminal Strip 600V 15A
$ 3.50, Qty1, From Amazon
Wire, Stranded, 14AWG, 2'
$ 0.40, Qty1, From taydaelectronics.com
Wire, Stranded, 22AWG, 4' (use solid instead of stranded if using Arduino UNO board)
$ 0.40, Qty1, From taydaelectronics.com
5V Indicator Light LED One 1 Channel Relay Module For Arduino ARM PIC AVR DSP
$ 2.43, Qty1, From Amazon
**10Pcs 5 x 7 cm DIY Prototype Paper PCB Universal Board New - Only need one
$ 6.65, Qty1, From Amazon
**16MHz Ceramic Resonator
$ 0.09, Qty1, From taydaelectronics.com
**ATmega328P microcontroller 28 pin DIP package
$ 1.65, Qty1, From ebay
Float sensors
$ 1.00, Qty2, From ebay
LED 10mm Red Water Clear Ultra Bright
$ 0.10, Qty1, From taydaelectronics.com
LED 10mm Green Water Clear Ultra Bright
$ 0.10, Qty1, From taydaelectronics.com
LED 10mm Blue Water Clear Ultra Bright
$ 0.10, Qty1, From taydaelectronics.com
10K OHM 1/4W 5% Carbon Film Resistor
$ 0.01, Qty1, From taydaelectronics.com
200 OHM 1/4W 1% Metal Film Resistor
$ 0.04, Qty3, From taydaelectronics.com
2 Way Speaker Terminal
$ 0.44, Qty2, From taydaelectronics.com
Crimp terminals for terminal block
$ 1.00, several
10mm LED Bezel Holder Plastic
$ 0.27, Qty27, From taydaelectronics.com
Piece of acrylic to hold float sensors
$ 5.00
Pump
$ 20.00, Qty1, From Amazon
Tubing
$ 3.00
Heat shrink
$ 0.50
Glue
$ 1.00
Bucket
$ 1.50
**These Items in yellow can be replaced with a Arduino UNO board, for less soldering ($11.38)
Total Price: $ 69.67
Drill
Misc Drill bits
Cutting tool for cutting plastic
Soldering Iron and solder
Screw driver, #1 phillips
Lighter or heat gun
Hardware for loading Arduino Bootloader and Firmware
Arduino Code Compiler (Its free online)
Wire strippers/cutters
Misc Drill bits
Cutting tool for cutting plastic
Soldering Iron and solder
Screw driver, #1 phillips
Lighter or heat gun
Hardware for loading Arduino Bootloader and Firmware
Arduino Code Compiler (Its free online)
Wire strippers/cutters
Down below is a basic schematic. I think the parts are self explanatory. If you need help identify where to use them, please let me know and I'll clear it up for you.
A Few things to note:
- The power supply must be disassembled to get at the printed circuit board inside.
- Where you mount things like the leds, plugs, etc... on the outside of the box are not important and are up to your preferences.
- This project does require you to have basic electronics knowledge / Tools
- To upload firmware to the microcontroller, you will need to download and install the Arduino code composer (its free)
- You will have to form the plexi to fit your sump or tank. Here is an example from my original sump.

Source Code:
Code:
int MaxLed = 6;
int PumpLed = 4;
int Float1 = 9;
int Float2 = 10;
//int Float3 = 11; //Only needed if running a sensor in R/O water reserve

int Max=0;
int Min=0;
int BucketMin=0;
int i = 0;
boolean Toggle= true;
void setup()
{
  pinMode(MaxLed, OUTPUT);
  pinMode(PumpLed, OUTPUT);
  pinMode(Float1, INPUT);
  pinMode(Float2, INPUT);
  pinMode(Float3, INPUT);
}

void loop()
{
  Max = digitalRead(Float1);
  Min = digitalRead(Float2);
  //BucketMin = digitalRead(Float3);//Only needed if running a sensor in R/O water reserve
//if ((Max == 1) || (BucketMin == 1)//Only needed if running a sensor in R/O water reserve and it should replace the other if statement directly below
if (Max == 1)
{
    digitalWrite(MaxLed, Toggle);
    digitalWrite(PumpLed, LOW);
    Toggle = !Toggle;
    i=0;
  }
  else
  {
    if(i == 10)
    {
      if(Min == 0)
      {
        digitalWrite(PumpLed, HIGH);
      }
      else
      {
        digitalWrite(PumpLed, LOW);
      }
      i=0;
    }
    digitalWrite(MaxLed, LOW);

  }
  i++;
  delay(500);                  // waits for a half a second
}
Finished Product


