Filtration Ideas Please.

pacu mom

Goliath Tigerfish
MFK Member
Jun 8, 2006
3,314
2,114
179
northern CA
Is the tank going to be a bare floor tank? If so, consider just extending vertical uptake pipes down to just off the floor. If strategically placed, they will remove debris from floor, and leave nothing to be vacuumed. These "poop sucker" pipes work extremely well. I have the longest tank upgrade in the history of fish forums. I have a 405 gallon fiberglass tank I plan to use as a sump for redundant filtration. I will be using a vertical pipe to return the water from the sump back to the main tank.

My sump tank (I was shocked to see my picture on some websites and contacted them. They must have stolen my picture from a fish forum) 1607822834491.png
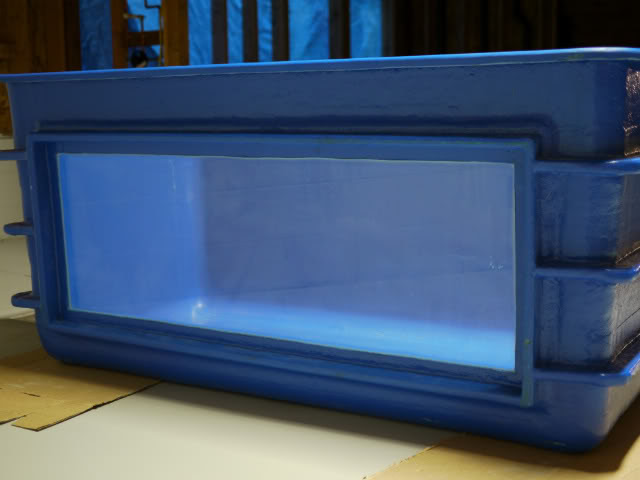

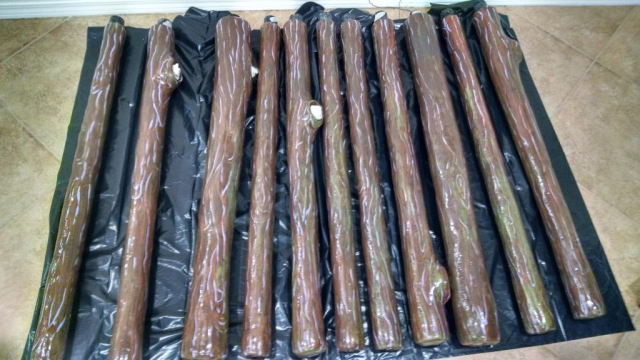
I love vertical pipes, and had eleven holes drilled on the top of my big tank. The eight uptakes and three returns for my mechanical filtration will be the only "decoration" in my undecorated tank. (will be making two more poop suckers, as I won't need uptakes near the top of the tank)
1607822979276.png
 
  • Love
Reactions: dr exum

jjohnwm

Sausage Finger Spam Slayer
MFK Member
Mar 29, 2019
3,769
9,200
164
Manitoba, Canada
The way you're feeling now was exactly how I was feeling when I first got my fibreglass tank. How the hell do I rig this thing up? I hunted high and low for ideas but in the end I wanted to utilise the KISS method (keep it simple stupid), and so i went with an extremely simple set up after seeing a fellow members set up on you tube. The simple drawing below shows you how basic it is. The fact that it has been running for about 18 months now without any problems whatsoever tells me I was right in doing it this way.

My tank is on a wooden stand. This raises the viewing window up to a better level for seeing the fish, and more importantly it means that the tank outlet is at a good position in relation to my barrel filter. If my tank had been on the floor I wouldn't have had enough height at the side to fit my barrel.

The drilling of the tank was easy. The bulkhead is 2". The internal elbow in the tank gives me my desired water level. The external elbow obviously directs the water down to my filtration. This consists of four stacked up crates. The top three are for mech and bio and have holes drilled in the bottom for ease of flow through each crate. The bottom crate just has a large hole cut in the side and my pump slots into this hole. The pump draws water down through the crates and as you can see I have a length of corrugated flex tubing returning the filtered water back to the tank. The end of the return lodges snuggly into a panel in my canopy, it cannot come loose, so no chance of any potential flooding incidents.

I heat the water with 3x300 watt heaters. They are all stuck to the inside of the tank via suction cups around the area where my water returns to the tank, for good heat distribution.

And that is it basically. They say the easiest way is usually the best, and that certainly rings true regarding my set up.

It's a bit "gluggy" but the sound is unimportant as the tank isn't in a family room. It's not the most aesthetically pleasing either, but again this tank isn't meant to be a centre piece of attraction. It's in my fish room, it's just for me.

One mistake i've made on the drawing is that it looks like you can see the tank water level through the viewing window. This isn't the case, i've just drew the window too high in relation to the tank.

Hope you can take something away from this and incorporate it into your set up. Good luck.

View attachment 1442995
I like this system; it's very close to the one I now use, with only a couple of minor changes. My barrel is drilled at the bottom and is piped into a sump beneath the tank. Mechanically filtered water is fed by gravity from the barrel to the sump, where it is heated, biologically filtered and then pumped back into the tank. I think the main advantages I derive from this are an increased water volume for the system as a whole, and also an extremely large amount of biological media which allows me to remove some when I need it to seed a new tank.

I also drill the hole on the side of the tank a bit higher, more or less where I want the eventual water level to be. On the inside, I attach an elbow and extend the intake pipe down to the bottom to better pick up debris. On the outside, I place a union ahead of the downwards-facing elbow. The union allows me to adjust the angle of the external elbow, which in turn gives me some adjustment of the exact water level in the tank; the higher I rotate the elbow, the higher the water level. If I were to change pumps, or adjust the flow rate by means of a valve or other control, rotating the external elbow can compensate and allow me to maintain the exact same water level as before the change.

A recent refinement I have added which is working beautifully is to substitute a Tee-fitting inside the tank for the elbow mentioned above. The Tee lets you attach the downpipe to draw the bulk of the water from the bottom of the tank, but the extra opening is great for adding yet another elbow (friction fit, not glued). This elbow is rotated such that it draws a tiny amount of water by surface skimming, which keeps the water surface nice and clean of debris or film. If I'm feeding floating food I just temporarily plug the skimmer opening until feeding is completed.
 
Last edited:
  • Like
Reactions: esoxlucius

Black_Diamond

Jack Dempsey
MFK Member
Oct 6, 2017
57
55
36
41
Reno, NV
Is the tank going to be a bare floor tank? If so, consider just extending vertical uptake pipes down to just off the floor. If strategically placed, they will remove debris from floor, and leave nothing to be vacuumed. These "poop sucker" pipes work extremely well. I have the longest tank upgrade in the history of fish forums. I have a 405 gallon fiberglass tank I plan to use as a sump for redundant filtration. I will be using a vertical pipe to return the water from the sump back to the main tank.

My sump tank (I was shocked to see my picture on some websites and contacted them. They must have stolen my picture from a fish forum) View attachment 1443056


I love vertical pipes, and had eleven holes drilled on the top of my big tank. The eight uptakes and three returns for my mechanical filtration will be the only "decoration" in my undecorated tank. (will be making two more poop suckers, as I won't need uptakes near the top of the tank)

View attachment 1443057
Is the 405 pentair your sump tank? Sorry that's just the way I read that. I like the pipes that look like wood those are very nice. Did you make them yourself?
 

pacu mom

Goliath Tigerfish
MFK Member
Jun 8, 2006
3,314
2,114
179
northern CA
Is the 405 pentair your sump tank? Sorry that's just the way I read that. I like the pipes that look like wood those are very nice. Did you make them yourself?
Yes, it will be my sump tank for redundant filtration. Primary mechanical filtration via six RTL-100s; primary biological filtration with two Ultima II 4000s.
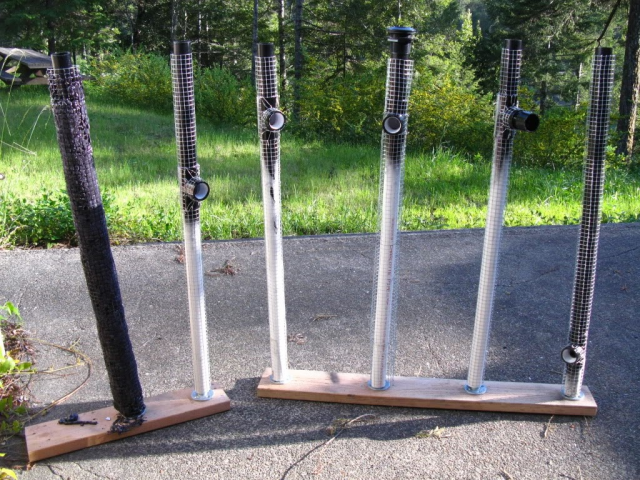
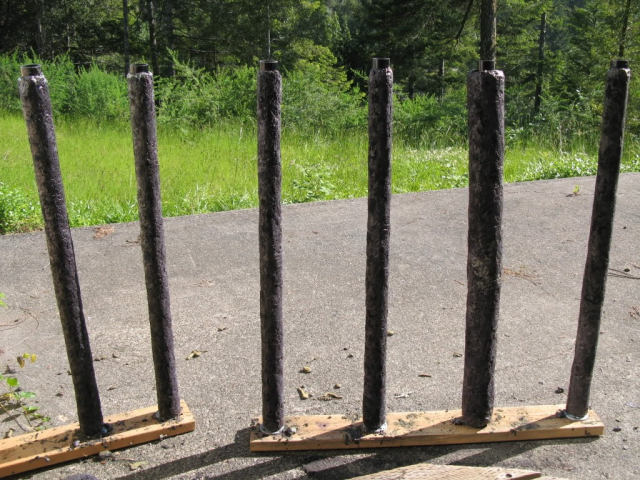
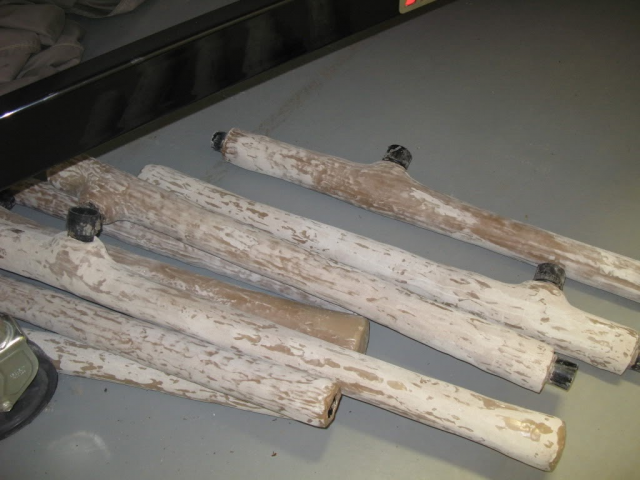
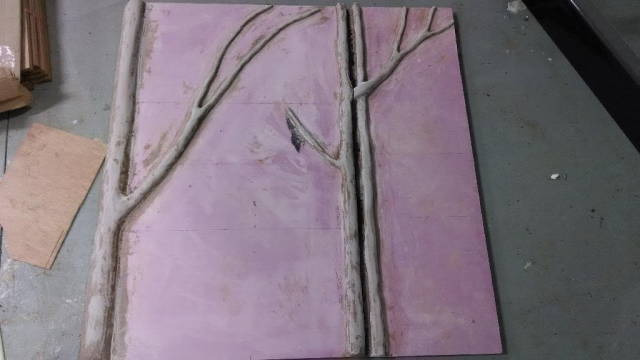
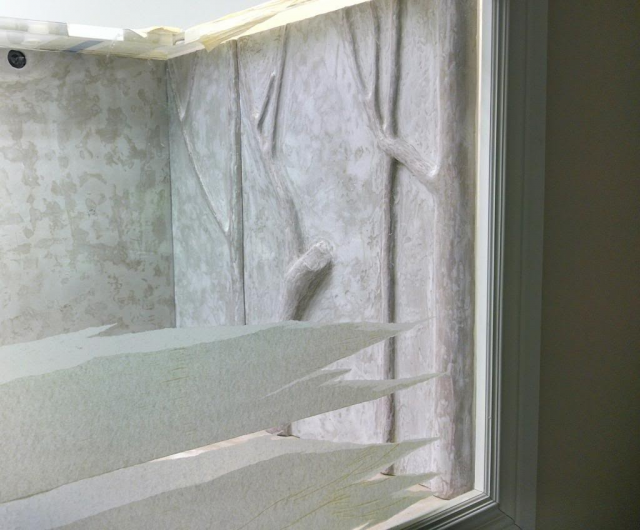
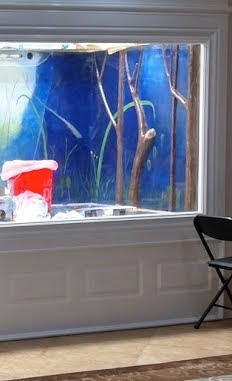
Since you asked, the pipes are covered with Pond Foam and then Polygem Zoopoxy, then painted.

1607829872258.png

Pond Foam
1607829904482.png

Polygem
1607829931375.png

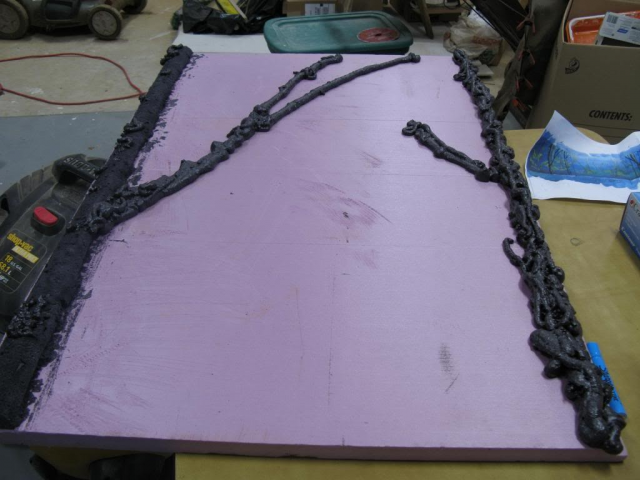
Backgrounds were done on foam panels with Pond Foam and Polygem
1607830062956.png

1607830084262.png

1607830129202.png

Painted with acrylic paint and sealed with clear epoxy
1607830178573.png
 
  • Love
Reactions: dr exum

esoxlucius

Balaclava Bot Butcher
MFK Member
Dec 30, 2015
3,690
13,743
194
UK
I like this system; it's very close to the one I now use, with only a couple of minor changes. My barrel is drilled at the bottom and is piped into a sump beneath the tank. Mechanically filtered water is fed by gravity from the barrel to the sump, where it is heated, biologically filtered and then pumped back into the tank. I think the main advantages I derive from this are an increased water volume for the system as a whole, and also an extremely large amount of biological media which allows me to remove some when I need it to seed a new tank.

I also drill the hole on the side of the tank a bit higher, more or less where I want the eventual water level to be. On the inside, I attach an elbow and extend the intake pipe down to the bottom to better pick up debris. On the outside, I place a union ahead of the downwards-facing elbow. The union allows me to adjust the angle of the external elbow, which in turn gives me some adjustment of the exact water level in the tank; the higher I rotate the elbow, the higher the water level. If I were to change pumps, or adjust the flow rate by means of a valve or other control, rotating the external elbow can compensate and allow me to maintain the exact same water level as before the change.

A recent refinement I have added which is working beautifully is to substitute a Tee-fitting inside the tank for the elbow mentioned above. The Tee lets you attach the downpipe to draw the bulk of the water from the bottom of the tank, but the extra opening is great for adding yet another elbow (friction fit, not glued). This elbow is rotated such that it draws a tiny amount of water by surface skimming, which keeps the water surface nice and clean of debris or film. If I'm feeding floating food I just temporarily plug the skimmer opening until feeding is completed.
That rough sketch of mine is an old one of how I envisaged my system to work, and by and large I haven't had the need to tweak anything....except one major major thing. It's obvious from the diagram that it is a surface skimming system but when you have big messy fish a surface skimming system is totally inadequate and impractical. You need bottom skimming to remove the waste they produce. It took me a few botched attempts to get it right but what I did was quite ingenious.

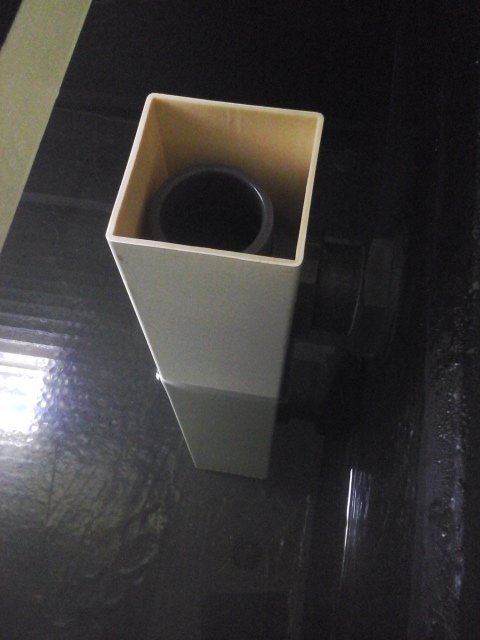
I brought some lengths of 4" PVC box section home from work and went about designing and fitting a section that slots over the internal elbow and then rests vertically reaching all the way down to the tank bottom. I drilled holes in the section where it touched the bottom and it ended up being a real game changer. My tank is spotless all the time now. You get the gist of it in the picture below. It's quite an old picture that, i've since changed it for a black one that blends in with the internal colour of the tank. When the tank is running the water level is about an inch from the top of that box section. All water that goes to my barrel filter is sucked from the bottom of the tank.

20190715_174303.jpg
 

Black_Diamond

Jack Dempsey
MFK Member
Oct 6, 2017
57
55
36
41
Reno, NV
Yes, it will be my sump tank for redundant filtration. Primary mechanical filtration via six RTL-100s; primary biological filtration with two Ultima II 4000s.
Since you asked, the pipes are covered with Pond Foam and then Polygem Zoopoxy, then painted.

View attachment 1443060

Pond Foam
View attachment 1443061

Polygem
View attachment 1443062

Backgrounds were done on foam panels with Pond Foam and Polygem
View attachment 1443063

View attachment 1443064

View attachment 1443065

Painted with acrylic paint and sealed with clear epoxy
View attachment 1443066
The finished product looks simply amazing man! The paneling is the exact finished product you could hope for with this type of tank. The filtration pipes are pretty cr what gave you that idea and how did you learn to do that? I wish you had a full tutorial I’d follow it to a T.
That rough sketch of mine is an old one of how I envisaged my system to work, and by and large I haven't had the need to tweak anything....except one major major thing. It's obvious from the diagram that it is a surface skimming system but when you have big messy fish a surface skimming system is totally inadequate and impractical. You need bottom skimming to remove the waste they produce. It took me a few botched attempts to get it right but what I did was quite ingenious.

I brought some lengths of 4" PVC box section home from work and went about designing and fitting a section that slots over the internal elbow and then rests vertically reaching all the way down to the tank bottom. I drilled holes in the section where it touched the bottom and it ended up being a real game changer. My tank is spotless all the time now. You get the gist of it in the picture below. It's quite an old picture that, i've since changed it for a black one that blends in with the internal colour of the tank. When the tank is running the water level is about an inch from the top of that box section. All water that goes to my barrel filter is sucked from the bottom of the tank.

View attachment 1443097
Saw you said that you brought this home from work. If I wanted to buy something similar where would I get this? It's a good idea. How far off the bottom is the pvc pipe that is being used to suction the bottom?
 

pacu mom

Goliath Tigerfish
MFK Member
Jun 8, 2006
3,314
2,114
179
northern CA
The finished product looks simply amazing man! The paneling is the exact finished product you could hope for with this type of tank. The filtration pipes are pretty cr what gave you that idea and how did you learn to do that? I wish you had a full tutorial I’d follow it to a T.
Some one who worked for a tank company that had a TV show, clued me in on Polygem.

Jrt has a thread with some fantastic builds out of Polygem.

marinerules made some beautiful coral with Polygem.


Last edited:

TexasMFK31

Peacock Bass
MFK Member
Jun 1, 2017
623
683
115
35
Yes, it will be my sump tank for redundant filtration. Primary mechanical filtration via six RTL-100s; primary biological filtration with two Ultima II 4000s.
Since you asked, the pipes are covered with Pond Foam and then Polygem Zoopoxy, then painted.

View attachment 1443060

Pond Foam
View attachment 1443061

Polygem
View attachment 1443062

Backgrounds were done on foam panels with Pond Foam and Polygem
View attachment 1443063

View attachment 1443064

View attachment 1443065

Painted with acrylic paint and sealed with clear epoxy
View attachment 1443066

I feel I have potentially asked you this one before, but the RTL-100s, are those mechanical filters washable? The websites I'm seeing don't state if they are reusable or not.
 

pacu mom

Goliath Tigerfish
MFK Member
Jun 8, 2006
3,314
2,114
179
northern CA
I feel I have potentially asked you this one before, but the RTL-100s, are those mechanical filters washable? The websites I'm seeing don't state if they are reusable or not.
They can be soaked in bleach and then rinsed. (according the the man who sold us our first RTLs) I don't do to well--first time I tried, I forgot about them and left them in bleach for weeks...the plastic part of the cartridges degraded :( Theoretically they can be reused multiple times (I've called and asked). Pressure washing also cleans out the gunk. RTLs are primarily used as mechanical filtration in big salt water/reef setups. The man who introduced us to RTLs set up and maintained salt water tanks for businesses. There is only one other MFK member who uses RTLs that I know of. Pentair Rainbow RTLs work great. You know, a lot of great filtration ideas originate with the reef keepers--like Herbie and Bean Animal filtration. We were fortunate to run into somebody who introduced us to RTLs. In my book, RTLs are great, perhaps just below sliced bread.
 
Last edited:
  • Like
Reactions: TexasMFK31

TexasMFK31

Peacock Bass
MFK Member
Jun 1, 2017
623
683
115
35
They can be soaked in bleach and then rinsed. (according the the man who sold us our first RTLs) I don't do to well--first time I tried, I forgot about them and left them in bleach for weeks...the plastic part of the cartridges degraded :( Theoretically they can be reused multiple times (I've called and asked). Pressure washing also cleans out the gunk. RTLs are primarily used as mechanical filtration in big salt water/reef setups. The man who introduced us to RTLs set up and maintained salt water tanks for businesses. There is only one other MFK member who uses RTLs that I know of. Pentair Rainbow RTLs work great. You know, a lot of great filtration ideas originate with the reef keepers--like Herbie and Bean Animal filtration. We were fortunate to run into somebody who introduced us to RTLs. In my book, RTLs are great, perhaps just below sliced bread.
Okay, that's good to know. Mechanical is what I am needing for my change. 2021 has to be better so I can upgrade my plywood tank, and the Ultima is great biological, but mechanical is something to be desired.
 
  • Like
Reactions: pacu mom
zoomed.com
hikariusa.com
aqaimports.com
Store