
Sorry for the semi formal format. I am overworked...
Aquatic photography also involves several “hidden” gorillas. The clarity of your water, health of your fishes and time of the day you conduct the session in all come into play.
Cloudy or debris filled water may not seem like much, but they can and often do ruin entire sessions. Trying to conduct a session when your fishes are sleeping often results in a waste of time preparing for the shoot. Also, it is advisable to shoot when there is no/ less light source asides from the tank. Although I’ve found that it doesn’t really make a difference.
Methods
Materials
Basic
Dslr camera (Canon 450D)
Master flash (Nissin Di622 Speedlite)
Slave flash (Britek AS-36B)
Styrofoam box


Optional
+ Camera accessories
Tripod stand
Remote trigger
Chillax couch.

Procedure
Preparation
1. Make sure to clean your glass inside and out. Clean the area between the water and the lid of the tank as well, especially if you’re going for surface feeding shots. Try not to shoot after feedings, water changes or adjusting the décor in the tank.


2. Place the slave flash over the area you intend to photograph. Point the flash upwards.

3. Cover the flash using a Styrofoam box. This will help soften the flash and even out the lighting. If you have more flashes, try covering the entire length of the tank with flashes & Styrofoam boxes. Play around with the setting of your flash and the height/size of the box until you find one that suits your style.

Camera Settings
This is the settings I use for most of my shots. Play around with it to get the best result.
Manual Mode
Shutter speed: 1/200
Aperture (F value): 6.3 – 8.0 (lower gives you a sharper pic & more lighting, higher – softer and dimmer pic)
ISO: 100
Flash exposure compo: +2
Quality: RAW
Techniques
There are basically 2 techniques that I’ve used. I call one the “go getter” and the other the “camper”.
I prefer the first style as it gives me more flexibility & thus far, better shots. I also improve better and seemed to have gained a better understanding of the art through this technique. The go getter style is one in which the camera is in my hand and my eye is at the “peephole” almost throughout the session.
I constantly adjust the settings depending on the position of the fish in question. If it is near the surface of the tank, I increase the F value. If I want to snap a subject that’s closer to the bottom, I decrease the F value. Generally I try and contain my shots to the green range as shown in the picture. The red area usually results in an overexposed shot, and the yellow, an underexposed one.

When taking pictures, I focus my shots on the eye of the fish. Another point to note is that shooting at an angle lower than the tank often gives an unnatural blue hue to the shot.

Upon finishing my session, I usually run the pictures I like through Lightroom 3 to get rid of blemishes and fine tune my shots. Following which, I watermark them with Paint.Net and share them first on MFK. As you can see, my equipment are pretty basic and cheap. Some are passed to me from my grand-dad, and have been used for the last 20 – 50 odd years. So it’s not true that you need insane equipment to produce quality photos (although it’d be nice). I’d like to thank www.aquatic-photography.com & Neoprodigy for helping me with several of the techniques described in this article, and critiquing my shots along the way. I have to say again that I am very much a beginner, and have plenty to learn from the far more experienced members of this art.
Cheers, and I’m looking forward to seeing more of your techniques & pics on MFK.
Xander
Photography Session Tips by Jcardona1
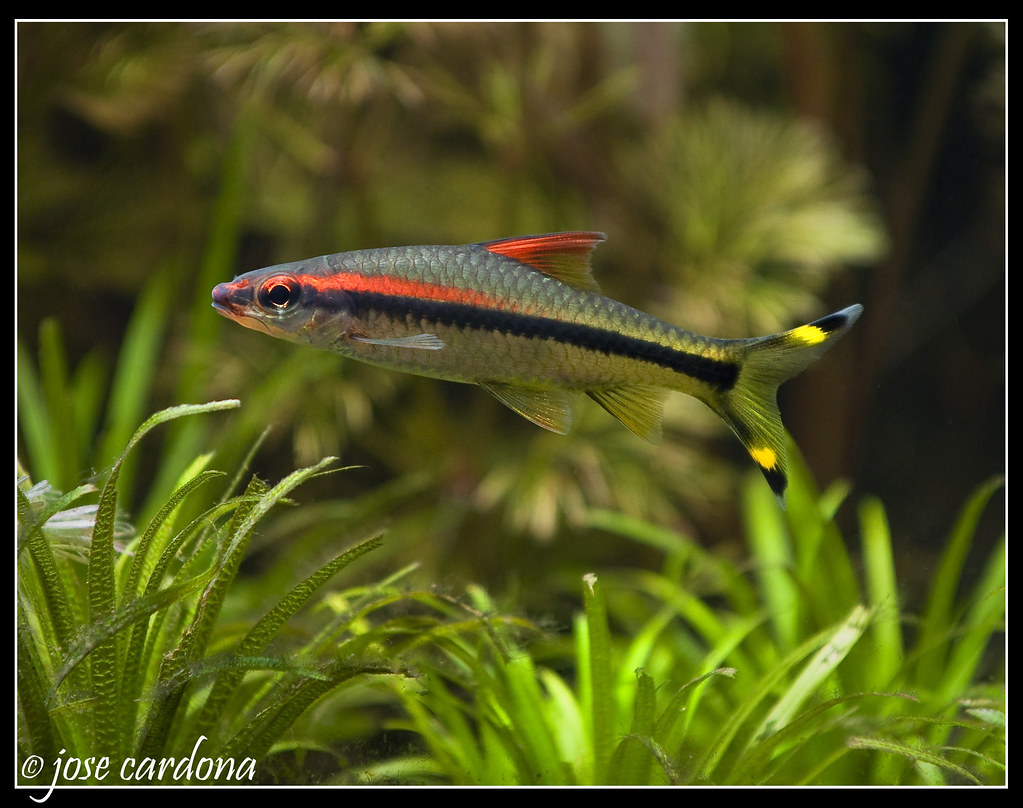
Wanted to take the time to show my little process for taking pics of fish. it's been work pretty good for me so far. please note i did NOT clean my glass and these are jpg files straight from the camera. so the quality isnt the best and they're a little under-exposed. but i think some of them are pretty good")
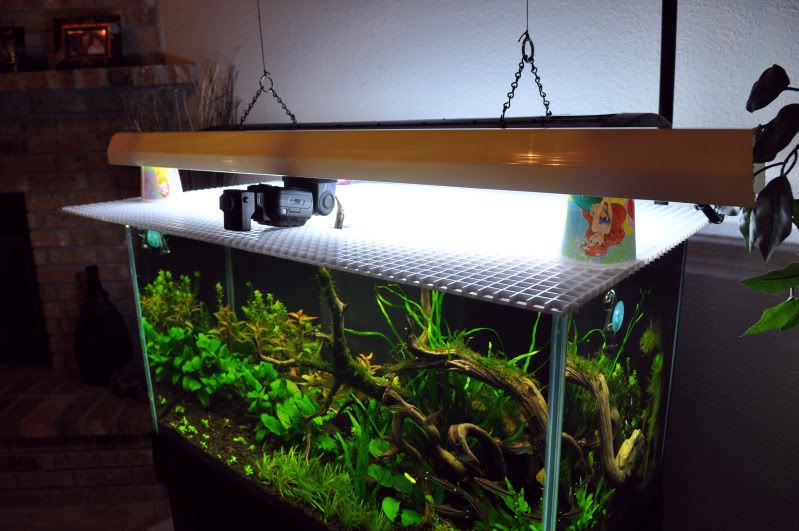
i use a sheet of eggcrate over the tank since i have a rimless tank. i take a piece of white plastic rain gutter and elevate it a few inches to clear my speedlight (disney cups optional ).
).
i place the speedlight in the middle pointing up and trigger it with a wireless radio trigger (CowboyStudios brand). place the flash in manual power mode and adjust settings accordingly. i havent tried it with two speedlights but i will in a few days.
enjoy!
Aquatic Photography: Basic Photo Session from Prep to Finish
Abstract
This article aims to guide readers through the basic preparation and shooting of an aquatic photo session. It is aimed at the general MFK population, who are unlikely willing to invest too much money into their equipment. It will encompass of the equipment needed, preparation for the shoot, (camera) settings used and techniques that should enable one to snap aquatic photos of reasonable quality and reasonable cost.Introduction
In aquatic photography, I find it helpful to remember that every photo I take is not the end result. It is merely part of a skill that develops over time and with practise. So don’t be disappointed or angered by less than satisfactory results, because today’s blurry, out of focus session could be the scaffold that produces next months POTM winning picture (especially since Chaitika is no longer allowed to compete).Aquatic photography also involves several “hidden” gorillas. The clarity of your water, health of your fishes and time of the day you conduct the session in all come into play.
Cloudy or debris filled water may not seem like much, but they can and often do ruin entire sessions. Trying to conduct a session when your fishes are sleeping often results in a waste of time preparing for the shoot. Also, it is advisable to shoot when there is no/ less light source asides from the tank. Although I’ve found that it doesn’t really make a difference.
Methods
Materials
Basic
Dslr camera (Canon 450D)
Master flash (Nissin Di622 Speedlite)
Slave flash (Britek AS-36B)
Styrofoam box
Optional
+ Camera accessories
Tripod stand
Remote trigger
Chillax couch.
Procedure
Preparation
1. Make sure to clean your glass inside and out. Clean the area between the water and the lid of the tank as well, especially if you’re going for surface feeding shots. Try not to shoot after feedings, water changes or adjusting the décor in the tank.
2. Place the slave flash over the area you intend to photograph. Point the flash upwards.
3. Cover the flash using a Styrofoam box. This will help soften the flash and even out the lighting. If you have more flashes, try covering the entire length of the tank with flashes & Styrofoam boxes. Play around with the setting of your flash and the height/size of the box until you find one that suits your style.
Camera Settings
This is the settings I use for most of my shots. Play around with it to get the best result.
Manual Mode
Shutter speed: 1/200
Aperture (F value): 6.3 – 8.0 (lower gives you a sharper pic & more lighting, higher – softer and dimmer pic)
ISO: 100
Flash exposure compo: +2
Quality: RAW
Techniques
There are basically 2 techniques that I’ve used. I call one the “go getter” and the other the “camper”.
I prefer the first style as it gives me more flexibility & thus far, better shots. I also improve better and seemed to have gained a better understanding of the art through this technique. The go getter style is one in which the camera is in my hand and my eye is at the “peephole” almost throughout the session.
I constantly adjust the settings depending on the position of the fish in question. If it is near the surface of the tank, I increase the F value. If I want to snap a subject that’s closer to the bottom, I decrease the F value. Generally I try and contain my shots to the green range as shown in the picture. The red area usually results in an overexposed shot, and the yellow, an underexposed one.
When taking pictures, I focus my shots on the eye of the fish. Another point to note is that shooting at an angle lower than the tank often gives an unnatural blue hue to the shot.
Conclusion
Upon finishing my session, I usually run the pictures I like through Lightroom 3 to get rid of blemishes and fine tune my shots. Following which, I watermark them with Paint.Net and share them first on MFK. As you can see, my equipment are pretty basic and cheap. Some are passed to me from my grand-dad, and have been used for the last 20 – 50 odd years. So it’s not true that you need insane equipment to produce quality photos (although it’d be nice). I’d like to thank www.aquatic-photography.com & Neoprodigy for helping me with several of the techniques described in this article, and critiquing my shots along the way. I have to say again that I am very much a beginner, and have plenty to learn from the far more experienced members of this art.
Cheers, and I’m looking forward to seeing more of your techniques & pics on MFK.
Xander
My Journey thus far

**All Images & Information is copyright 2010 Alexander Eng or used with permission. No material may be reproduced without permission.
Photography Session Tips by Jcardona1
Wanted to take the time to show my little process for taking pics of fish. it's been work pretty good for me so far. please note i did NOT clean my glass and these are jpg files straight from the camera. so the quality isnt the best and they're a little under-exposed. but i think some of them are pretty good
i use a sheet of eggcrate over the tank since i have a rimless tank. i take a piece of white plastic rain gutter and elevate it a few inches to clear my speedlight (disney cups optional
).i place the speedlight in the middle pointing up and trigger it with a wireless radio trigger (CowboyStudios brand). place the flash in manual power mode and adjust settings accordingly. i havent tried it with two speedlights but i will in a few days.
enjoy!
Last edited:
