Optimizing W/D Sump

Jon M

Polypterus
MFK Member
Dec 18, 2010
1,252
151
96
Port Saint John, FL
What is wrong with the 300 watts heaters you are using with that contoller? That's a good and common approach.
Don't like they way they looks. Would much rather have some bio blocks of some sort neatly stacked in there.

So I got that filter block today and put it into the water flow section between the center chamber and pump chamber. As with most things I try, there is always something I overlook or don't think of.

The water takes longer to run threw the inserted sponge, so the pump pushes water out of the pump chamber faster than the water can flow threw the inserted sponge so I had to turn my pump down. o_O Which I truly hate to do since I try to have it pushing as much as possible. The sponge was a few inches thicker than the slot. I squeeze it a bit to get it to fit in there thinking that would give it a nice snug fit so all water runs threw it, and it does. But maybe if I didnt squeeze as much the water would flow threw a little quicker allowing me to turn pump up a bit? I doubt it though. I'm currently just letting it run for a few and gonna check it in a couple hours.
 

jjohnwm

Sausage Finger Spam Slayer
MFK Member
Mar 29, 2019
3,754
9,166
164
Manitoba, Canada
Do you mean that you have stuffed a sheet of foam into that narrow vertical gap between those last two partitions? If so, then you are forcing the water through the "width" of the sheet of foam, rather than across its face; this presents the most resistance possible to the flow. Using a piece that is too large and that needs to be squeezed into position does indeed make this worse. And since the water flows downward through that slot, there isn't really any "head pressure" built up to help force the water through. And, unfortunately, since the cross-sectional area of that channel is so small, it will clog up in record time.

Sorry, but this is another set of examples of all that is bad about unnecessary partitions. Putting foam into that slot doesn't optimize the function of the filter; it simply magnifies its problems. I know you don't want to hear this, but removing that second-last partition, and then jamming a fairly rigid piece of foam in its place, so that the water flows through the entire piece of foam horizontally before freely flowing to the pump, would be about the only way this would work. Of course, the last partition would then still be as useless as ever...but it would still be nice and shiny...
 
  • Like
Reactions: esoxlucius

esoxlucius

Balaclava Bot Butcher
MFK Member
Dec 30, 2015
3,689
13,733
194
UK
So I got that filter block today and put it into the water flow section between the center chamber and pump chamber
Yeah, gotta agree with jjohnwm jjohnwm there. Bad bad move placing a sponge in a vertical slot. If it restricts the flow now when the sponge is at it's cleanest, then how do you thing things are going to go as it slowly clogs up!

If you go back to my crappy looking super efficient set up in post #11 I'll explain why I made the decision to put a bucket in that first partition because it addresses the problem you are facing now. I came to that decision by a lot of trial and error, it wasn't always like that.

Originally I had a heap of vertical sponges in that first section, of varying grades, all lined up against the partition glass. But I wasn't maximising the whole area of each square piece of sponge because the water only flowed through the bottom inch or so, thanks to the glass partition! This inch or so of sponge would clog quickly, and the water level in my first section would rise. So I very regularly had to clean them and that leads me to the most annoying part. As I disturbed the sponges and gently lifted them out most of the gunk collected on them would simply fall off and sink to the bottom of my first compartment, which then required syphoning out. Total pita.

I quickly worked out that using the full surface area of the sponge is best for optimum efficiency. How could I do this? My next plan was to place them horizontally. On top of a makeshift plastic platform made of a bit of thin pvc tubing and egg crate. This would keep that bottom gap unobstructed between first and second section. Bingo. I thought I'd solved it because the sponges blocked up a lot more slowly. However, when I did get round to cleaning them I was back to square one with the gunk thing when I lifted the sponges out, gunk all over.

I had to have a rethink and make it better, more workable. The Eureka moment came when I realised it would be better if the sponges were inside something, something I could just lift out on maintanance day, no gunk or anything. And that is when my bucket idea came into play.

It is brilliant.

My point is. At this moment you are in the very early stages of where I was. Trying to work things out. I got there in the end through trial and error. So will you.....but i'm afraid you gotta go back to the drawing board regarding your current plan!
 
  • Like
Reactions: jjohnwm

Jon M

Polypterus
MFK Member
Dec 18, 2010
1,252
151
96
Port Saint John, FL
Do you mean that you have stuffed a sheet of foam into that narrow vertical gap between those last two partitions? If so, then you are forcing the water through the "width" of the sheet of foam, rather than across its face; this presents the most resistance possible to the flow. Using a piece that is too large and that needs to be squeezed into position does indeed make this worse. And since the water flows downward through that slot, there isn't really any "head pressure" built up to help force the water through. And, unfortunately, since the cross-sectional area of that channel is so small, it will clog up in record time.

Sorry, but this is another set of examples of all that is bad about unnecessary partitions. Putting foam into that slot doesn't optimize the function of the filter; it simply magnifies its problems. I know you don't want to hear this, but removing that second-last partition, and then jamming a fairly rigid piece of foam in its place, so that the water flows through the entire piece of foam horizontally before freely flowing to the pump, would be about the only way this would work. Of course, the last partition would then still be as useless as ever...but it would still be nice and shiny...
Yeah, gotta agree with jjohnwm jjohnwm there. Bad bad move placing a sponge in a vertical slot. If it restricts the flow now when the sponge is at it's cleanest, then how do you thing things are going to go as it slowly clogs up!

If you go back to my crappy looking super efficient set up in post #11 I'll explain why I made the decision to put a bucket in that first partition because it addresses the problem you are facing now. I came to that decision by a lot of trial and error, it wasn't always like that.

Originally I had a heap of vertical sponges in that first section, of varying grades, all lined up against the partition glass. But I wasn't maximising the whole area of each square piece of sponge because the water only flowed through the bottom inch or so, thanks to the glass partition! This inch or so of sponge would clog quickly, and the water level in my first section would rise. So I very regularly had to clean them and that leads me to the most annoying part. As I disturbed the sponges and gently lifted them out most of the gunk collected on them would simply fall off and sink to the bottom of my first compartment, which then required syphoning out. Total pita.

I quickly worked out that using the full surface area of the sponge is best for optimum efficiency. How could I do this? My next plan was to place them horizontally. On top of a makeshift plastic platform made of a bit of thin pvc tubing and egg crate. This would keep that bottom gap unobstructed between first and second section. Bingo. I thought I'd solved it because the sponges blocked up a lot more slowly. However, when I did get round to cleaning them I was back to square one with the gunk thing when I lifted the sponges out, gunk all over.

I had to have a rethink and make it better, more workable. The Eureka moment came when I realised it would be better if the sponges were inside something, something I could just lift out on maintanance day, no gunk or anything. And that is when my bucket idea came into play.

It is brilliant.

My point is. At this moment you are in the very early stages of where I was. Trying to work things out. I got there in the end through trial and error. So will you.....but i'm afraid you gotta go back to the drawing board regarding your current plan!
So my thought process was right on not wanting to squeeze the sponge. Now I know you want the flow threw the surface area front and not vertical. Oh well. It was like 12 bucks in sponges. I went ahead and removed it and turned the pump back up!
 

esoxlucius

Balaclava Bot Butcher
MFK Member
Dec 30, 2015
3,689
13,733
194
UK
You say the first section is sealed. We can see the tape, and also those two drains from your display tank are hard plumbed into your lid. So yeah, in my eyes, as you said in an earlier post "nearly impossible to get into".......but yet you change your filter pad out once a week?

How do you get into it to change out the pads? Do you have to unscrew the drains attached to the lid and then take the tape off and remove the lid that way. Or is it possible to take the tape off and ever so slightly lift the lid by an inch or two, to just give you enough wiggle room, sort of, to take out the pads and replace with new ones? But with the pipes attached to the lid I imagine that would be very difficult.

Either way would leave me spitting feathers, what a faff.
 

Jon M

Polypterus
MFK Member
Dec 18, 2010
1,252
151
96
Port Saint John, FL
You say the first section is sealed. We can see the tape, and also those two drains from your display tank are hard plumbed into your lid. So yeah, in my eyes, as you said in an earlier post "nearly impossible to get into".......but yet you change your filter pad out once a week?

How do you get into it to change out the pads? Do you have to unscrew the drains attached to the lid and then take the tape off and remove the lid that way. Or is it possible to take the tape off and ever so slightly lift the lid by an inch or two, to just give you enough wiggle room, sort of, to take out the pads and replace with new ones? But with the pipes attached to the lid I imagine that would be very difficult.

Either way would leave me spitting feathers, what a faff.
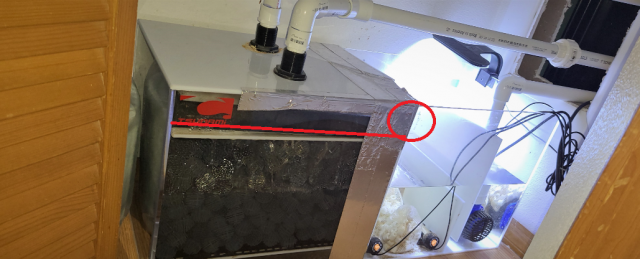
So ya, the tape is simply holding down a pressure crack in the top. It is not holding down a "lid." I mean you can call it a lid, but that would imply it comes up. and again, it does not. From stock, factory, that top is SEALED down to the sides. Glued.

So the media I change weekly is a pull out tray. I made a line where the tray rest above the bioballs and then circled the front where it pulls out. So THAT is an entrance to the chamber technically, but if you try to pull it out all the way it will bump into your return plumbing. Not impossible, but inconvenient. Not that taking the tray completely out would matter, since we're talking about roughly like a 2" opening for the tray which I most def cannot get my hand/arm into for any sort of maintenance.

Hopefully that addresses what you meant. The more we mull it over the more I feel like I really don't have anything setup with this w/d inaccurately, and it doesn't seem like there's much I could do to make it more efficient besides physically altering it. (which I won't do, I'd rather just go buy another design I approve of)

slide tray.png
 

esoxlucius

Balaclava Bot Butcher
MFK Member
Dec 30, 2015
3,689
13,733
194
UK
Right, I'm with you, I get it now.

In theory then, as impractical as it currently seems, things could be improved dramatically by ensuring that your mech floss is in the correct place thus ensuring that water can't flow over and /or around it. This would solve your concerns over the regular build up of difficult to remove crud in the bottom of your sump.

And if you did solve it then there really wouldn't be any need to ever go into your near impossible to reach bio ball w/d section. I believe they are designed to be almost self cleaning due to the constant flow. That's probably the reason why it's sealed, because there's no reason to go in there, other than to put in your bio balls in the first place.

I think the whole thing is still a bit of a faff, but I sort of understand the seemingly daft design now.

Just a couple of things to ponder over......

Why does the water bypass the floss in the first place? Is it because it's a faff to get the floss in the correct position in the tray? Or is it because your stock is on the heavy side and they produce hell of a lot of waste which fills the floss quickly? Or is your turnover very high and the section where your floss is can't take the high flow so it flows over/around your floss?

A bit of tweaking and you could probably make it work, sort of. Though I must admit, I much prefer the simplicity of mine, lol.
 

jjohnwm

Sausage Finger Spam Slayer
MFK Member
Mar 29, 2019
3,754
9,166
164
Manitoba, Canada
Wow...I take back anything diplomatic I may have said about that sump before. That is, simply put, one stupid design...and, of course, the more experience you have with it, the more obvious that is becoming to you.

So, if you are dead-set on doing no mods and just buying another one, bear in mind that your desired features and requirements are likely to change over time, so try to get something versatile and user-configurable, with easy access to set it up as you wish. With luck, it might be almost as effective as a good DIY design like Esox showed. ;)
 
Last edited:

esoxlucius

Balaclava Bot Butcher
MFK Member
Dec 30, 2015
3,689
13,733
194
UK
Wow...I take back anything diplomatic I may have said about that sump before. That is, simply put, one stupid design...and, of course, the more experience you have with it, the more obvious that is becoming to you.

So, if you are dead-set on doing no mods and just buying another one, bear in mind that your desired features and requirements are likely to change over time, so try to get something versatile and user-configurable, with easy access to set it up as you wish.
Lol, I chose to offer the diplomatic version....but your no whistles and bells version works too.
 

Jon M

Polypterus
MFK Member
Dec 18, 2010
1,252
151
96
Port Saint John, FL
Right, I'm with you, I get it now.

In theory then, as impractical as it currently seems, things could be improved dramatically by ensuring that your mech floss is in the correct place thus ensuring that water can't flow over and /or around it. This would solve your concerns over the regular build up of difficult to remove crud in the bottom of your sump.

And if you did solve it then there really wouldn't be any need to ever go into your near impossible to reach bio ball w/d section. I believe they are designed to be almost self cleaning due to the constant flow. That's probably the reason why it's sealed, because there's no reason to go in there, other than to put in your bio balls in the first place.

I think the whole thing is still a bit of a faff, but I sort of understand the seemingly daft design now.

Just a couple of things to ponder over......

Why does the water bypass the floss in the first place? Is it because it's a faff to get the floss in the correct position in the tray? Or is it because your stock is on the heavy side and they produce hell of a lot of waste which fills the floss quickly? Or is your turnover very high and the section where your floss is can't take the high flow so it flows over/around your floss?

A bit of tweaking and you could probably make it work, sort of. Though I must admit, I much prefer the simplicity of mine, lol.
Well, I think the floss does muck up fast. I've skipped the week before and gone near 2 weeks and yes, the culprit I believe in that scenario is the floss clogging a bit and water flowing around. I think my very high flow in conjunction with that makes that happen if I don't change the floss weekly. I don't think I'm overly stocked. I feel like if the tray was designed with higher walls that would help some? Or maybe if I bought another floss that was a little wider than the tray so I could taper it up the edges? The stuff I buy seems to work nice, but it's width is damn near the width from wall to wall, maybe even a hair under... Maybe someone could suggest a different mech media?... Frankly, I just shopped for good price, reviews, and this one seemed to have a less and more porous layer so that seems pretty good. more fine on the bottom side obv)

Wow...I take back anything diplomatic I may have said about that sump before. That is, simply put, one stupid design...and, of course, the more experience you have with it, the more obvious that is becoming to you.

So, if you are dead-set on doing no mods and just buying another one, bear in mind that your desired features and requirements are likely to change over time, so try to get something versatile and user-configurable, with easy access to set it up as you wish. With luck, it might be almost as effective as a good DIY design like Esox showed. ;)
Thank you! I'm not sump design guru, but I really did, and still do, think this design is pretty wonky...
 
zoomed.com
hikariusa.com
aqaimports.com
Store