It’s been a whole year

Ulu

Potamotrygon
MFK Member
Dec 13, 2018
1,843
3,130
164
The Sunny San Joaquin
I had to make a steel brace to square up the front body. It wasn’t too difficult and it really huge difference in the geometry of the nose.

Then I spent a lot of time getting the front bumper, and the front fenders, and the radiator shell all squared up and straight.

That made it noticeable that the headlights we’re not level and I had to slot out the holes for the spreader bar.

I now have the headlights, parking lights and front turn signals mounted on the car and straightened nicely. I rewired all those lights from scratch except for one turn signal. They are all loomed too.

The wires don’t go anywhere, because there is no firewall or switch panel yet.

But wiring is slow and tedious work if you solder everything & double heat shrink all the connections. I redesigned the wiring system to have fewer wires and fewer connections. In the end I don’t think it’s going to have any crimp connectors, although there will be some soldered-on terminals.

My next major task will be to finish trimming and attaching the rear fenders.

Once that is done I am going to do some welding on the crossmembers to help unitize them into the car.
 

Ulu

Potamotrygon
MFK Member
Dec 13, 2018
1,843
3,130
164
The Sunny San Joaquin
Those fenders need a little bit more trimming but I decided to wait until I got the crossmembers welded up.

I spent some time cleaning up the pushrod for the brakes, & I had to do some welding to repair the clutch pedal hook. It was pretty worn so I welded it up and re-ground it to shape.

CBB117E4-E276-4FB1-A269-6E79CE8FDFD3.jpeg
9E1D9381-0082-416E-9756-A8AECCD70F6A.jpeg
D7FA5E8C-65BA-45D8-873A-91CD0054AEE3.jpeg
I straightened up the bent pedals, Installed some new pedal rubbers, and reinstalled the pedal assembly.

Since I had to replace the whole master cylinder and front plumbing for the brakes to work, I put that all back together and spent some time bleeding the brakes. They work ok now, but the original structure that held the master cylinder in place was garbage and I had to replace it with some temporary struts and angle braces so it’s kind of like a tinker toy set right now.
 
  • Like
Reactions: Caveden

Ulu

Potamotrygon
MFK Member
Dec 13, 2018
1,843
3,130
164
The Sunny San Joaquin
The master cylinder was still moving a little, so I added another strut and a clip. It is much more solid now. That also took out all the free play of my brake pedal, and I had to remove the pushrod and readjust it.

I got the firewall in place with 7 of 8 bolts secure. One more and I can do the cowl alignment and start to mold the firewall in to the cowl with epoxy filler, polyester resin, and fiberglass cloth.

But first I have to trim the floor pan off another quarter inch on each edge, where I had trimmed it to fit the body, because the body was originally set up too wide.

That became obvious when you looked at the wedge shaped gaps it was throwing into the Runningboard assemblies and the fact that the doors did not close evenly.

Because the body is already on the chassis I will have to do this lying on the floor with an electric nibbler overhead but it shouldn’t be too difficult. I will have to trim the last couple inches with a sawzall because there is a 14 gauge doubler plate below.
 

Ulu

Potamotrygon
MFK Member
Dec 13, 2018
1,843
3,130
164
The Sunny San Joaquin
The brakes are done and I discovered that what I thought was a dripping master cylinder was is a cracked plastic brake fluid reservoir.

I was able to order a new one for $11 and it is now installed. Just for yocks I looked up the plastic reservoir for my Toyota and it’s $98! Anyhow the brake system is sealed up and bled and works OK for now.

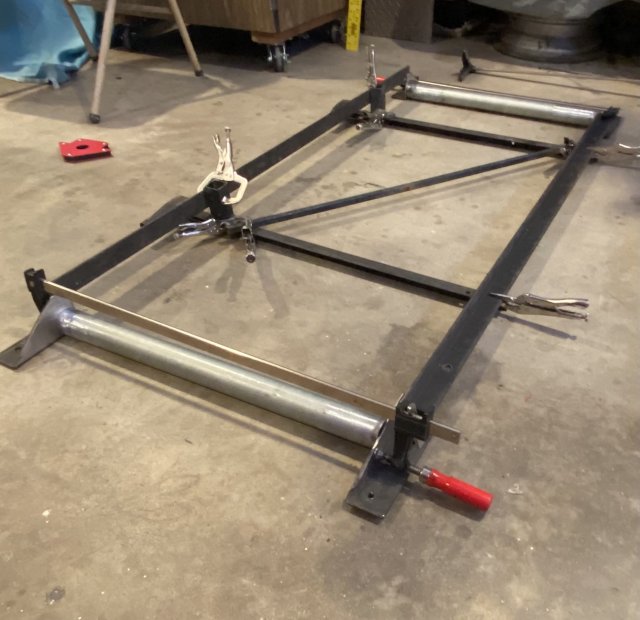
I got the floor pan all trimmed up, and I welded the crossmembers (runningboard braces) together as a frame with some 1.75” od steel tubing braces.

Here it is all clamped together with some temporary bracing. Notice that the areas I’m going to weld are very shiny, because you cannot weld over dirt, rust and paint and get a good weld.
1A119A39-5F1F-44E6-8FC8-1D163CD1C748.jpeg

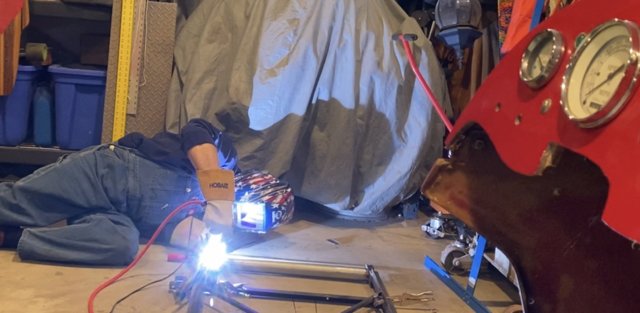
An old retired fish keeper crawls on the floor to practice out of position welding techniques:

C8A23A31-773D-43F9-AFD2-CC1B65D7C448.jpeg
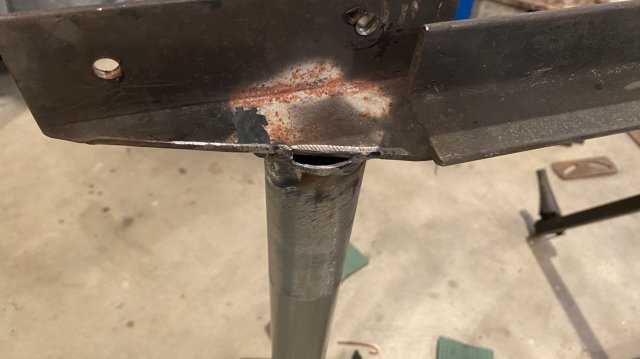
Here’s an example of my welding where I had to close the big gap at the end of the tube.

90FBB974-75DD-4B89-AC4C-7561C1E50BAB.jpeg
you can see that I didn’t clean the metal quite as well as I should have and brought some corrosion up to the top.
474FAF39-0121-4BD9-834B-DFE78491739D.jpeg

It doesn’t look 100% professional to me but it’s all very strong. I got good fusion and plenty of penetration, because I know what to look for as I am welding.

So here it is installed under the car with a few bolts. Where the new tube spans it was previously just spanned by the plywood and fiberglass runningboard. The spacing and alignment was only obtained from the sheet-metal floor pan, the formed edge of which I have trimmed off completely now.

image.jpg
 

Ulu

Potamotrygon
MFK Member
Dec 13, 2018
1,843
3,130
164
The Sunny San Joaquin
I made a “Monte Carlo bar” which ties the rear shock towers together, and I added 6 struts to the rear subframe. Two are short clamp-on arrangements which releave the floor pan of vertical forces from the rear subframe.

The other four pick up the rear subframe to the rear shock tower at the sub frame crossmember and at the tail of the car. In doing so they also help relieve the floor pan of vertical forces. Those were all bolted together and each made out of one piece of electro mechanical tubing.

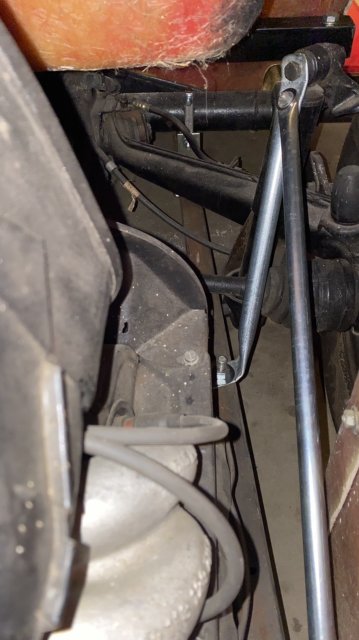
Here you can see the two right hand struts, both being silver in color, and one end of the Monte Carlo bar, which is a square tube painted shiny black. The short strut in front is silver too, and you can see it clamps around the Volkswagen torsiontube.
AF53BBD8-5075-4510-B343-0A645B868A13.jpeg
Anyhow, that all went together quite well and now that the frame is stiff in the back, I can get the rear fenders squared up and attached to the body with confidence.

but first I decided to put the steering back together. The main steering column was extended about 2 feet because the wheelbase of this car is longer than stock and the driver sits essentially in the rear seat position. This piece of tubing was used to extend the steering column, and I didn’t notice it had a big defect in it, until I burnished all the rusty paint and dirt off of it on the wire wheel.

73AD2162-3BE2-40F7-84ED-807301EAED87.jpeg

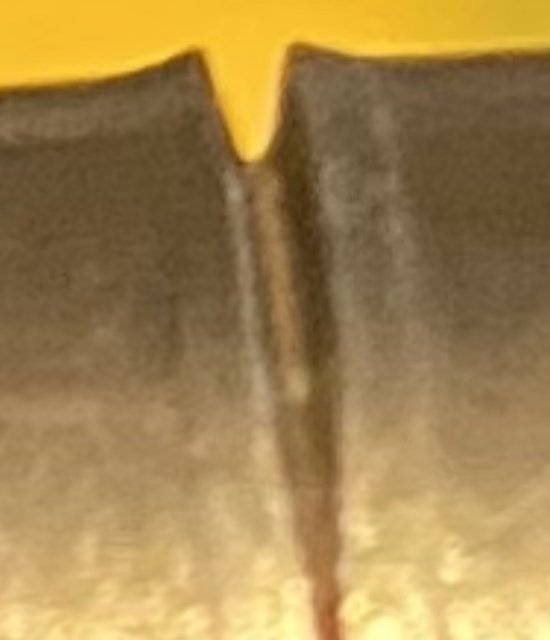
Look closely and you’ll see that there is a gash in this tube, made with a tubing cutter. It goes 2/3 of the way around the tube & nearly penetrates the wall.
0A9F1F5B-E3CC-40AE-9FEF-427079CEE795.jpeg
So what do you think? Poor attention to detail? Head in the sand mistake ignored? Deliberate attempt at sabotage?

What the heck was going on here?
 
Last edited:

esoxlucius

Alligator Gar
MFK Member
Dec 30, 2015
3,670
13,557
194
UK
I think we have a problem Houston! Your pics, for some reason are not showing, not for me anyway.

You describe your work in such detail, and with a childlike enthusiasm. I was so looking forward to critiquing your endeavours, and explaining to you how I'd have done it instead, probably resulting in the car falling to bits on its first test run, lol.

Get them pics sorted! Lol.
 
  • Like
Reactions: Ulu

Ulu

Potamotrygon
MFK Member
Dec 13, 2018
1,843
3,130
164
The Sunny San Joaquin
Esox, nobody else is complaining. I posted these at the VW forum and the welding forum too.
 

esoxlucius

Alligator Gar
MFK Member
Dec 30, 2015
3,670
13,557
194
UK
Esox, nobody else is complaining. I posted these at the VW forum and the welding forum too.
It's sorted itself out, pics are showing now :thumbsup:

That defect, especially in a such a critical area as the steering column, is quite an eye opener. Good job finding that. Is that from a previous owners botch job?
 

Ulu

Potamotrygon
MFK Member
Dec 13, 2018
1,843
3,130
164
The Sunny San Joaquin
It's sorted itself out, pics are showing now :thumbsup:

That defect, especially in a such a critical area as the steering column, is quite an eye opener. Good job finding that. Is that from a previous owners botch job?
Maybe his wife got tired of him working on the car and brought out the tubing cutter?

Anyhow, I will/have gone over every bit of kit here well before major road trials.
 

Ulu

Potamotrygon
MFK Member
Dec 13, 2018
1,843
3,130
164
The Sunny San Joaquin
. . . You describe your work in such detail, and with a childlike enthusiasm. I was so looking forward to critiquing your endeavours . . .
I want to break this to you gently, but I don’t record these things in such intricate detail for your enjoyment. This is my form of recordkeeping so I know what I’ve done to the vehicle and I have pictures and descriptions of my work and when it was done.

Because these forums sometimes vaporize suddenly, I have recorded this information on 4 of them. There’s often a lot of copy and paste involved.

Anyhow, what may perhaps appear to the casual observer as a child like enthusiasm, is actually an engineer’s innate sense of self-preservation, through extensive documents on everything performed, observed, corrected, etc.
 
  • Like
Reactions: Caveden
zoomed.com
hikariusa.com
aqaimports.com
Store