Weld-on #40 and #42

Hari Haran

Jack Dempsey
MFK Member
May 30, 2018
72
38
36
Table saw, and lots of work.

Pouring 40 works the best.
Yeah I agree, the reason I want to try rods, it's already freezing in Jersey, I thought of doing it in my garage with one of those gas heaters where rods are less work glueing it, I cannot find any company which sells cast rods so would just do #40.
 

BichirKing

Dovii
MFK Member
Jun 19, 2018
886
988
105
51
PNW
the cool thing about Weldon is that you can make multiple pours without a cold weld. i got about a 1/2" thick reinforcement with the 100ml. also a heater will help keep the bubbles out plus if you stir the mix slowly that helps out a lot with no bubbles. you will only need to stir it for about a minute. you only have about 20 mins before it starts thickening. temperature plays a big roll in how long it takes to completely set up and be hard enough to move onto another seam. it was mid 50s in my garage and it took about 2 hrs per seam. i went to Wal-Mart and found some cheap measuring cups and a meat injector needle that had a 5ml on it. i filled the tube up to 5ml then put that in a cheap plastic food container and added the measured out acrylic to the container. slowly stir that making sure you scrape the sides of the container with your mixing stick, i used popsicle sticks, for about a minute. it will kinda seem "cloudy" but that goes away when it sets up. make sure you put masking tape, i used the blue kind, along the seam you want to pour. i left about a 1/4" gap between the seam and tape on each side. pour the mix in and after a few minutes slowly pull the tape up and that will leave a nice edge. be careful anything you get weld on on it will become part of the acrylic.


 

Hari Haran

Jack Dempsey
MFK Member
May 30, 2018
72
38
36
the cool thing about Weldon is that you can make multiple pours without a cold weld. i got about a 1/2" thick reinforcement with the 100ml. also a heater will help keep the bubbles out plus if you stir the mix slowly that helps out a lot with no bubbles. you will only need to stir it for about a minute. you only have about 20 mins before it starts thickening. temperature plays a big roll in how long it takes to completely set up and be hard enough to move onto another seam. it was mid 50s in my garage and it took about 2 hrs per seam. i went to Wal-Mart and found some cheap measuring cups and a meat injector needle that had a 5ml on it. i filled the tube up to 5ml then put that in a cheap plastic food container and added the measured out acrylic to the container. slowly stir that making sure you scrape the sides of the container with your mixing stick, i used popsicle sticks, for about a minute. it will kinda seem "cloudy" but that goes away when it sets up. make sure you put masking tape, i used the blue kind, along the seam you want to pour. i left about a 1/4" gap between the seam and tape on each side. pour the mix in and after a few minutes slowly pull the tape up and that will leave a nice edge. be careful anything you get weld on on it will become part of the acrylic.
B BichirKing , thanks for the steps involved.

i am planning to sand and polish the tank, should i apply #40 before polishing?

Also some of the seams needs work, has some splitting on the outside so i will be doing #4, should i use #4 on the inside seams as well before doing #40, so that covers the inside seams?
 

BichirKing

Dovii
MFK Member
Jun 19, 2018
886
988
105
51
PNW
no 4 is weaker and not suited to seam repair. 40 is what you want to use to repair the seam. as far as polishing it can be done before or after. how cloudy is the tank?
i'll look for a thread where a guy repaired a huge tank, lots of good info and post it.
 

BichirKing

Dovii
MFK Member
Jun 19, 2018
886
988
105
51
PNW
I need to correct what I previously stated. I used 200ml for the 8' long pours. 100ml was used on the short 2' runs.
 

Hari Haran

Jack Dempsey
MFK Member
May 30, 2018
72
38
36
no 4 is weaker and not suited to seam repair. 40 is what you want to use to repair the seam. as far as polishing it can be done before or after. how cloudy is the tank?
i'll look for a thread where a guy repaired a huge tank, lots of good info and post it.
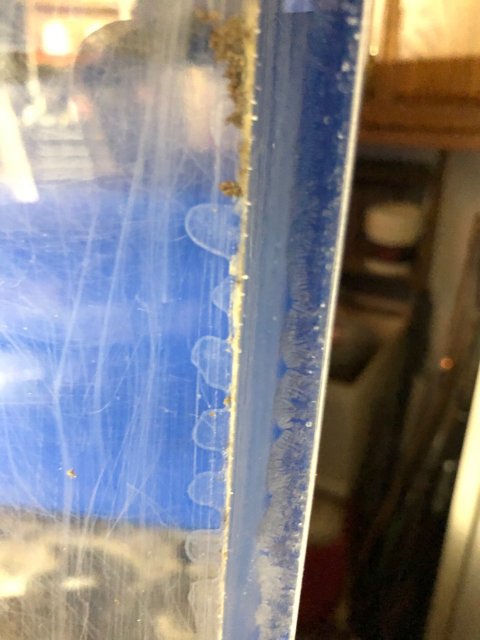
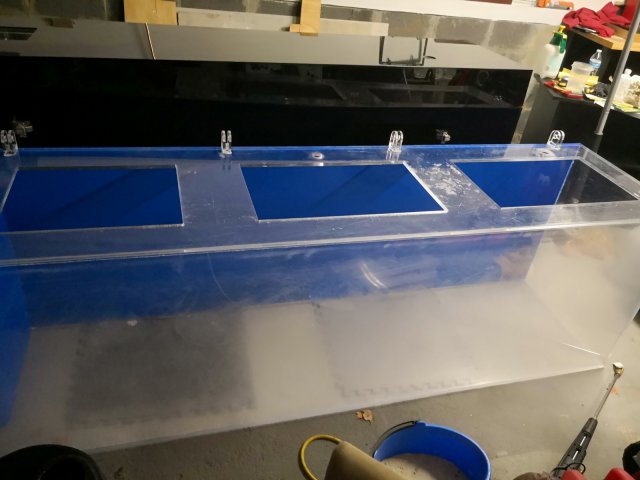
ok, is there a way to fix the seams, i was told to run #4 on the outer seams which made sense as it's not easy to apply #40 on the outside please find seam pic attached.

also tank pic below, its bit cloudy just lots of scratches.

323e5ce420da4faab41cc67be4e4e7bbcd7c3ca8-1.jpg

IMG_20181129_074613.jpg
 
  • Like
Reactions: BichirKing

BichirKing

Dovii
MFK Member
Jun 19, 2018
886
988
105
51
PNW
everything I've read says #4 is for virgin material. #16 is #4 with pieces of acrylic melted into it. started with a tank in similar condition. I started with 1500grit wet sand paper, use lots of water. use an orbital sander and keep it moving in large swipes. after you notice the major scratches start coming out I switched to 2000 grit and repeated. I also used headlight restorer fog remover it worked better than novus. im planning on using the novus to do a finish polish.
as far as the seam is concerned, once the 40 is poured in it will flow into the crack and seal it. I would put blue painters tape on the outside of the seam to keep it from flowing out. once its hardened you can easily pull the tape off. I have 4 3/4" holes I filled and you can barely see them once it cures. may I ask where you are located?
 

Hari Haran

Jack Dempsey
MFK Member
May 30, 2018
72
38
36
everything I've read says #4 is for virgin material. #16 is #4 with pieces of acrylic melted into it. started with a tank in similar condition. I started with 1500grit wet sand paper, use lots of water. use an orbital sander and keep it moving in large swipes. after you notice the major scratches start coming out I switched to 2000 grit and repeated. I also used headlight restorer fog remover it worked better than novus. im planning on using the novus to do a finish polish.
as far as the seam is concerned, once the 40 is poured in it will flow into the crack and seal it. I would put blue painters tape on the outside of the seam to keep it from flowing out. once its hardened you can easily pull the tape off. I have 4 3/4" holes I filled and you can barely see them once it cures. may I ask where you are located?
i am from jersey, used novos on my 150 worked out fine, but there was not much scratches to start with.

my other thread below suggesting #4 to fill gaps as its too thin for #40.

https://www.monsterfishkeepers.com/forums/threads/300-gallon-1-2-inch-acrylic-bow-issues.710709/
 

BichirKing

Dovii
MFK Member
Jun 19, 2018
886
988
105
51
PNW
well I'm in Oregon so I guess I have to help you from afar. you could use #4 it wouldn't hurt. if it was me I'd do what I did on my sump that developed a leak in a seam and that was just to corner pour the seam like I did in the tank. either way once you add the corner bracing weld on it wont leak or be a worry. this actually becomes one with the acrylic on a molecular level so the entire thing becomes one solid piece.
 

Hari Haran

Jack Dempsey
MFK Member
May 30, 2018
72
38
36
well I'm in Oregon so I guess I have to help you from afar. you could use #4 it wouldn't hurt. if it was me I'd do what I did on my sump that developed a leak in a seam and that was just to corner pour the seam like I did in the tank. either way once you add the corner bracing weld on it wont leak or be a worry. this actually becomes one with the acrylic on a molecular level so the entire thing becomes one solid piece.
This is more than enough help i could get to do it myself, there is bit of heavy lifting so extra hand would have been nice lol.
let me see how it goes, thanks for posting pictures and explanation, i will try to post updates/questions here as i work on it. thanks.
 
  • Like
Reactions: BichirKing
zoomed.com
hikariusa.com
aqaimports.com
Store