Optimizing W/D Sump

  • We are currently upgrading MFK. thanks! -neo
After finally seeing pictures of your sump I can fully understand why you feel that change is the way forward. That taped up enclosed section looks a right pita, and yes, if water is bypassing your mech side then the bottom of your sump will very quickly get full of crud, and without further mech filtration downstream it will find its way back to your display tank. You need to sort that out.

My sump is also in three sections though the dimensions may be slightly different to yours. I've attached pictures for reference of the three sections so you can see what's going on in each of them. Forgive me for the stark simplicity of it all, it really is beginner level stuff, but hell does it work, and it's a joy to work on. And those two aspects are key with sumps.

Pic 1.
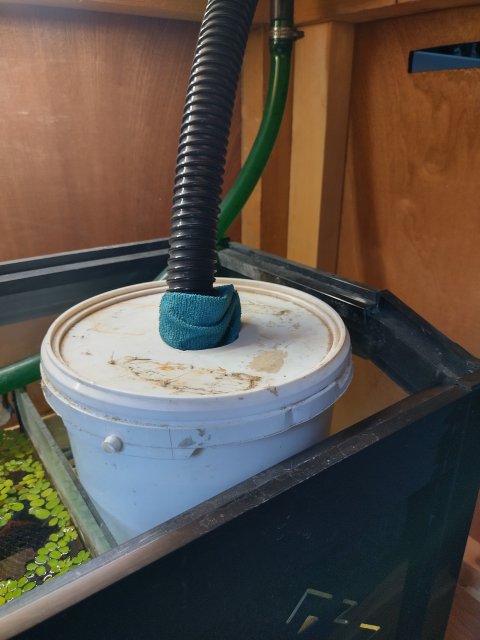
The water from the display tank gravity feeds down into that white bucket. The bucket is solely for mech filtration. Coarse and fine sponges, and filter floss are housed within it. That bucket lifts out and everything within it is rinsed out or replaced on maintanance day, simple.

Pic 2.
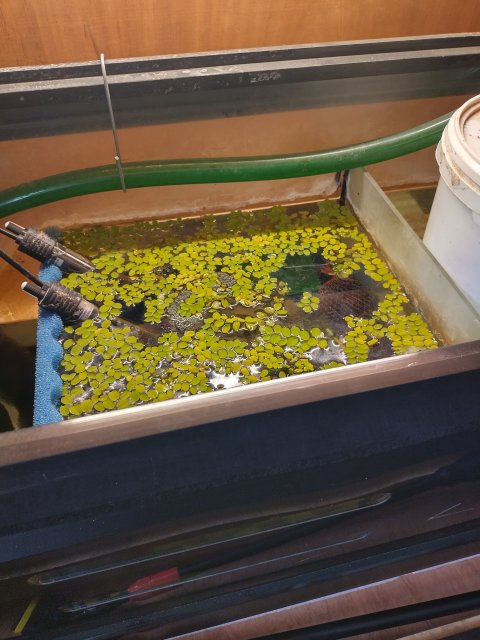
Bio side. Sponges, ceramic rings, bio balls. Also heaters (with the tops always above the surface of the water, something I swear by to prolong the life of heaters). And I also have a surface smattering of salvinia too to help keep nitrates virtually undetectable on this set up (salvinia also in display tank). My bio side is very rarely touched. Importantly, and this applies to your system, my mech side is fantastic so I never get a build up of crud in my bio section.

Pic 3.
Pump section, along with some spare sponges. And yes, as jjohnwm jjohnwm said, this section is quite small and is the only area of the set up where evaporation causes the water level to retreat. It's critical areas such as these where your daily checks come in. Ignore, or become complacent with your system, and it will bite you on the arse!

Can you see how basic and simple my system is? No need for fancy pants stuff.
IMG_20220605_161104_HDR.jpg

IMG_20220605_161114_HDR.jpg

IMG_20220605_161521_HDR.jpg
 
  • Like
Reactions: jjohnwm
I use a 125 tank as a sump, and it normally holds about 100 gallon of water (it is filled to about 3" of the height of the tank/sump) while running.
and I keep it running while doing water changes, but.........
By simply turning a valve, some tank water always returns to the sump, while most of it is sent to the garden.
I usually change almost the entire 100 gallons. each water change
At the point it drains enough that the pump to almost start sucking air, I close the valve (no more to the garden) and start adding the new 100 gallons Water to the tank, via the sump.

I know they are popular, but I don't like shallow, low water volume sumps,
not enough wiggle room if something goes south, like a plugged overflow line to the sump allowing the pump to run dry.
Shallow sumps also do not provide enough height for what I consider the most important function of a sump, a chamber for growing plants for nitrate reduction
View attachment 1496625

By using a 125 tank as a sump for the 180 (main tank), even if the power goes out, the 3" of play in the sump, can handle any overflow from the tank until power is restored..

Makes sense. Sounds like a very smooth setup. Unfortunately I don't have the luxury of that much water volume in this particular w/d sump. I totally understand the benefits you're describing with the setup, but they don't seem like viable options for mine. I could completely redue my filter, but I'm wanting to continue with what I got (since I've alrdy bought it and plumbed it!) and just wanted to make sure I had it running as efficient as possible.

I did try using plants in the sump when I first hade it installed under the tank by the fella that helped when I bought it. That was a bit of a nightmarish mess.... Let's leave it at that... lol

This wet/dry sump is a perfect example of what I was mentioning earlier about partitions. Let's take the last partition first; I mean the one closest to the pump and beneath which the water flows. What function does it serve? Hint: it's nothing good. It simply takes up space and gets in the way when you are reaching in to do something. Removing that partition would not impact the function of this sump at all.

Now how about the one next to that one, the one that is sealed at the bottom and forces water to flow over the top? What does it do, exactly? Well, it prevents the water level in the wet/dry chamber from dropping below a certain level...but why would one want that? Having as much of the wet/dry media above water level is a good thing; that's what bioballs are intended for, and the bacteria on them is exposed to much more oxygen that way than drowning them under water. So having the water level drop lower would not hurt a thing and might help.

But that partition also creates the chamber in which the pump sits, which is the only chamber that will show a change in water level if water or other material is removed from or added to the system. Just by a rough eyeball estimation, I'd say that this chamber occupies about 25% of the foot print of the sump. Now let's say that over the course of the next few days, you have 2 gallons of water evaporate from this system, which can easily happen depending upon the size of the tank, how well covered it is, temperature, relative humidity, etc. Two gallons of water loss from the entire system might translate to a drop in water level in that tiny pump chamber of, say, 4 inches. But if that partition were removed, the water level in the entire sump would only drop 1 inch. You would have much more time between water top-offs without worrying about starving the pump. If you have a reasonable water change schedule, you'd likely never do top-offs as levels wouldn't drop far enough between changes.

As far as mechanical filtration goes, why can't you place a tray on top of the bioball column and fill it with floss and/or foam? If the sump could be lowered somewhat, you could make this extra container deeper and place the mechanical media to fit snugly across the bottom. Make it easy to access, and if you use foam you could literally remove it daily, give it a quick squeeze and rinse in tap water and replace it in minutes. Doing this will reduce nitrate build-up in your system because you will be removing much of the solid organic waste before it breaks down. And, if you don't wish to do daily maintenance like this, a deeper tray with foam at the bottom will build up a certain amount of "head" as the foam clogs and water flow through it slows down. Standing water above the foam will increase pressure to force itself through the clogged foam, actually increasing the efficiency of the mechanical filtration by decreasing the minimum particle size being removed.

That fine sediment/silt that forms under the bioballs? Good luck with finding a way to prevent it; I suspect that it is largely composed of the bacterial biofilm sloughing off the bioballs as the filter ages, and it always appears. If you have room, you can install a drain at the bottom of the wet/dry chamber, controlled with a valve, and then periodically just drain a small amount of water off in an effort to remove the accumulation.

A question for you: why is the wet/dry chamber so sealed up in your sump? The benefit of the wet/dry concept is maximum aeration and oxygenation available to the bacteria. It would seem that a very loosely covered chamber, allowing maximum airflow, would be preferable. Does the manufacturer explain their logic behind this?

So it just seems like a poor design when you describe the partitions.

I actually don't ever top off the sump. It doesn't run low enough for me to need to between weekly wc.

So, I already have a tray above the bioballs that has media. I just have the pads I linked in my first post in it and change it out once a week. Like I mentioned, I don't think that gets everything and sometimes some of the water may flow over the edges since its not packed like water tight to the edges of the inside of the sump.

I actually am relief to hear that sediment buildup is normal. I thought it was due to my lack of mech filtration. I don't see how I'd make a deeper tray as, this thing is literally built and sealed. I was actually looking at other ones online and apparently (obviously not all of them but everyone i looked at!) don't have that top where the plumbing comes in sealed, and that top piece simply rest in place and it can be lifted for reaching the bioball chamber. Which MAKES PERFECT SENSE! So to answer your question as to why it's so sealed up... Mine does NOT lift up like the ones I saw. It is all sealed as in like glued together. WHY, they did this I have no clue man? I didn't design it. O_o I'd also like to know why you would completely seal a chamber in a filter making it nearly impossible to get into!!

So here's how I obtained this design... I'll leave the business's name out though. I contacted a few local aquarium businesses here local around Orlando. One told me they had a used tank in the warehouse they'd sell me. I asked what was included. They said tank, canopy, stand, and they'd throw in a custom filtration system. I figured cool.... What I was told is they had this one "custom made" for this setup, and said they would include it at their business's cost to have it made. It seemed like a great deal to me.... In retrospect, I probably should have asked more questions and got more details. I don't feel like I got totally ripped off since this is a functioning w/d sump. I'm just thoroughly confused as to why it doesn't look like any other tsunami design on their website, and why it's lacking in certainly functionalities. (like the sealed bioball chamber) My first thought is the people I bought it from were probably like "put together the most budget w/d we can to throw in so we can make this sale." Again, I probably should have asked more questions but I thought I was getting a good deal and didn't think to question a company that does custom aquariums because I was like "they clearly know their stuff, they won't steer me wrong."

Anyhow, my take away here is a few things. I literally wasn't looking to start smashing this thing apart removing glued partitions, drilling drains, modifying partitions to create new trays. I was just kinda looking for some tricks or tips to optimize this one, as it is? If that makes sense... Once I start going crazy with permanently altering the design, that involves disconnecting it at my unions and pulling it out, and honestly at that point my thoughts are I may as well be installing a new one with proper design and functionaility. So you think I should be cramming this tray with tons of floss and foam as oppose to my single layer I've been putting in there? Can you link me some examples of what you mean? Cause I guess I'm not exactly sure the difference from foam, and floss, etc. I'm not even sure what I've been using is considered? Foam as far as I understood...

Do you think removing the heaters in the sump and maybe looking into an in-line heater would help with less stuff for the sediment to grab onto in the center chamber?.... I saw these ceramic hotdog shaped blocks being used online a few times and was thinking maybe I could fill the center w/ those if I removed the heaters and got in-line heating? Also, no one has mentioned this yet, but what about those areas where the water comes under and over. I see people with tons of like sponges in those slots? I was worried that would mess w/ my flow and I'd have to turn my pump down. Is that something worth considering?...
 
After finally seeing pictures of your sump I can fully understand why you feel that change is the way forward. That taped up enclosed section looks a right pita, and yes, if water is bypassing your mech side then the bottom of your sump will very quickly get full of crud, and without further mech filtration downstream it will find its way back to your display tank. You need to sort that out.

My sump is also in three sections though the dimensions may be slightly different to yours. I've attached pictures for reference of the three sections so you can see what's going on in each of them. Forgive me for the stark simplicity of it all, it really is beginner level stuff, but hell does it work, and it's a joy to work on. And those two aspects are key with sumps.

Pic 1.
The water from the display tank gravity feeds down into that white bucket. The bucket is solely for mech filtration. Coarse and fine sponges, and filter floss are housed within it. That bucket lifts out and everything within it is rinsed out or replaced on maintanance day, simple.

Pic 2.
Bio side. Sponges, ceramic rings, bio balls. Also heaters (with the tops always above the surface of the water, something I swear by to prolong the life of heaters). And I also have a surface smattering of salvinia too to help keep nitrates virtually undetectable on this set up (salvinia also in display tank). My bio side is very rarely touched. Importantly, and this applies to your system, my mech side is fantastic so I never get a build up of crud in my bio section.

Pic 3.
Pump section, along with some spare sponges. And yes, as jjohnwm jjohnwm said, this section is quite small and is the only area of the set up where evaporation causes the water level to retreat. It's critical areas such as these where your daily checks come in. Ignore, or become complacent with your system, and it will bite you on the arse!

Can you see how basic and simple my system is? No need for fancy pants stuff.
View attachment 1496652

View attachment 1496653

View attachment 1496654

Nice setup man. So, I do want to make sure we're on the same page with something. The tape isn't what's sealing this chamber. It's literally, glued and sealed like that stock. The tape is solely holding down the top where the pressure crack happened when the first guy that helped me plumbed this too tight. So with that tape not there nothing changes. It's still sealed. I just wanted to make sure we were both on the same page with that.

Yours looks very user friendly, and the bucket is super clever. I just don't see how I'd run something like that since I have the bioball chamber and the drip tray section. Like I mentioned in my msg right before this, my main goal is to optimize what I have, not to start physically altering it. If I didn't have it hooked up, then I'd be all about doing so.
 
I've pondered off and on, "do I simply have a poorly designed w/d and should I buy another one?," but I've for the most part read tsunami designs are pretty popular.... (it certainly wasn't cheap!) I just can't fathom how I'd add any mechanical to this? Maybe some pictures would be helpful? I'll go snap a few and post them. Thanks for the responses guys.

It is not poorly designed. W/D filters are designed primarily for biological filtration, so they shouldn't be compared to other types of sump filtration with mechanical (filter socks) and submerged bio media. It sounds like your primary issue is that you would like more mechanical filtration.

First, if you are utilizing overflow boxes on you system, are you using overflow prefilter sponges? They might help with debris collection.
1654638918817.png


Second, you could consider adding more mechanical filtration. I LOVE LOVE RTL filters for mechanical filtration. Not commonly found in fresh water setups....oftalmos is the only other MFK member I know that runs them on his big 765 gallon tank system. https://www.monsterfishkeepers.com/...tank-part-1.107226/#lg=thread-107226&slide=32 These filters are seen on big reef systems. (And everyone knows that the reef guys are light years ahead of us fresh water people--they're the ones who came up with Herbie, Bean Animal, etc., etc.)

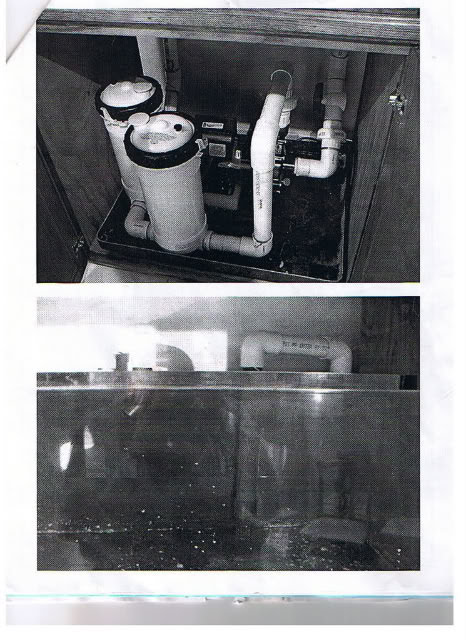
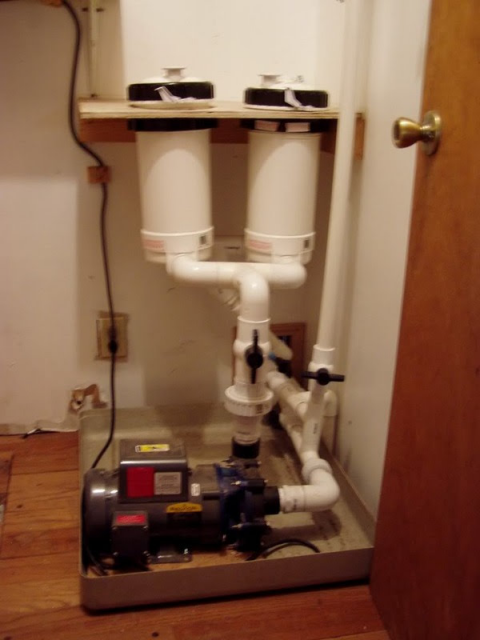
I was clueless what to do for filtration on my 300 gallon tank and called up a man who sets up and maintains reef systems in business offices....that's how I was introduced to RTL filters. He actually sold the RTLs to us and sent us this picture of one of his setups
1654639636343.png

This is our setup
1654639669385.png

The RTL-25s work very well for us. So well, that we are going with six RTL-100s on our big tank (which still isn't done)

While RTLs are generally regarded as pool/spa filters, there is at least one aquatic company that sells RTL filters.
 
Hey fellas. Long time member. Been on a bit of a hiatus from the internet. Hope these forums are still pretty active. I'd like to get back in touch with some like minded hobbyist online again!

I'd like to start with getting some opinions, and advice on one of my current tanks filtrations. I was recently viewing the under your stand thread and I see all these beautiful sump, and w/d sump setups with all sorts of gadgets and media. I'm feeling like maybe my setup is beyond basic and maybe I could get some pointers on optimizing my setup.

I have a tsunami w/d sump filter. (very unimpressed with the design but that's another story) Not sure about gallons. 36" long x 14" wide x 16" tall. So when I look at other folks setups I see tons of media, sponges, etc and this is where I'm feeling like I'm under equipped.

I have floss in the tray above the bioball chamber I replace every week. (sometimes I'll give it an extra week but for the most part it's a weekly change). Then obviously the large bio-ball chamber. Then I have 2x 300w heaters in the large center chamber with a couple random media bags of ceramic rings. Then in the pump chamber at the end I just have more random media bags of ceramic rings, and the pump.

I see people with layers of sponges, these rectangular block things, even sponges in the transition spots where the water flows over into the next chamber? So I've googled setting up a w/d pretty extensively in the past and I really couldn't find a definitive "guide" so to speak, for what to put in them and where.

So lay it on me. What would you suggest for upgrades???

I'm a little late to this party, and still felt inclined to respond. OP, there's nothing wrong with your W/D sump. That's barely any detritus in your sump. Regardless how much layers and mechanical filtration you add, you'll still get detritus. Sure you can add more, but I'm fairly certain it will not eliminate the flow of detritus to the other chambers. Pictures that see of folks with clean sumps are likely because they are recently set-up. Unless you like tinkering, I wouldn't change a thing. If I showed you my sump when I set up four years ago to now, it certainly would not be as "clean looking" - and I'm OCD about stuff like that LOL.

Edit: I agree, the guy you paid to plumb didn't do the greatest work, especially cracking your sump.
 
See, some people love that sump...and some (like me) hate it...but I think everyone agrees that it can work. You want to "optimize" it, but not do any major changes, so probably best not to start going down that rabbit hole. You could easily add prefilters to the intakes (in the tank, not in the sump, as suggested by pacu mom pacu mom ), but again, some detritus in the bottom is going to happen.

I can't really tell where the tray is that contains your mech filtration; is it actually right on top of the bioballs? Do you need to remove that tape every time you clean it? If so, I can see why you would want to tweak it a little; carefully cutting the foam so that it is a snug fit, that prevents water from bypassing the mech media, would be a nice improvement. And...do you need the tape on there? What happens it you just remove it and leave it off? If you are concerned about the top moving out of place, I think a brick or rock to weight it down would be a lot more convenient than that PITA tape.

You've probably heard that most fishing lures are designed to catch fishermen rather than fish? That's actually true about most products of any type, and certainly includes sumps, yours included. So, if you don't intend to go at it with sleeves rolled up and a set of tools at the ready...leave it. Fish with the lure you're already purchased, learn what you can about it, and then remember those lessons the next time you buy one.
 
Last edited:
It is not poorly designed. W/D filters are designed primarily for biological filtration, so they shouldn't be compared to other types of sump filtration with mechanical (filter socks) and submerged bio media. It sounds like your primary issue is that you would like more mechanical filtration.

First, if you are utilizing overflow boxes on you system, are you using overflow prefilter sponges? They might help with debris collection.
View attachment 1496874


Second, you could consider adding more mechanical filtration. I LOVE LOVE RTL filters for mechanical filtration. Not commonly found in fresh water setups....oftalmos is the only other MFK member I know that runs them on his big 765 gallon tank system. https://www.monsterfishkeepers.com/...tank-part-1.107226/#lg=thread-107226&slide=32 These filters are seen on big reef systems. (And everyone knows that the reef guys are light years ahead of us fresh water people--they're the ones who came up with Herbie, Bean Animal, etc., etc.)

I was clueless what to do for filtration on my 300 gallon tank and called up a man who sets up and maintains reef systems in business offices....that's how I was introduced to RTL filters. He actually sold the RTLs to us and sent us this picture of one of his setups
View attachment 1496875

This is our setup
View attachment 1496876

The RTL-25s work very well for us. So well, that we are going with six RTL-100s on our big tank (which still isn't done)

While RTLs are generally regarded as pool/spa filters, there is at least one aquatic company that sells RTL filters.

Pacu mom from old oscarfish.com??

Eh, agree to disagree on the design. I feel like completely sealing it where you can never get in certain chambers is a poor design. Also, imo, not being versatile enough to add different types of filtration like more mech is a poor design. It may be great bio filtration, but I feel like a filtration system should be versatile enough to improve on mech, chem, and bio filtration. So those filter sponges on the drain in my overflow chamber? That sounds like an extremely bad idea... What happens when they clog and the pump is still pumping to my tank? Also, those would def disrupt my flow. That's not an option for me. I can't say I've ever seen anyone put a sponge filter on the drain in their overflow either? Maybe I'm misunderstanding?

I'll take a look at the RTL. I'm unfamiliar, but interested.

I'm a little late to this party, and still felt inclined to respond. OP, there's nothing wrong with your W/D sump. That's barely any detritus in your sump. Regardless how much layers and mechanical filtration you add, you'll still get detritus. Sure you can add more, but I'm fairly certain it will not eliminate the flow of detritus to the other chambers. Pictures that see of folks with clean sumps are likely because they are recently set-up. Unless you like tinkering, I wouldn't change a thing. If I showed you my sump when I set up four years ago to now, it certainly would not be as "clean looking" - and I'm OCD about stuff like that LOL.

Edit: I agree, the guy you paid to plumb didn't do the greatest work, especially cracking your sump.

I honestly wasn't aware the detritus was a normal thing since I keep seeing all these clear sumps online running. It doesn't bother me much now that I'm aware it's normal. Still wouldn't mind some additional mech for the water though... I'm not sure anyone has mentioned it yet, but I'm still considering the sponge blocks I've seen pushed into the slots where water goes from one chamber to the next? Still, I see that effecting flow somewhat, but maybe not... Hopefully you're not referring to the plumbing in the pics cause that was me and I thought I did pretty good, lol. :D Ya, the original job was not very good at all imo, and the cracking of the top of the sump seemed like a real basic mistake. I mean it took me seconds to see what happened with the pipe being too long at the elbow and pushing down to tightly on the sump lid. But hey, that's how we learn. I wasn't confident enough to plumb a setup like this when I first got the tank which is why I had to enlist dude's help, and now I can. :)

See, some people love that sump...and some (like me) hate it...but I think everyone agrees that it can work. You want to "optimize" it, but not do any major changes, so probably best not to start going down that rabbit hole. You could easily add prefilters to the intakes (in the tank, not in the sump, as suggested by pacu mom pacu mom ), but again, some detritus in the bottom is going to happen.

I can't really tell where the tray is that contains your mech filtration; is it actually right on top of the bioballs? Do you need to remove that tape every time you clean it? If so, I can see why you would want to tweak it a little; carefully cutting the foam so that it is a snug fit, that prevents water from bypassing the mech media, would be a nice improvement. And...do you need the tape on there? What happens it you just remove it and leave it off? If you are concerned about the top moving out of place, I think a brick or rock to weight it down would be a lot more convenient than that PITA tape.

You've probably heard that most fishing lures are designed to catch fishermen rather than fish? That's actually true about most products of any type, and certainly includes sumps, yours included. So, if you don't intend to go at it with sleeves rolled up and a set of tools at the ready...leave it. Fish with the lure you're already purchased, learn what you can about it, and then remember those lessons the next time you buy one.

So the tray is literally sitting right on top of the bioballs. It isn't technically ON them as there is a little slit in both sides that the tray rest on, but its immediately above the bioballs. Which presents another design flaw.... When you pull the tray out to change media, you have to be careful of the water level in the bio-ball chamber. If it's enough to make the balls float up they will float up and in the space the tray was when you pull it out. Then when you try to push the tray back in the balls prevent you from doing so and you have to pull it in and out and shimmy the balls down below the tray. So gotta make sure waters lower when you pull it out...

Maybe I need to find another foam. The one I have comes in long lengths (i linked it) but the width is just wide enough to fit inside the tray so making it wider wouldnt be an option less I double up or something. So I feel like the tape is throwing some people off... Nothing happens if I remove it. The lid will simply open a bit where the crack is and I'll have splashing water shoot out of the crack as the drains come hit the foam on the mech tray. So that tape is solely holding the lid where the pressure crack is down so that it's semi sealed where it cracked.

As far as the top "moving out of place," impossible. As I already mentioned, the top was and is literally, glued down onto the sides permanently. Was like that when I received it... Another odd design choice imo, since it's essentially impossible to ever get into that bio-ball chamber. The other ones I see online (even on tsunami's website) the lid is removable so you can get inside that chamber... Not sure why mine wasn't designed like that.

Ya, suggestion heard. It's a big learning curve for next time I'm in the market for a w/d or just plain sump now that I've come across these things I can check for this kind of stuff when I purchase another one. I did plumb all my pipes from the tank to the sump with unions on the sump end. So if I do ever want to simply replace this it's as simple as plumbing from the unions into a new one, so that's always a plus.
 
Pacu mom from old oscarfish.com??

Eh, agree to disagree on the design. I feel like completely sealing it where you can never get in certain chambers is a poor design. Also, imo, not being versatile enough to add different types of filtration like more mech is a poor design. It may be great bio filtration, but I feel like a filtration system should be versatile enough to improve on mech, chem, and bio filtration. So those filter sponges on the drain in my overflow chamber? That sounds like an extremely bad idea... What happens when they clog and the pump is still pumping to my tank? Also, those would def disrupt my flow. That's not an option for me. I can't say I've ever seen anyone put a sponge filter on the drain in their overflow either? Maybe I'm misunderstanding?

I'll take a look at the RTL. I'm unfamiliar, but interested.


Yep - I was on O Fish--I miss some of the characters like kmuda. As far as the filter sponge in the overflow drain, that's what we were told to use when we set the tank up. And yes, they got pretty disgusting when we were feeding floating pellets many of which ended up in the overflow box. None issue now since we feed sinking pellets only and the RTLs take care of the debris, so haven't used the sponges in about 15 years.
 
Yep - I was on O Fish--I miss some of the characters like kmuda. As far as the filter sponge in the overflow drain, that's what we were told to use when we set the tank up. And yes, they got pretty disgusting when we were feeding floating pellets many of which ended up in the overflow box. None issue now since we feed sinking pellets only and the RTLs take care of the debris, so haven't used the sponges in about 15 years.

Well hey long time no see! Those pacu still kickin' in that big setup of urs? Ya, remember he had those super old kissing gourami? Hope all them fellas are doing well.

So I decided to buy a foam block that's the width of the sump and I can put it into that flow over part from the center to the pump chamber. I looked at the design and my biggest worry is sponges getting clogged, but the flow doesn't seem to be so much that the sponge would back it up. Either way, that divider is below the sump rim so if something terrible happen it would simply make the water flow over that end so it's overflow proof, so we'll see how adding that sponges helps out.

I really want to figure out a better form of heating than those 300w heaters but all the inlines I look at have iffy reviews, and also all seem to be directed torwards soft plumbing with barb fittings on each end. Boo to soft plumbing... I know there has to be some more clever ways people are heating larger setups than these 300w suckers.
 
What is wrong with the 300 watts heaters you are using with that contoller? That's a good and common approach.
 
MonsterFishKeepers.com