48x48 Workhorse "The Rig"

  • We are currently upgrading MFK. thanks! -neo
Thanks man! Keep us posted on your build too!


Some rough math on this;

Towers are: 16”x7”x23.5” - 11.39 gallons each, that’s 22.78 gallons total.
A 22.78 gallon reactor is 1.52 cubic feet of K1 at 50% volume. One could easily fit 2 cubic feet which is more than it would seem.

I have a lot left over from the last build (around 4 cubic feet in the example sack) so I’ll let you guys know exactly how much was able to fit.

View attachment 1300630 View attachment 1300631

I need to do some calculations once I find out how much bio/lbs K1 can support. For poret foam doing two corner hmf filters I will get the following:

12.5in x 28in x 3in = 1,050 cu in x 32 (amount of internal sq cu/in) x 2 (# of corner filters) = 67,2000 sq in. = 467 sq ft. In aquaculture they go by 3 sq ft/lb of fish, which means those to corner filters support 156lbs of fish. Obviously this is not perfect as not all fish are equal in their waste, but this is an insane amount of bio in a very small space (100 sq in of space lost out of 4,608, about 2%). The big downside vs K1 is that it will be a pain to clean the poret while K1 needs no maintenance. Not sure if you know how to calculate it for K1, but I don't want to lose a ton of space to internal overflows.
 
Duplicate post.

Only other thing, isnt K1 super loud? Will it be a problem in a tank that is in the living room?
 
Those setups are really nice. What do you use for mechanical inside the Ultima?

Ultima's come preloaded with their own proprietary media that is designed to address both mechanical and bio.
 
  • Like
Reactions: Dis
How did you get under the hood pics of the star trek enterprise !!!!

Those setups are really nice.

Thanks gents!

Only other thing, isnt K1 super loud? Will it be a problem in a tank that is in the living room?

This tank goes in a finished garage, not the living room. There is a 60"x30" sump full of 6 cubic feet of K1/ton of air about 6' away. The pumps are silent so noise is minimal. It's not hard to make quiet if one invests in a proper air pump.
 
Thanks gents!


This tank goes in a finished garage, not the living room. There is a 60"x30" sump full of 6 cubic feet of K1/ton of air about 6' away. The pumps are silent so noise is minimal. It's not hard to make quiet if one invests in a proper air pump.

My issue with K1 sound is not the air pump, but the "boiling" of the K1 itself. Do you have a lid on the sump to reduce the noise?
 
My issue with K1 sound is not the air pump, but the "boiling" of the K1 itself. Do you have a lid on the sump to reduce the noise?

Yes there are lids, I use 3/4 insulation styrofoam. You can wrap the sump with it as well as it will silence the knocking around hum of the K1.
 
  • Like
Reactions: mrrobxc
wednesday13 wednesday13 will the below (extruded bar stock) work well to reinforce the seams on this tank? Tap does not carry cell cast bar stock. Link:

https://www.tapplastics.com/product/plastics/plastic_rods_tubes_shapes/square_acrylic_bar/150

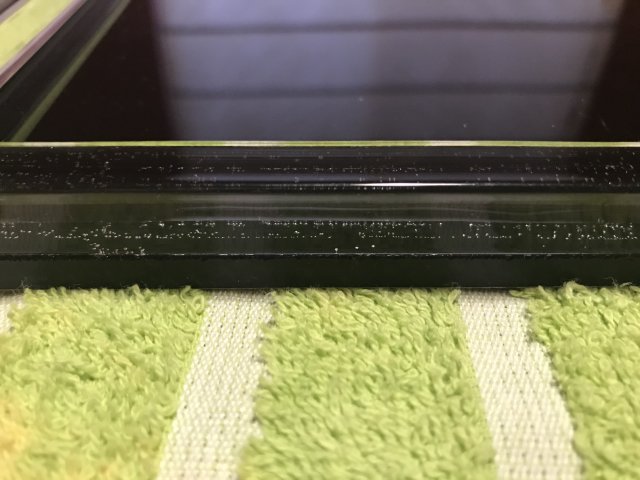
Can I use a stronger material like Weldon #40 to make up for the difference, if there is any? Also is there a trick to installing this stuff without the tiny bubbles? I would hate to stare at that. Pics from lids I just build as an example of what I'm referring to.

IMG_4439.jpg

I would prefer to use the corner stock so the edges are not rounded. Problem being I don't know how to cut the corners so they line up. Link: any ideas?

https://www.tapplastics.com/product/plastics/plastic_rods_tubes_shapes/corner_angle/151
 
Thanks gents!


This tank goes in a finished garage, not the living room. There is a 60"x30" sump full of 6 cubic feet of K1/ton of air about 6' away. The pumps are silent so noise is minimal. It's not hard to make quiet if one invests in a proper air pump.

Whether I go with HMF or K1, I will probably be using a jehmco linear pump which are ultra silent. I am more worried about the noise of the K1 media hitting itself and banging against the walls.
 
wednesday13 wednesday13 will the below (extruded bar stock) work well to reinforce the seams on this tank? Tap does not carry cell cast bar stock. Link:

https://www.tapplastics.com/product/plastics/plastic_rods_tubes_shapes/square_acrylic_bar/150

Can I use a stronger material like Weldon #40 to make up for the difference, if there is any? Also is there a trick to installing this stuff without the tiny bubbles? I would hate to stare at that. Pics from lids I just build as an example of what I'm referring to.

View attachment 1300713

I would prefer to use the corner stock so the edges are not rounded. Problem being I don't know how to cut the corners so they line up. Link: any ideas?

https://www.tapplastics.com/product/plastics/plastic_rods_tubes_shapes/corner_angle/151


Most of the corner stock isnt a true 45°/triangle so it wont work like ur thinking unless it says somewhere it is.. i have the 1" square in a tank and also a tank with the 1/2". #40 will give u bubble free adhesion if u get most all the bubbles out with a vibrating table or vacuum before pouring... I know u like things super clean tho and the #40 may not be to ur liking if it dries "milky" which is usually the case since we cant anneal it in an oven at home. Theres also a fine line with #40 heating up too much and crazing areas of the tank ur working on so this may be a tough one. Im not one for aesthetics over here so #40 is my go too for strength over looks. personally id prob still use the #40 with the square stock to get a clean adhesion and prevent crazing from using too much glue at once. Only problem is any excess glue may become milky which u wont like looking at. The excess glue can be sanded off back to clear but thats another project in itself. Its alot harder to achieve perfect seams/joints using #4 esp. with square stock as theres nothing to really hold it in place inside the tank while ur working which leads to bubbles as it dries.

To answer ur original quesion.... yes, the #40 will make up any differences in the triangle stock. You could just as easily eliminate the stock all together tho and pour a bevel of the same size of solid #40. either way tip the tank at 45° angles while ur working so the glue/pieces "puddle" in place where u want them. #40 is like syrup but will still run if u dont keep it in place by tipping the tank.

Again, def. a tough one when going for perfection. lotta factors can work against you in the process and may look worse than that pic u posted. I guess the key points to think about are using as little as #40 as possible to keep everything "cool"/craze free when working but still adding strength if thats what ur goin for. Most def. do a cple tests on scrap pieces to work it out before diving in. U can basically pour out #40 on the seam while the tank is tipped then sandwich/melt ur stock acrylic right over top pushing out any air at the same time. think of it like a sticker. start on one end of the material and rock it in place to the other side flush. The fine line will be using enough glue to not leave any air pockets but not too much or ull be sanding it back off the tank walls for days. It sets up really hard/solid and an orbital or palm sander will be the only way to make it flush/clean again. Are u just trying to reinforce bad seams?

I'll get ya some pics of crazing from using too much #40 and also how it can look milky under water. Theres really no rhyme or reason to the milkyness. ive done a half dozen tanks and some come out perfectly clear and others look like silicone. the more i read, only way to fix it is sand it off or aneel in an oven.
 
  • Like
Reactions: JK47 and mrrobxc
MonsterFishKeepers.com