530g Tank Setup and Plumbing Help :)

  • We are currently upgrading MFK. thanks! -neo
Yeah it’s looking great so far! You’re hitting all the boxes for sexy plumbing. You may consider unions just under the stand on the vertical pipes (intake to pump). Possibly the return manifold/assembly as well. Those are large items to pull out but the need to is incredibly rare.

I’ll think on it. Here is the plumbing for the 24/7 behind the hmf. I’m a bit uncomfortable here. You can see the waterline will be about 1/4in or so from the top. Is this how close you acrylic guys go? Typically with glass I’m used to like 1in but I think it will look stupid like that. Thought?

FYI I’m worried about it because this is all slip material which means once it’s in, there is no fixing it. At least not easily.
 
I was thinking of actually cutting the pipe in half and putting a union, but not sure I can put a union inside the tank.
 
I was thinking of actually cutting the pipe in half and putting a union, but not sure I can put a union inside the tank.
You can and should. Will make adjusting much easier that’s too high. I use 1” min from the top. Big fish move big water
 
First problem of the day JK47 JK47 . You seem to be an expert in airline tubing (along with everything else). I ordered 8in round airstones (these are massive) but they came with 3/8th connections and not the typical 1/4in airline tubing. Is there a way to still connect these to my 1/4in manifold? I can’t seem to find squat via google.
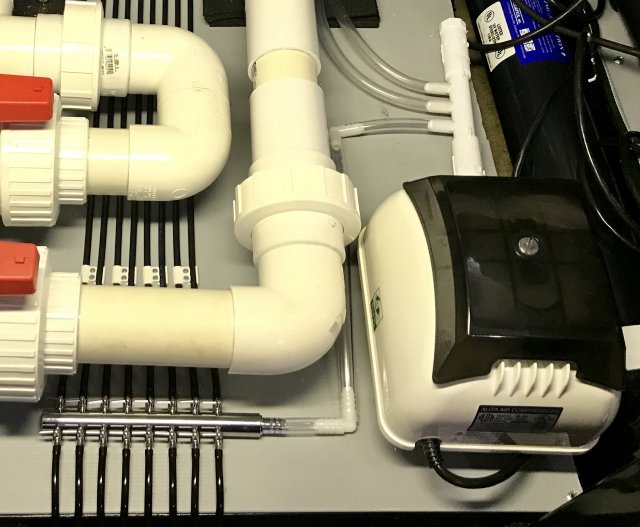
Pics of how I use 3/8” and 1/4”. There are plenty of other ways and I’m sure better ways to do it. LMK what you come up with if you dont mind.
49F77D32-4CA3-4507-80E0-35CC008EBA12.jpeg
 
  • Like
Reactions: Jacob92677
Pics of how I use 3/8” and 1/4”. There are plenty of other ways and I’m sure better ways to do it. LMK what you come up with if you dont mind.
View attachment 1321866

I’ve put it on the back burner for now but my take the easy way out and just buy smaller airstones. I called jehmco and they told me just run a 3/8in line straight from my airpump and get rid of my manifold. Not a fan of the 3/8 line because it is very thick and will be hard to hide in the tank. If I stick with 1/4 I have black silicone tubing that I can easily run under the hmf sponge to hide it and you wouldn’t notice it.
 
I’ve put it on the back burner for now but my take the easy way out and just buy smaller airstones. I called jehmco and they told me just run a 3/8in line straight from my airpump and get rid of my manifold. Not a fan of the 3/8 line because it is very thick and will be hard to hide in the tank. If I stick with 1/4 I have black silicone tubing that I can easily run under the hmf sponge to hide it and you wouldn’t notice it.

3/8” is only for K1 chambers. I use a pvc manifold with x3 3/8” hose barbs. Uxcel makes a stainless manifold that is 3/8” in, x16 1/4” out. The black lines on the floor are black air lines going to various areas. All lines in the tank are black as well.

In your case you could cut a 1” section of 3/8” hose and get a stainless 3/8” hose barb x 1/4” hose barb fitting. 1/4” black line to you pump would move a lot of air. Your pump may run hot if you don’t bleed off excess though.
 
  • Like
Reactions: deeda
3/8” is only for K1 chambers. I use a pvc manifold with x3 3/8” hose barbs. Uxcel makes a stainless manifold that is 3/8” in, x16 1/4” out. The black lines on the floor are black air lines going to various areas. All lines in the tank are black as well.

In your case you could cut a 1” section of 3/8” hose and get a stainless 3/8” hose barb x 1/4” hose barb fitting. 1/4” black line to you pump would move a lot of air. Your pump may run hot if you don’t bleed off excess though.

I love how massive the 8in airstones are but I just don’t think I want 3/8in airline in my tank. I’m exchanging emails with jemhco for ideas. Looks like they have 5in rounded airstones that are 1/4in. Might just get 4 of those and break it up eventually across the tank. I have 3 returns that essentially create 4 sections on the tank that I can place the airstones.
 
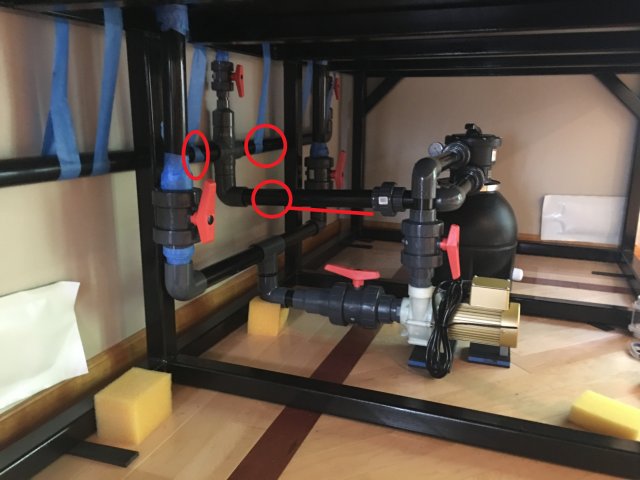
The more I look at this plumbing and mentally walk through how this would weld together, the more I think the unions need be used for your plumbing assembly ease, not just disassembly.


DDFF2BBF-7BBF-4AE3-BFB0-4CA27692A461.jpeg

Comments:
  • Ultima to return manifold: You should consider moving the union currently closest to the Ultima, closer to the manifold (flip what you have now). You want to plumb from a square point outward if you want all lines perfect.
  • Manifold to returns: You should consider putting two unions just after the middle tee as well. It's much easier to plumb to short distances and hook up a union than to keep long stretches square and true.
Doing the above will let you solvent weld in the middle (center reference) and plumb out from there. Do not plumb from Ultima to tank, plumb tank to Ultima. If you have to move 1" or so for a mistake, its much easier to scoot an Ultima than drill and patch a new tank or replumb. The downside of working with sexy plumbing is perfection is much harder and there little room for mistakes all while having the eye drawn to it.

Lastly when mocking up/rough in your plumbing, make sure the pipe seats to the fitting socket depth (much easier with this combo than regular schedule 40) or that the additional length that isn't seated will be accommodated for via pipe length. Every 1/4" you are off for one fitting will carry through until it is off inches at the other side. Hence why working from center reference out and plumbing to unions as you go. Must easier to rebuild a piece that cut out and redo.
 
  • Like
Reactions: Jacob92677
The more I look at this plumbing and mentally walk through how this would weld together, the more I think the unions need be used for your plumbing assembly ease, not just disassembly.


View attachment 1321949

Comments:
  • Ultima to return manifold: You should consider moving the union currently closest to the Ultima, closer to the manifold (flip what you have now). You want to plumb from a square point outward if you want all lines perfect.
  • Manifold to returns: You should consider putting two unions just after the middle tee as well. It's much easier to plumb to short distances and hook up a union than to keep long stretches square and true.
Doing the above will let you solvent weld in the middle (center reference) and plumb out from there. Do not plumb from Ultima to tank, plumb tank to Ultima. If you have to move 1" or so for a mistake, its much easier to scoot an Ultima than drill and patch a new tank or replumb. The downside of working with sexy plumbing is perfection is much harder and there little room for mistakes all while having the eye drawn to it.

Lastly when mocking up/rough in your plumbing, make sure the pipe seats to the fitting socket depth (much easier with this combo than regular schedule 40) or that the additional length that isn't seated will be accommodated for via pipe length. Every 1/4" you are off for one fitting will carry through until it is off inches at the other side. Hence why working from center reference out and plumbing to unions as you go. Must easier to rebuild a piece that cut out and redo.

Thanks for the feedback. You read my mind. Last night I reminded myself to take my time and that it will be worth losing the extra 1hr to installing the extra unions now, not to mention making it easier to weld everything.

Glad you said to start welding from the tank towards the pump and ultima. I wasn’t sure where to start. Will be starting in the next hour. I’m just praying that adding the primer and solvent doesn’t throw off all my measurements.
 
  • Like
Reactions: JK47
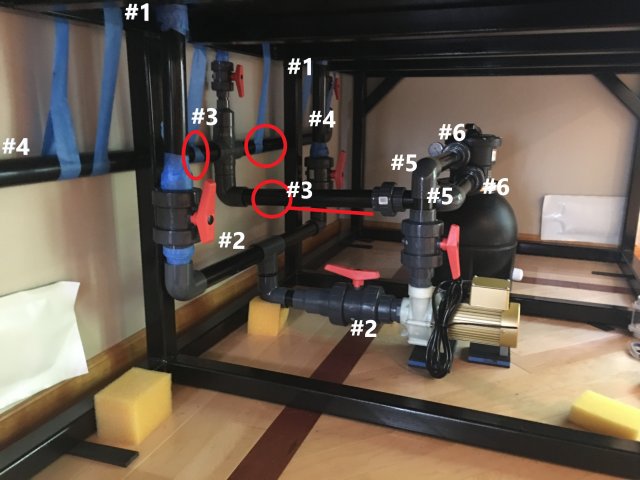
Lastly you may need some help with sequence. It does matter what you plumb first, second etc.. Consider the below. Build pieces that can be mounted via union to union. It helps keep things clean and square. You cannot solvent weld to a center point without unions. It's possible but not likely if you don't have a ton of experience.

  1. Sets the pump reference point. This will keep short distances while staying squared up/evenly spaced.
  2. Finish off the intake line. Your pump will be middle, left or right of center reference. From there everything is square or its not. Doing this first, helps square up the Ultima, last.
  3. Solvent weld the middle section in and elbow height. There should be just enough room with the pump housing return line off center to the left. This pairs really well for compact plumbing on the Ultima.
  4. Solvent weld the outer returns to the union nut (red) of the center manifold.
  5. You should be squared up to this point. Measure this last and you can make up for any mistakes you made along the way while still looking squared up. A visual correction that's hard to spot.
  6. This is the last thing to set is the Ultima itself. The Ultima placement is derivative of your plumbing, not the other way around.

DDFF2BBF-7BBF-4AE3-BFB0-4CA27692A461.jpg

It's take me years and many hard lessons to learn some of these install tricks along the way. Hopefully you can avoid some pain day one.
 
MonsterFishKeepers.com